EasyManua.ls Logo

Humminbird Wide One Deep User Manual

Humminbird Wide One Deep
20 pages
To Next Page IconTo Next Page
Page #1 background imageLoading...
Page #1 background image
INSTALLATION PREPARATION
PARTS SUPPLIED
PARTS SUPPLIED
Before installing your new Humminbird fishsinder, please ensure the following parts are
included in the box:
Fishfinder
Transducer with 20’ (6m) of cable and mounting hardware kit
Mounting system and mounting hardware kit
6’ (2m) power cable
Publications kit
It any of these items is missing, call our Customer Support Hotline.
ACCESSORIES
Humminbird offers a wide assortment of accessories that complement and expand the
capability of your new fishfinder. These accessories are designed with the same high
standards and are backed by the same one-year warranty. The Humminbird Accessory
catalog included with your unit contains descriptions of the many accessories available
and ordering information. All Humminbird accessories are available through your full-
service Humminbird dealer or factory direct through our number listed in the Customer
Support section.
INSTALLATION OVERVIEW
Your Humminbird fishfinder consists of two primary components to install: the control
head and the transducer.
The control head contains the sonar transmit and receive circuitry, as well as the user
controls and display. It should be installed in a location that provides access to the
controls and visibility while in use. The control head mounts on a quick disconnect
mounting system that swivels and tilts providing flexibility for viewing from almost
anywhere on the boat.
The transducer converts electrical energy from the transmitter into mechanical pulses or
sound waves. The transducer also receives the reflected sound waves and converts
them back into electrical signals for display on the control head. It should be installed in
contact with the surface of the water in an area that has smooth waterflow- usually on
the transom of the boat. There are several mounting options for the transducer. Review
the following section to determine the method that works for you and your boat.
Question and Answer IconNeed help?

Do you have a question about the Humminbird Wide One Deep and is the answer not in the manual?

Humminbird Wide One Deep Specifications

General IconGeneral
Display TypeLCD
Sonar Frequency200 kHz
Depth Capability600 feet
Frequency200 kHz
GPSNo
Maximum Depth600 feet
Water ResistanceYes

Summary

Installation Preparation

Parts Supplied

List of components included in the fishfinder box for installation.

Accessories Overview

Overview of optional accessories available to enhance fishfinder capabilities.

Installation Overview

Introduction to the fishfinder's main components and installation concept.

Transducer Mounting Options

Determining How to Mount the Transducer

Explains transom installation versus inside hull mounting for the transducer.

Alternate Transducers and Mounting Methods

Discusses alternative transducer types and mounting techniques.

Portable and Trolling Motor Mounting

Details on adapting the transducer for portable or trolling motor installations.

Thru-Hull Mounting

Description of through-hull transducer installation for specific boat types.

Transducer Exchange and Installation Start

Transducer Exchange

Information on exchanging the standard transducer for other types.

Beginning Installation

List of tools and materials required for the fishfinder installation.

Transom Installation

Determine Transducer Mounting Location

Guidance on selecting the optimal location on the boat's transom.

Drill Mounting Holes

Step-by-step instructions for drilling holes for transducer mounting.

Assemble Transducer

Procedure for assembling the transducer with its mounting bracket.

Mount Transducer to Transom

Securing the assembled transducer unit to the transom.

Adjust Transducer Running Position

Final adjustments for optimal transducer performance at speed.

Route Transducer Cable

Instructions for routing the transducer cable through the boat hull.

Inside Hull Installation

Determine Mounting Location

Guidance on selecting an internal hull location for the transducer.

Test Mounting Location

Method for testing transducer performance before permanent mounting.

Permanently Mount Transducer

Instructions for permanently affixing the transducer using epoxy.

Control Head Installation

Determine Control Head Mount Location

Guidance on selecting the best position for the control head unit.

Connect Power Cable to Boat

Instructions for wiring the control head power supply to the boat's system.

Drill Mounting Holes

Steps for drilling holes to mount the control head bracket.

Run Cables

Procedure for routing cables to the control head unit.

Assemble Connector Holder

Attaching cable connectors and mounting the control head unit.

Test the Installation

Initial Setup and Basic Operation

Steps to power up and confirm basic functionality after installation.

Using The Wide One Deep

On-Screen Display Explained

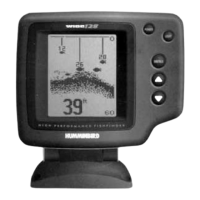
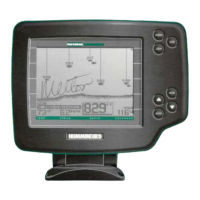
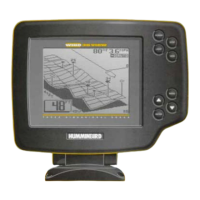
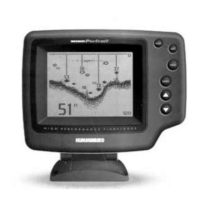
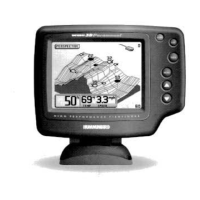
Explanation of the fishfinder's display elements, symbols, and data.

Control Button Functions

Description of the physical buttons and their operational roles.

Menu System Navigation

How to navigate and use the fishfinder's menu system for adjustments.

Adjusting Sensitivity

How to modify the sonar receiver sensitivity for optimal returns.

Managing Depth Range

Setting and controlling the display's depth range for viewing.

Utilizing Zoom Features

Using zoom functions to enhance target visibility and detail.

Setting Alarms

Configuration of bottom and fish alarms for alerts.

Target Identification and Display

Understanding ID settings and adjusting display scroll rate.

Related product manuals