4
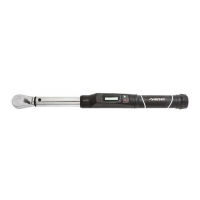
SETTINGS
HOW TO CHANGE UNIT OF TORQUE MEASUREMENT
1. Power on the wrench as described on Page 3. Press “UNI” repeatedly to select one of the five torque measurement
options: Ft-lbs., In-lbs., Nm, Kg-m or Kg-cm
2. The wrench is ready to use.
HOW TO SET MODE
There are four mode options: P = Peak Torque (default), A = Angle, PA = Peak Angle, PCt = Target Torque Alert Setting
1. Power on the wrench as described on Page 3. Press “M” repeatedly to scroll through the different modes. “SEL” will
show at the top of the screen to indicate the mode being selected. The currently selected mode will NOT show as an
option when scrolling through modes.
2. Press “SET” to select the new mode. The screen will show the last setting for the mode selected.
3. The wrench is ready to use.
Note: To exit out of setting mode without changing the mode, press “ ”. The current mode and setting will remain
unchanged.
HOW TO SET TARGET TORQUE IN “PEAK TORQUE” MODE
1. Power on the wrench as described on Page 3. Press “SET”. The current torque setting will flash on the screen.
2. The unit of torque measurement can also be adjusted at this time. Press “UNI” to change it if required.
3. Press “s” or “t” to select the torque value, then press “SET” to confirm the value.
4. The wrench is ready to use.
5. Apply torque and rotate the wrench at a constant moderate speed until alerted to stop by the handle vibration, beeps
and LCD display. The LCD screen alternates red/green when the “target torque alert” warning starts. When the target
torque is reached the LCD Screen shows solid red.
Note: After reaching the target torque the display will flash for 10 seconds, then default to the last setting. The
next measurement can be taken while the screen is flashing by applying force again, or by pressing “ ” to
return to the last setting.
HOW TO SET ANGLE
1. Power on the wrench as described on Page 3. Place the torque wrench on a stable flat surface to calibrate.
2. Press “M” until the “A” mode is reached, then press “SET”.
3. The screen will show “OOOO” as the torque wrench calibrates, then will display the last angle value set.
4. If desired angle is displayed, the wrench is ready to use.
5. If you want a different angle, press “SET” again to change the angle degree. Press “s” or “t” to get to the required
angle, then press “SET”.
6. The wrench is ready to use.
7. Apply torque and rotate the wrench at a constant moderate speed until alerted to stop by the handle vibration, beeps
and LCD display.
8. To take the next measurement press “ ” or wait until the display stops flashing.
Note: After reaching the target angle the display will flash for 10 seconds, then default to the last setting. For
better accuracy the torque wrench should be rotated between 10 degrees/sec – 180 degrees/sec.
 Loading...