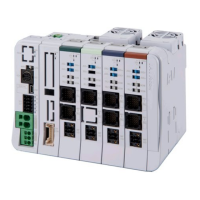
31
4.3.2 Setting of axis No.
For PCON-SE, ACON-SE and ERC2-SE
Set axis No. for slave station No. on the SIO link.
Set the axis No. in a hexadecimal of 0 to F so that the first axis No. is 0, and 16
th
axis No. is F.
Axis No. is set by the teaching box or personal computer supporting software.
◎ Operation of personal computer supporting software
[1] Open the main screen. [2] Click the setting (S). [3] Move the cursor to the controller setting (c).
[4] Move the cursor to the axis No. assignment (N) and click. [5] Enter No. into the axis No. table.
◎ Operation of teaching box RCM-T
[1] Open the user adjusting screen. [2] Move the cursor to the assignment NO._ with ▼key. [3]
Enter axis No. and press the Return key. [4] Enter 2 into adjusting NO._ and press the Return key.
◎ Operation of simple teaching box RCM-E
[1] Open the user adjusting screen. [2] Open the Return key to open a screen of the assignment
NO._. [3] Enter axis No. and press the Return key. [4] Enter 2 into adjusting NO._ and press the
Return key.
For details of the setting method, refer to the Operation Manuals for the teaching box or the personal
computer supporting software.
CAUTION
1. Set an axis No. so as not to be duplicated.
2. Remove the link connection for the axis to be set for setting and changing the axis No.
3. Connect the terminal resistor between SGA and SGB on the ends.
 Loading...