English
21
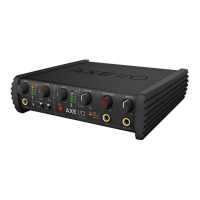
will require a separate stereo amplifier; in this case, the rear panel outputs should be connected to the amplifier’s inputs.
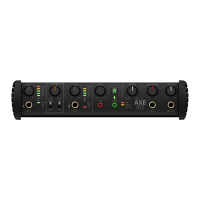
Line outputs 1/L and 2R are electronically balanced and floating, automatically compensates level when
connection is balanced or unbalanced. For this reason these outputs are also idea for use onstage, when
directly feeding the FOH without any need for isolators or DI boxes. The AXE IO has a solid strong signal free
from ground loops that will work perfectly in these situations. Line outputs 3 and 4 are unbalanced.
On the front panel of AXE I/O is present one 1/4” (6.35mm) jack sockets where to connect a pair of headphones
whose level can be controlled with the headphones knob.
7 Direct monitoring
When recording an audio signal into your audio software, there is often a slight delay before it reaches the
outputs. This delay, called latency, is caused by the computer processing required to process the audio. Since
this delay can be distracting, AXE I/O provides a direct monitoring path from the inputs to the outputs, and this
is controlled by the Monitor knob. The Monitor knob allows you to blend your input signals with the playback
streams from your computer. This allows you to monitor your input signal with zero latency. If the knob is
positioned at 12 o’clock, the input signal and the playback stream will be equally balanced. Turning the knob to
the left will increase the level of the direct signal; turning to the right will increase the level of the playback stream
from the DAW.
When Monitor is set to DIRECT, make sure any software monitoring option for direct (or “low latency”)
monitoring is disabled. Disabling low latency monitoring prevents “double-monitoring” of input audio signals
when using the Direct Monitoring feature. When “double-monitoring” occurs, there will be an increase in volume
and an undesirable “phasing” sound. For more details about its monitoring function, refer to the documentation
for your audio software.
IMPORTANT: Always makes sure MONITOR knob is set fully clockwise (DAW) when connecting microphones.
This is because even if your DAW is not running or does not have an active recording track loud feedback could
occur if your monitoring level is high and the MONITOR knob is set on DIRECT.
8 Control software
This is a macOS and Windows applet that controls all the functionalities for the AXE I/O, also presenting
additional informations from the status of AXE I/O. From this applet you will have extended and comprehensive
metering, have control over output levels, sample rate, MIDI setup, and other important AXE IO options.
To open the Control software:
After installing the Control software on your computer (refer to section 1.1 of this manual for more information)
click the icon on your desktop to launch it.
Assuming that your AXE I/O interface is connected to your computer with the USB cable, the Control app GUI
(Graphical User Interface) will appear as shown on the sections below. The green State ‘LED’ at the screen top
left should be illuminated; this confirms that the AXE I/O interface is connected and properly working.
 Loading...