Pour télécharger la version complète, rendez-vous sur le site www.ikea.com
21FRANÇAIS
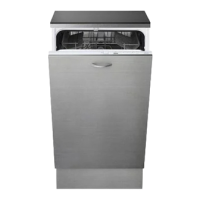
Description de produit
1
Panier supérieur
2
Volets pliables
3
Bouton de réglage de la hauteur du panier supérieur
4
Bras d'aspersion supérieur
5
Panier inférieur
6
Panier à couvert
7
Bras d'aspersion inférieur
8
Ensembleltre
9
Réservoir à sel
10
Distributeurs de détergent et liquide de rinçage
11
Panneau de commande
Première utilisation
Conseils au sujet de la première utilisation
Avant l'installation et la première utilisation de l'appareil, il
convient de lire attentivement les consignes « SÉCURITÉ ET
GARANTIE » et « INSTRUCTIONS D'ASSEMBLAGE » disponible
dans le sachet de documentation du produit. Rappelez-vous
d'enlever toutes les pièces de protection pour le transport du
lave-vaisselle.
Remplissage du réservoir à sel
’utilisation de sel empêche la formation de CALCAIRE sur la
vaisselle et sur les composantes fonctionnelles de l’appareil.
• LE RÉSERVOIR DE SEL NE DOIT JAMAIS ÊTRE VIDE.
• Il est important de régler la dureté de l'eau.
Le réservoir de sel est situé dans la partie inférieure du lave-
vaisselle (voir DESCRIPTION DU PRODUIT) et il doit être rempli
quand le voyant REMPLISSAGE DE SEL
1. Upper rack
2.
3. Upper rack height adjuster
4. Upper sprayer arm
5. Lower rack
6. Cutlery basket
7. Lower sprayer arm
8. Filter Assembly
9. Salt reservoir
10. Detergent and Rinse Aid dispensers
11. Rating plate
12. Control panel
ADVICE REGARDING THE FIRST TIME USE
After installation, remove the stoppers from the racks and the
retaining elastic elements from the upper rack.
FILLING THE SALT RESERVOIR
The use of salt prevents the formation of LIMESCALE on the
dishes andon the machine’s functional components.
• It is important that the salt reservoir be never empty.
• It is important to set the water hardness.
The salt reservoir is located in the lower part of the
dishwasher (see PRODUCT DESCRIPTION) and should be
filled when the SALT REFILL indicator light in the
control panel is lit .
1. Remove the lower rack and
unscrew the reservoir cap
(anticlockwise).
2. Only the first time you do this: fill
the salt reservoir with water.
3. Position the funnel (see figure)
and fill the salt reservoir right up
to its edge (approximately 1 kg);
it is not unusual for a little water to
leak out.
4. Remove the funnel and wipe any
salt residue away from the
opening.
1. On-Off/Reset button with indicator light
2. Program selection button
3. Salt refill indicator ligh
4. Rinse Aid refill indicator ligh
5. Program number and delay time indicator
6. Tablet indicator light
7. Display
8. Half Load indicator light
9. Half Load button
10. Delay button
11. START/Pause button with indicator light / Tab
1 2 3 4 5 6 7 8 9 10
11
sur le panneau de
commande est allumé.
1. Enlevez le panier inférieur et
dévissez le bouchon du réservoir
(sens antihoraire).
2. Placezl'entonnoir(voirgure)
et remplissez le réservoir de sel
jusqu'au bord (environ 1 kg) ; il est
normal qu'un peu d'eau déborde.
3. Seulement lors de la première
opération : remplissez le réservoir
de sel avec de l'eau.
4. Enlevez l’entonnoir et essuyez les
résidus de sel autour de l’ouverture.
2
2
1
5
4
3
6
1011
12
0000 000 00000
Service:
7
8
9
11
Assurez-vous que le bouchon est bien serré pour éviter que du
détergent pénètre dans le réservoir durant le cycle de lavage
(le réservoir pourrait s’endommager au point de ne plus être
réparable).
Une fois cette opération complétée, lancez un programme sans
charger le lave-vaisselle.
Utilisez seulement le sel spécialement conçu pour les
lave-vaisselles. Si le contenant de sel n'est pas rempli,
l'adoucisseur et l'élément chauant peuvent être
endommagés à cause de l'accumulation de calcaire.
L'utilisation de sel est recommandée avec n'importe quel
type de lessive pour lave-vaisselle.
Chaque fois que vous avez besoin d’ajouter du sel, il est
obligatoire de terminer la procédure avant le début du cycle
de lavage an d'éviter toute corrosion.
Réglage de la dureté de l'eau
Pour que l'adoucisseur d'eau fonctionne à la perfection, il est
important de régler la dureté de l'eau aux conditions existantes
dans votre résidence. Cette information peut être obtenue de
votre fournisseur d'eau local. La dureté de l'eau est réglée par
défaut à la valeur d'usine.
• Éteindre l'appareil en appuyant sur la touche MARCHE/ARRÊT.
• Éteindre l'appareil en appuyant sur la touche MARCHE/ARRÊT.
• Appuyez sur la touche
• Switch on the appliance by pressing the ON/OFF button.
• Switch off the appliance by pressing the ON/OFF button.
• Hold down button
for 5 seconds, until you hear a beep.
• Switch on the appliance by pressing the ON/OFF button.
•
•
The current selection level number and the salt indicator light
Press button to select the desired hardness level (see
WATER HARDNESS TABLE).
• Switch off the appliance by pressing the ON/OFF button.
Setting is complete!
Water Hardness Table
Level
°dH
German degrees
°fH
French degrees
1 Soft 0 - 6 0 - 10
2 Medium 7 - 11 11 - 20
3 Average 12 - 17 21 - 30
4 Hard 18 - 34 31 - 60
5 Very hard 35 - 50 61 - 90
Make sure the cap is screwed on tightly, so that no detergent can
get into the container during the wash program (this could damage
the water softener beyond repair).
As soon as this procedure is complete, run a program without
loading. The “Pre-Wash” program alone is NOT
Residual saline solution or grains of salt can lead to corrosion,
irreparably damaging the stainless steel components.
The guarantee is not applicable if faults are caused by such
circumstances.
s.
heating element may be damaged as a result.
Whenever you need to add salt, it is mandatory to complete
the procedure before the beginning of the washing cycle.
SETTING THE WATER HARDNESS
To allow the water softener to work in a perfect way, it is essential
that the water hardness setting is based on the actual water hard-
ness in your house. This information can be obtained from your local
water supplier. The factory setting is for average (3) water hardness.
FILLING THE RINSE AID DISPENSER
A
should be lled when the RINSE AID REFILL indicator light
B
(110 ml) reference notch of the lling space - avoid spilling it.
NEVER pour the rinse aid directly into the tub.
ADJUSTING THE DOSAGE OF RINSE AID
If you are not completely satised with the drying results, you can
The current selection level number and rinse aid indicator light ash.
the dishwasher model. The factory setting is specic to the model,
FILLING THE DETERGENT DISPENSER
dishwashers.
useof detergent, rinse aid liquid and rened salt is required.
To open the detergent dispenser
press button A.
Introduce the detergent into
the dry dispenser B only.
Place the amount of detergent
for pre-washing directly inside
the tub.
A
B
B
The detergent dispenser automatically opens up at the right time
according to the program. If all-in-one detergents are used, we
recommend using the TABLET button, because it adjusts the
program so that the best washing and drying results are always
achieved.
pendant 5 secondes ; un signal
sonore retentit.
• Allumer l'appareil en appuyant rapidement sur le bouton
MARCHE/ARRÊT.
• Le numéro de niveau de sélection actuel et le témoin de sel
clignotent tous les deux
• Appuyez sur la touche
• Switch on the appliance by pressing the ON/OFF button.
• Switch off the appliance by pressing the ON/OFF button.
• Hold down button
for 5 seconds, until you hear a beep.
• Switch on the appliance by pressing the ON/OFF button.
•
•
The current selection level number and the salt indicator light
Press button to select the desired hardness level (see
WATER HARDNESS TABLE).
• Switch off the appliance by pressing the ON/OFF button.
Setting is complete!
Water Hardness Table
Level
°dH
German degrees
°fH
French degrees
1 Soft 0 - 6 0 - 10
2 Medium 7 - 11 11 - 20
3 Average 12 - 17 21 - 30
4 Hard 18 - 34 31 - 60
5 Very hard 35 - 50 61 - 90
Make sure the cap is screwed on tightly, so that no detergent can
get into the container during the wash program (this could damage
the water softener beyond repair).
As soon as this procedure is complete, run a program without
loading. The “Pre-Wash” program alone is NOT
Residual saline solution or grains of salt can lead to corrosion,
irreparably damaging the stainless steel components.
The guarantee is not applicable if faults are caused by such
circumstances.
s.
heating element may be damaged as a result.
Whenever you need to add salt, it is mandatory to complete
the procedure before the beginning of the washing cycle.
SETTING THE WATER HARDNESS
To allow the water softener to work in a perfect way, it is essential
that the water hardness setting is based on the actual water hard-
ness in your house. This information can be obtained from your local
water supplier. The factory setting is for average (3) water hardness.
FILLING THE RINSE AID DISPENSER
A
should be lled when the RINSE AID REFILL indicator light
B
(110 ml) reference notch of the lling space - avoid spilling it.
NEVER pour the rinse aid directly into the tub.
ADJUSTING THE DOSAGE OF RINSE AID
If you are not completely satised with the drying results, you can
The current selection level number and rinse aid indicator light ash.
the dishwasher model. The factory setting is specic to the model,
FILLING THE DETERGENT DISPENSER
dishwashers.
useof detergent, rinse aid liquid and rened salt is required.
To open the detergent dispenser
press button A.
Introduce the detergent into
the dry dispenser B only.
Place the amount of detergent
for pre-washing directly inside
the tub.
A
B
B
The detergent dispenser automatically opens up at the right time
according to the program. If all-in-one detergents are used, we
recommend using the TABLET button, because it adjusts the
program so that the best washing and drying results are always
achieved.
pour sélectionner le niveau de
dureté souhaité (voir TABLEAU DE DURETÉ DE L'EAU).
• Éteindre l'appareil en appuyant sur la touche MARCHE/ARRÊT.
Le réglage est terminé!
Tableau de dureté de l'eau
Niveau °dH
Degrés
allemand
°fH
Degrés
français
°Clark
Degrés
anglais
1 Très douce 0 - 6 0 - 10 0 - 7
2 Moyenne 7 - 11 11 - 20 8 - 14
3 Douce 12 - 16 21 - 29 15 - 20
4 Dure 17 - 34 30 - 60 21 - 42
5 Très dure 35 - 50 61 - 90 43 - 62
Système d'adoucisseur d'eau
Un adoucisseur d'eau réduit automatiquement la dureté de
l'eau, en évitant ainsi la formation de calcaire sur la résistance,
etencontribuantégalementàunemeilleureecacitéde
nettoyage. Ce système se régénère avec du sel, il est donc
nécessaire de remplir le bac de sel lorsqu'il est vide. La
fréquence de régénération dépend du réglage du niveau de
dureté de l'eau - la régénération par défaut a lieu une fois tous
les 5 cycles Éco avec un niveau de dureté de l'eau réglé à 3.
Leprocessusderégénérationdébutelorsdurinçagenaletse
termineenphasedeséchageavantlanducycle.
* Une régénération simple consomme : ~3,5 L d'eau ;
* Elle prend 5 minutes de plus pour le cycle ;
* Elle consomme moins de 0,005kWh d'énergie.
1. Upper rack
2.
3. Upper rack height adjuster
4. Upper sprayer arm
5. Lower rack
6. Cutlery basket
7. Lower sprayer arm
8. Filter Assembly
9. Salt reservoir
10. Detergent and Rinse Aid dispensers
11. Rating plate
12. Control panel
ADVICE REGARDING THE FIRST TIME USE
After installation, remove the stoppers from the racks and the
retaining elastic elements from the upper rack.
FILLING THE SALT RESERVOIR
The use of salt prevents the formation of LIMESCALE on the
dishes andon the machine’s functional components.
• It is important that the salt reservoir be never empty.
• It is important to set the water hardness.
The salt reservoir is located in the lower part of the
dishwasher (see PRODUCT DESCRIPTION) and should be
filled when the SALT REFILL indicator light in the
control panel is lit .
1. Remove the lower rack and
unscrew the reservoir cap
(anticlockwise).
2. Only the first time you do this: fill
the salt reservoir with water.
3. Position the funnel (see figure)
and fill the salt reservoir right up
to its edge (approximately 1 kg);
it is not unusual for a little water to
leak out.
4. Remove the funnel and wipe any
salt residue away from the
opening.
1. On-Off/Reset button with indicator light
2. Program selection button
3. Salt refill indicator ligh
4. Rinse Aid refill indicator ligh
5. Program number and delay time indicator
6. Tablet indicator light
7. Display
8. Half Load indicator light
9. Half Load button
10. Delay button
11. START/Pause button with indicator light / Tab
1 2 3 4 5 6 7 8 9 10
11

 Loading...