Zum Herunterladen der vollständigen Version besuchen Sie bitte www.ikea.com
11DEUTSCH
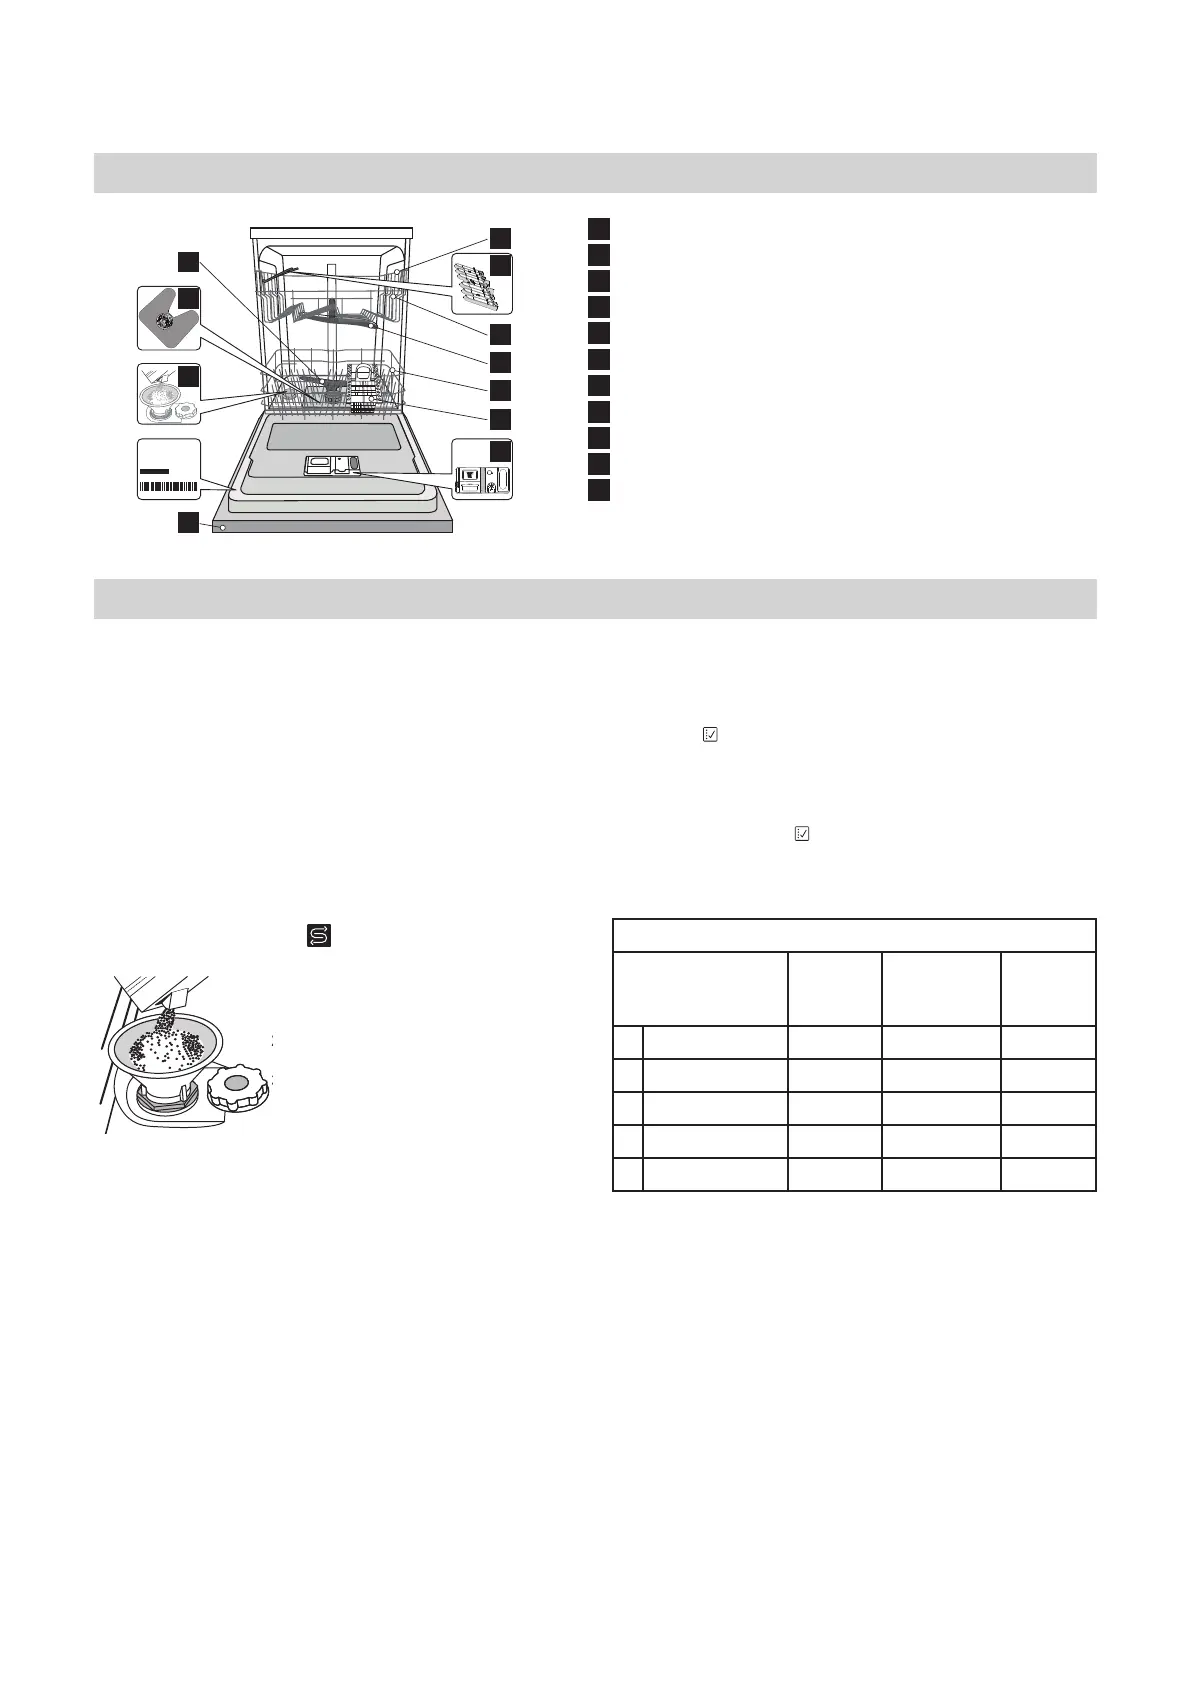
Produktbeschreibung
1
Oberkorb
2
Faltbare Klappen
3
Oberkorb Höhenversteller
4
Oberer Sprüharm
5
Unterkorb
6
Besteckkorb
7
Unterer Sprüharm
8
Filtereinheit
9
Salzbehälter
10
Spülmittel und Klarspülerspender
11
Bedienblende
Erster Gebrauch
Hinweise zur ersten Inbetriebnahme
Bitte lesen Sie vor Installation und erstem Gebrauch des
Produktes sorgfältig die Anleitungen „SICHERHEITSHINWEISE“
und „MONTAGEANWEISUNG“ in der Tasche der
Produktunterlagen durch. Bitten denken Sie daran, sämtliche
Teile zum Transportschutz aus dem Geschirrspüler zu entfernen.
Salzbehälter befüllen
Mit der Verwendung von Salz werden KALKABLAGERUNGEN
auf dem Geschirr und den funktionalen Komponenten des
Geschirrspülers verhindert.
• DER SALZBEHÄLTER DARF NIE LEER SEIN.
• Es ist wichtig, die Wasserhärte einzustellen.
DerSalzbehälterbendetsichimGeschirrspülerboden(siehe
PRODUKTBESCHREIBUNG) und muss aufgefüllt werden, wenn
die SALZNACHFÜLLANZEIGE
1. Upper rack
2.
3. Upper rack height adjuster
4. Upper sprayer arm
5. Lower rack
6. Cutlery basket
7. Lower sprayer arm
8. Filter Assembly
9. Salt reservoir
10. Detergent and Rinse Aid dispensers
11. Rating plate
12. Control panel
ADVICE REGARDING THE FIRST TIME USE
After installation, remove the stoppers from the racks and the
retaining elastic elements from the upper rack.
FILLING THE SALT RESERVOIR
The use of salt prevents the formation of LIMESCALE on the
dishes andon the machine’s functional components.
• It is important that the salt reservoir be never empty.
• It is important to set the water hardness.
The salt reservoir is located in the lower part of the
dishwasher (see PRODUCT DESCRIPTION) and should be
filled when the SALT REFILL indicator light in the
control panel is lit .
1. Remove the lower rack and
unscrew the reservoir cap
(anticlockwise).
2. Only the first time you do this: fill
the salt reservoir with water.
3. Position the funnel (see figure)
and fill the salt reservoir right up
to its edge (approximately 1 kg);
it is not unusual for a little water to
leak out.
4. Remove the funnel and wipe any
salt residue away from the
opening.
1. On-Off/Reset button with indicator light
2. Program selection button
3. Salt refill indicator ligh
4. Rinse Aid refill indicator ligh
5. Program number and delay time indicator
6. Tablet indicator light
7. Display
8. Half Load indicator light
9. Half Load button
10. Delay button
11. START/Pause button with indicator light / Tab
1 2 3 4 5 6 7 8 9 10
11
der Bedienblende leuchtet.
1. Ziehen Sie den Unterkorb
heraus und schrauben Sie den
Salzbehälterdeckel gegen den
Uhrzeigersinn ab.
2. SetzenSiedenTrichterauf(siehe
Abbildung) und füllen Sie den
BehälterbiszumRandmitSalz(ca.
1 kg); es ist normal, wenn etwas
Wasser ausläuft.
3. Nur beim ersten Mal: Befüllen Sie
den Salzbehälter mit Wasser.
4. Den Trichter abnehmen und die
SalzrestevomÖnungsrand
entfernen.
2
2
1
5
4
3
6
1011
12
0000 000 00000
Service:
7
8
9
11
Sicherstellen, dass der Deckel fest angeschraubt ist, so
dass kein Spülmittel während dem Waschprogramm in den
Behältergelangt(dieskönntedenWasserenthärterirreparabel
beschädigen).
Sobald dieses Verfahren abgeschlossen ist, ein Programm ohne
Beladung laufen lassen.
Verwenden Sie bitte nur Spezialsalz für Geschirrspüler.
Wenn der Salzbehälter nicht gefüllt ist, könnten
Kesselsteinablagerungen den Wasserenthärter und das
Heizelement beschädigen. Die Verwendung von Salz wird bei
jeder Art von Geschirrspülmittel empfohlen.
Immer wenn Sie Salz zugeben müssen, ist es zwingend
vorgeschrieben, diesen Vorgang vor dem Beginn des
Spülgangs auszuführen, um Korrosion zu vermeiden.
Wasserhärte einstellen
Damit der Wasserenthärter perfekt arbeiten kann, muss die
Wasserhärte je nach der aktuellen Wasserhärte in Ihrem Haus
eingestellt werden. Diese Information erhalten sie bei Ihrem
örtlichen Wasserversorger. Das Werk stellt den Standardwert für
die Wasserhärte ein.
• Gerät mit der EIN/AUS-Taste einschalten.
• Gerät mit der EIN/AUS-Taste ausschalten.
• Die Taste
• Switch on the appliance by pressing the ON/OFF button.
• Switch off the appliance by pressing the ON/OFF button.
• Hold down button
for 5 seconds, until you hear a beep.
• Switch on the appliance by pressing the ON/OFF button.
•
•
The current selection level number and the salt indicator light
Press button to select the desired hardness level (see
WATER HARDNESS TABLE).
• Switch off the appliance by pressing the ON/OFF button.
Setting is complete!
Water Hardness Table
Level
°dH
German degrees
°fH
French degrees
1 Soft 0 - 6 0 - 10
2 Medium 7 - 11 11 - 20
3 Average 12 - 17 21 - 30
4 Hard 18 - 34 31 - 60
5 Very hard 35 - 50 61 - 90
Make sure the cap is screwed on tightly, so that no detergent can
get into the container during the wash program (this could damage
the water softener beyond repair).
As soon as this procedure is complete, run a program without
loading. The “Pre-Wash” program alone is NOT
Residual saline solution or grains of salt can lead to corrosion,
irreparably damaging the stainless steel components.
The guarantee is not applicable if faults are caused by such
circumstances.
s.
heating element may be damaged as a result.
Whenever you need to add salt, it is mandatory to complete
the procedure before the beginning of the washing cycle.
SETTING THE WATER HARDNESS
To allow the water softener to work in a perfect way, it is essential
that the water hardness setting is based on the actual water hard-
ness in your house. This information can be obtained from your local
water supplier. The factory setting is for average (3) water hardness.
FILLING THE RINSE AID DISPENSER
A
should be lled when the RINSE AID REFILL indicator light
B
(110 ml) reference notch of the lling space - avoid spilling it.
NEVER pour the rinse aid directly into the tub.
ADJUSTING THE DOSAGE OF RINSE AID
If you are not completely satised with the drying results, you can
The current selection level number and rinse aid indicator light ash.
the dishwasher model. The factory setting is specic to the model,
FILLING THE DETERGENT DISPENSER
dishwashers.
useof detergent, rinse aid liquid and rened salt is required.
To open the detergent dispenser
press button A.
Introduce the detergent into
the dry dispenser B only.
Place the amount of detergent
for pre-washing directly inside
the tub.
A
B
B
The detergent dispenser automatically opens up at the right time
according to the program. If all-in-one detergents are used, we
recommend using the TABLET button, because it adjusts the
program so that the best washing and drying results are always
achieved.
5 Sekunden lang gedrückt halten, bis Sie einen
Piepton hören.
• Gerät durch schnelles Drücken der EIN/AUS-Taste einschalten.
• Die Nummer der aktuell ausgewählten Stufe und die
Salznachfüllanzeige blinken.
• Drücken Sie die Taste
• Switch on the appliance by pressing the ON/OFF button.
• Switch off the appliance by pressing the ON/OFF button.
• Hold down button
for 5 seconds, until you hear a beep.
• Switch on the appliance by pressing the ON/OFF button.
•
•
The current selection level number and the salt indicator light
Press button to select the desired hardness level (see
WATER HARDNESS TABLE).
• Switch off the appliance by pressing the ON/OFF button.
Setting is complete!
Water Hardness Table
Level
°dH
German degrees
°fH
French degrees
1 Soft 0 - 6 0 - 10
2 Medium 7 - 11 11 - 20
3 Average 12 - 17 21 - 30
4 Hard 18 - 34 31 - 60
5 Very hard 35 - 50 61 - 90
Make sure the cap is screwed on tightly, so that no detergent can
get into the container during the wash program (this could damage
the water softener beyond repair).
As soon as this procedure is complete, run a program without
loading. The “Pre-Wash” program alone is NOT
Residual saline solution or grains of salt can lead to corrosion,
irreparably damaging the stainless steel components.
The guarantee is not applicable if faults are caused by such
circumstances.
s.
heating element may be damaged as a result.
Whenever you need to add salt, it is mandatory to complete
the procedure before the beginning of the washing cycle.
SETTING THE WATER HARDNESS
To allow the water softener to work in a perfect way, it is essential
that the water hardness setting is based on the actual water hard-
ness in your house. This information can be obtained from your local
water supplier. The factory setting is for average (3) water hardness.
FILLING THE RINSE AID DISPENSER
A
should be lled when the RINSE AID REFILL indicator light
B
(110 ml) reference notch of the lling space - avoid spilling it.
NEVER pour the rinse aid directly into the tub.
ADJUSTING THE DOSAGE OF RINSE AID
If you are not completely satised with the drying results, you can
The current selection level number and rinse aid indicator light ash.
the dishwasher model. The factory setting is specic to the model,
FILLING THE DETERGENT DISPENSER
dishwashers.
useof detergent, rinse aid liquid and rened salt is required.
To open the detergent dispenser
press button A.
Introduce the detergent into
the dry dispenser B only.
Place the amount of detergent
for pre-washing directly inside
the tub.
A
B
B
The detergent dispenser automatically opens up at the right time
according to the program. If all-in-one detergents are used, we
recommend using the TABLET button, because it adjusts the
program so that the best washing and drying results are always
achieved.
um die gewünschte Härtestufe
auszuwählen(sieheWASSERHÄRTE-TABELLE).
• Gerät mit der EIN/AUS-Taste ausschalten. Die Einstellung ist
abgeschlossen!
Wasserhärte-Tabelle
Stufe °dH
Deut.
Härtegr.
°fH
Französischer
Härtegr.
°Clark
Englische
Härtegr.
1 Weich 0 - 6 0 - 10 0 - 7
2 Mittel 7 - 11 11 - 20 8 - 14
3 Durchschnittlich 12 - 16 21 - 29 15 - 20
4 Hart 17 - 34 30 - 60 21 - 42
5 Sehr hart 35 - 50 61 - 90 43 - 62
Wasserenthärtungsanlage
Der Wasserenthärter verringert automatisch die Wasserhärte
und verhindert somit die Bildung von Kalk auf dem Heizgerät.
DiesträgtauchzueinerezienterenReinigungbei.Dieses
System regeneriert sich mit Salz, daher ist es erforderlich, Salz
indenBehälterzufüllen,wenndieserleerist.DieHäugkeitder
Regeneration hängt von der Einstellung der Wasserhärte ab. Bei
Einstellung der Wasserhärtestufe auf 3 wird die Regeneration
einmal nach jeweils 5 Eco-Programmen durchgeführt.
Der Regenerationsprozess beginnt in der Endspülung und endet
in der Trocknungsphase, bevor der Zyklus endet.
* Eine einzelne Regeneration verbraucht: ~3,5 l Wasser;
* erfordert bis zu 5 zusätzliche Minuten für das Programm;
* Energieverbrauch unter 0,005 kWh.
1. Upper rack
2.
3. Upper rack height adjuster
4. Upper sprayer arm
5. Lower rack
6. Cutlery basket
7. Lower sprayer arm
8. Filter Assembly
9. Salt reservoir
10. Detergent and Rinse Aid dispensers
11. Rating plate
12. Control panel
ADVICE REGARDING THE FIRST TIME USE
After installation, remove the stoppers from the racks and the
retaining elastic elements from the upper rack.
FILLING THE SALT RESERVOIR
The use of salt prevents the formation of LIMESCALE on the
dishes andon the machine’s functional components.
• It is important that the salt reservoir be never empty.
• It is important to set the water hardness.
The salt reservoir is located in the lower part of the
dishwasher (see PRODUCT DESCRIPTION) and should be
filled when the SALT REFILL indicator light in the
control panel is lit .
1. Remove the lower rack and
unscrew the reservoir cap
(anticlockwise).
2. Only the first time you do this: fill
the salt reservoir with water.
3. Position the funnel (see figure)
and fill the salt reservoir right up
to its edge (approximately 1 kg);
it is not unusual for a little water to
leak out.
4. Remove the funnel and wipe any
salt residue away from the
opening.
1. On-Off/Reset button with indicator light
2. Program selection button
3. Salt refill indicator ligh
4. Rinse Aid refill indicator ligh
5. Program number and delay time indicator
6. Tablet indicator light
7. Display
8. Half Load indicator light
9. Half Load button
10. Delay button
11. START/Pause button with indicator light / Tab
1 2 3 4 5 6 7 8 9 10
11

 Loading...