Schedule cleaning mode
•
Create a schedule and let it work automatically everyday.
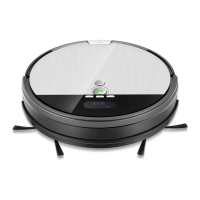
0 88:88 Clock Time Setup
A.
When the vacuum is turned on, it will beep while pressing the button
for 2 seconds, and the Hour part on the display screen will blink, sho wing
that it has entered the state of time setting. Button
®
and are used to
adjust the time numbers. Press button to switch between hour, minute,
12/ 24 hour and week.
Q
B.
12/24 Hour Format Setup: Press button to switch between 12/24 hour
format, and the display screen will show ON\OFF respectivel.y
C.
When time setting is completed, press button to save the setup .
8
© 8 8:88 Schedule Cleaning Timer Setup
Once the schedule is set up successfully, the robot will work on time every day
at the certain time. lf the power switch at the side of the robot is turned off, the
schedule will be lost and need to be reset.
A.
When the vacuum is turned on, quickly press the button , it will beep
and the signs of
"0" and " DAY " on the display screen will blink, showing
to save the setup.
9
Cancel the schedule
When the machine is turned on, quickly press the button , it will beep and
the signs of
"0"
and " DAY" on the display screen will blink, showing that it
any operation, and the setup will not be saved.
The current setup will not succeed if button ® isn't pressed.
any operation, and the setup will not be saved.
The current setting will not succeed if button ® isn't pressed.
For more details information, please visit: www.ilifecare.in
that it has entered the state of schedule setting mode . Press button to switch
between hours and minutes. Press button ® and to adjust the time numbers.
B. when the schedule setting is completed, press button
has entered the state of schedule setting mode. Press button @ to cancel the day
schedule, and the display screen will show " ---- " . lf the button @ is pressed again,
the schedule will be opened, and the display screen will show the previous schedule
time.
®