19
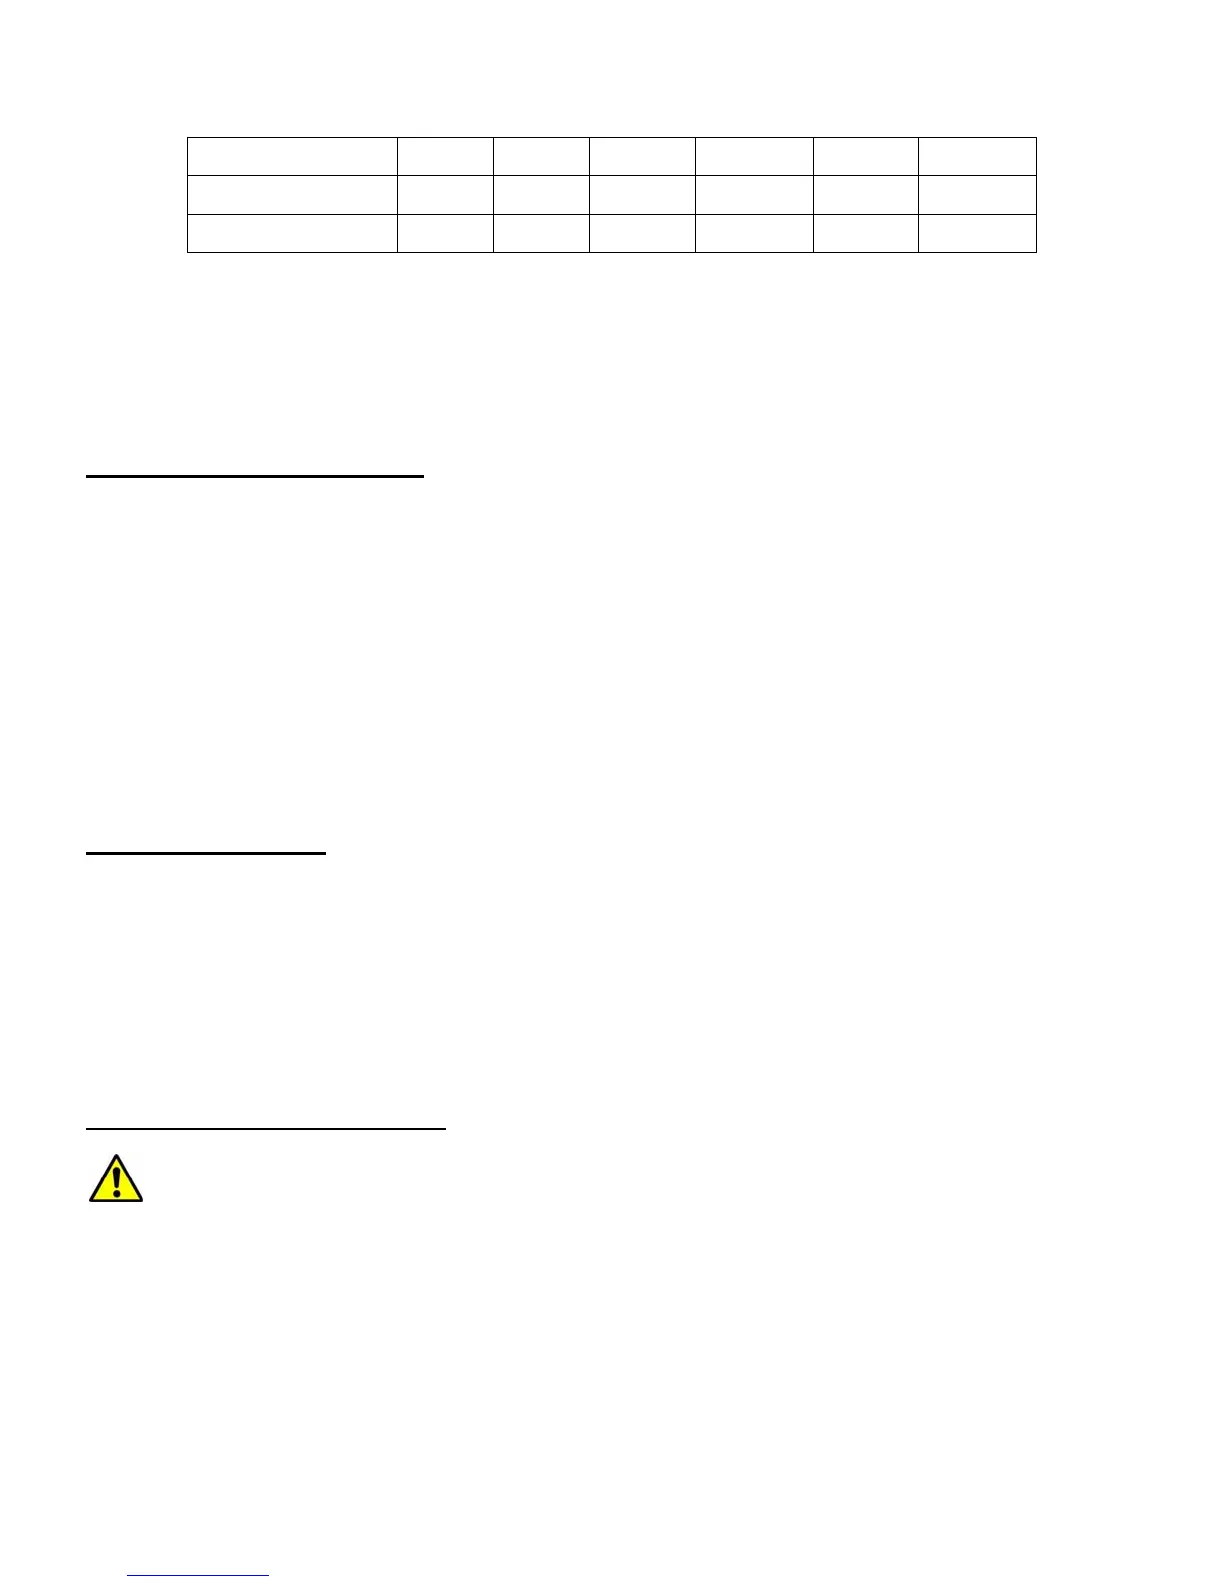
All the time zones in North America are “UTC –”, as shown in the following table, so ensure the
display shows “UTC -” instead of “UTC +” if in North or South America.
Time Zone Hawaii Alaska Pacific Mountain Central Eastern
Hour behind UT -10 -9 -8 -7 -6 -5
Enter UTC -600 -540 -480 -420 -360 -300
To adjust minutes, move the cursor to each digit and use the number keys to input the number
directly. Use ▲ or ▼ key to toggle between “+” and “-”. When the time information entered is correct, press
ENTER and go back to the previous screen. Note that fractional time zones can be entered.
Do not manually add or subtract an hour from displayed time to reflect Daylight Saving Time (DST).
Only select “Y” after DST begins.
For other parts of the world you can find your “time zone” information from internet.
Set Observation Site Coordinate
The third and fourth lines display the longitude and latitude coordinates, respectively. The longitude
and latitude coordinates will be automatically updated when the GPS picks up satellite signals. “W/E”
means western/eastern hemisphere; “N/S” means northern/southern hemisphere; “d” means degree; “m”
means minute; and “s” means second.
If, for any reason, your GPS can’t pick up a signal, you can manually enter the GPS coordinates.
Press ◄ or ► key to move the cursor and using ▲ or ▼ key to toggle between “W” and “E”, “N” and “S”,
using number key to change the numbers. It is always a good idea to do your home work to get the GPS
coordinates before traveling to a new observation site.
The site coordinates information can be found from your smart phone, GPS receiver or via the
internet. Site information in decimal format can be converted into d:m:s format by multiplying the decimal
numbers by 60. For example, N47.53 can be changed to N47º31'48”: 47.53º = 47º +0.53º,
0.53º=0.53x60'=31.8', 0.8'=0.8x60"=48". Therefore, 47.53º=47º31'48" or 47d31m48s.
Select N/S Hemisphere
If the polar axis is aligned to the North Celestial Pole, then set the mount to Northern Hemisphere. If
the polar axis is pointing to the South Celestial Pole, set the mount to Southern Hemisphere. Press the ◄ or
► key to move the cursor and use the ▲ or ▼ key to toggle between “Northern Hemisphere” and “Southern
Hemisphere”.
As an example, select Northern Hemisphere if you are located in US and press ENTER to go back
to the main menu.
The time and site information will be stored inside the hand controller’s memory chip. If you are not
traveling to another observation site, they do not need to be changed.
Check the Hand Controller Battery
The hand controller has a real time clock which should display the correct time every time the mount
is turned on. If the time is off too much, please check the battery inside the hand controller and
replace it if required. The battery is a 3V, CR1220 button battery.
STEP 11. Polar Alignment
One of CEM25’s unique features is that the polar scope can be accessed at anytime. It will not be
blocked by DEC axle as in a German equatorial mount. This makes it possible to adjust the polar alignment
during the tracking.
In order for an equatorial mount to track properly, it has to be accurately polar aligned.