EasyManua.ls Logo

Jensen DC 9520 A User Manual

Jensen DC 9520 A
12 pages
To Next Page IconTo Next Page
Page #1 background imageLoading...
Page #1 background image
How to Install the KDC 9520 AM/FM
Stereo Receiver/Cassette Tape
Player/CD Player
®
Installation............................. 2
Before You Begin Installation..... 2
Tools and Supplies Needed ....... 2
Speaker Requirements .............. 2
Prepare Radio for
Installation.................................. 2
Adapters for Easier
Installation.................................. 2
Connections........................ 3
Crimp Connections ............. 3
Upgrading your System ...... 3
Disconnect Battery..................... 4
Remove Old Radio .................... 4
Wiring....................................... 5
Fuse Adapters .................... 5
Cars with a Single
Speaker Wire ...................... 5
Wiring with a Wiring Adapter ..... 6
Connect Wires ........................... 6
Wiring Color Codes.................... 6
Attach Wires to Radio ................ 6
Install Wiring Inside the Car....... 6
Wiring Diagram–Advanced
Installation.................................. 7
Testing ....................................8
Reconnect Battery ..................... 8
Test Power Wiring ...................... 8
View/Set the Clock..................... 8
Test Antenna Connection ........... 8
Test Memory Wiring ................... 8
Test Speaker Connections......... 9
Final Installation....................... 10
Troubleshooting................ 11
Reset Button ............................ 11
Specifications
and Warranty...................... 12
Contents
Technical Assistance
For technical assistance with the installation of the
KDC 9520, call 1-800-323-0221.
Installation
Welcome!
What you're holding in your hands is no ordinary owner's
manual. We've tried to make the instructions in this book
clear and easy to follow.
For your Jensen stereo to work right, it must be installed
correctly. This manual will show you how to install your new
stereo like a pro. It's a good idea to read all of these
instructions before you begin the installation. Most
installations are straightforward and can be handled by a
do-it-yourselfer with the right tools, patience, and the ability
to follow instructions. But, do-it-yourself installation isn't for
everyone. If you still don't feel confident after reading this
book, consider turning the installation job over to someone
better suited to it.
Warranty Service
If your Jensen stereo should ever require service, you will
need to have the original dated receipt. If you ever need to
return the unit for any reason, always include the receipt
with the product.
PWR
SEL
CD
TAPE
BAND
CDC
LOU
MO
CLK
RELEASE
COMPACT
DIGITAL AUDIO
35W x 4
KDC9520
8X OVERSAMPLING
RDM
PGM
AMS
MEM
CLR
RPT
A-B
RPT
INTRO
2
1
3
4
5
6
VOL
VOL
PR OG
A.PS
DISC
KDC9520 _EIN.p65 3/14/00, 1:27 PM1
Question and Answer IconNeed help?

Do you have a question about the Jensen DC 9520 A and is the answer not in the manual?

Jensen DC 9520 A Specifications

FM Tuner IconFM Tuner
tuning range87.5 MHz-107.9 MHz
FM mono sensitivity12 dBf
50 dB quieting sensitivity (stereo)16 dBf
AM Tuner IconAM Tuner
tuning range530 kHz-1710 kHz
Amplifier IconAmplifier
total system power140 Watts peak
power output (front)2 x 35 Watts
power output (rear)2 x 35 Watts
Tape Player IconTape Player
frequency response±3 dB . 50 Hz-15 kHz
CD Player IconCD Player
frequency response20 Hz-20 kHz
General IconGeneral
power supply11-16 VDC, negative ground
speaker output impedance4-8 Ohms

Summary

Installation Guide

Before Installation

Essential preparations, tools, and supplies needed before beginning the car stereo installation.

Speaker and Radio Preparation

Details speaker requirements and steps to prepare the radio unit for installation.

Installation Adapters

Information on using electrical and dashboard adapters to simplify the installation process.

Battery Disconnection

Crucial safety step emphasizing the disconnection of the battery's negative terminal.

Removing the Old Radio

Step-by-step instructions for safely removing the existing car stereo from the dashboard.

Wiring Procedures

Key information and warnings regarding the car stereo wiring process, including fuse adapters.

Connecting Wires

Guidance on splicing, crimping, or soldering wires and connecting them to the radio unit.

Wiring Diagram

Illustrates advanced wiring connections for speakers, amplifiers, and other components.

Post-Installation Testing

Battery Reconnection and Power Test

Reconnects battery and verifies the unit powers on and displays correctly.

Clock and Antenna Tests

Procedures for setting the clock and testing antenna reception and radio tuning.

Memory and Speaker Tests

Verifies radio station presets are stored and speakers are wired correctly for audio output.

Final Installation and Troubleshooting

Physical Mounting

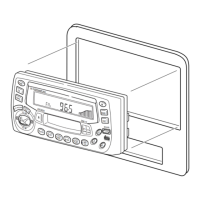
Illustrates the final steps of physically mounting the stereo unit into the dashboard.

Troubleshooting Common Issues

Addresses common problems like no power, no sound, or blown fuses with solutions.

Reset Button Functionality

Explains how to use the reset button to resolve operational errors and reset error codes.

Specifications and Warranty

Technical Specifications

Lists detailed technical parameters for the tuner, amplifier, and player functions.

Limited One Year Warranty

Details the warranty coverage, terms, limitations, and service procedures for the product.

Related product manuals