6074816-UIM-A-0421
10 Johnson Controls Ducted Systems
OPTIONAL COLD WEATHER CHARGING
1. Assemble the charging tent.
2. Slide the charging tent over the top of the condenser unit.
3. Position the door zipper over the line set so the charging tent sits
evenly on the ground.
4. Make sure the distance around the condenser inside of the
charging tent is even for airflow.
5. Stake down the edges of the charging tent cover to prevent the unit
fan from blowing the charging tent away.
6. Start the condenser.
7. For better temperature measurement inside the charging tent, use
a thermocouple to monitor temperature readings. Locate the ther-
mocouple monitor approximately 8 in. to 10 in. away from the coil
guard and 2/3 of the way above the bottom of the coil on the oppo-
site side from the control box.
8. Based on the outdoor ambient temperature, begin adjusting win-
dows in order to achieve a stable temperature above 55°F inside
the tent. Note that the colder the outdoor ambient temperature is
the fewer windows need removal.
9. Use the condenser charging chart. Verify that the outdoor ambient
temperature listed on the charging chart is the temperature inside
the charging tent.
10. Carefully adjust the charging tent windows until reaching the
desired temperature, and allow the unit to stabilize for a minimum of
15 min. Check the thermocouple to make sure the temperature is
still maintained at the preferred temperature. If the temperature is
out of range, adjust the windows by opening or closing them.
11. When the condition inside the charging tent is stabilized, follow the
System Charge procedure to adjust charge in the unit.
12. Add or remove charge and adjust the windows to maintain the pre-
ferred temperature inside the tent.
SECTION VII: ELECTRICAL CONNECTIONS
GENERAL INFORMATION AND GROUNDING
The control box cover is held in place with three screws (one screw in
each lower corner and one screw at the top center post). The control
box can swing open by removing the screw from the center of each side
of the control box and allowing the control box to lower 1 in. or so into a
pivotal position.
The control box can then swing open from the left by rotating on the
right side pivots for easy service of refrigeration components. If no wir-
ing is in or routed through the control box, it can be removed from the
unit by lifting slightly, tilting the top hinge out, and lifting the bottom
hinge out. During the installation, route the low voltage wiring for the
thermostat along the unit whip to help facilitate the swing away feature
of the control box. See Figure 12.
Check the electrical supply to ensure it meets the values specified on
the unit nameplate and wiring label.
Power wiring, control (low voltage) wiring, disconnect switches, and
over current protection must be supplied by the installer. Wire size must
be sized following NEC requirements.
The complete connection diagram and schematic wiring label is located
on the inside surface of the unit service access panel.
FIELD CONNECTIONS POWER WIRING
1. Install the correct size weatherproof disconnect switch outdoors
and within sight of the unit.
2. Remove the screws at the top and sides of the corner cover. Slide
the control box cover down and remove from unit.
3. Run power wiring from the disconnect switch to the unit.
4. Route wires from disconnect through power wiring exit provided
and into the unit control box as shown in Figures 12, 13, 14, and 15.
5. Install the correct size time-delay fuses or circuit breaker, and make
the power supply connections.
NOTICE
For better airflow, the size of the charging tent must be at least 70 in.
x 70 in. x70 in. and must have some adjustable flaps or windows to
control the temperature inside the charging tent. The charging tent
must not have a floor or floor covering. Follow the System Charge
procedures from Section VI of this Installation Manual.
NOTICE
A flexible electrical whip must be installed in order to use the swing
away function of the control box. Other type electrical whips require
the wiring to be disconnected in order to swing the control box open.
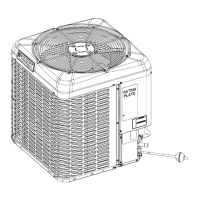
Figure 12: Outdoor Unit Swing Away Control Box
CAUTION
All field wiring must only use copper conductors and be in accordance
with Local, National, Fire, Safety and Electrical Codes. This unit must
be grounded with a separate ground wire in accordance with the
above codes.
$
+,*+92/7$*(
(/(&75,&$/:+,3
&21752/%2;
6ZLQJDZD\
!