– 8 –
A
B
F
D
C
E
G
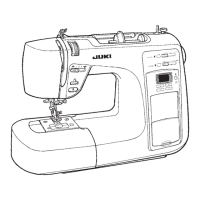
9) Front panel
○
Remove setscrews
to
from the front panel.
○
Put a thin screwdriver in the notch
A
in the rising section under the arm and
pry off the front panel and hook
B
of the rear panel. (Fig 1)
○
Detach clinch nails (
C
and
D
) of the front panel and rear panel, while pushing
down the front panel.
○
Opening the right side of the front panel in the direction of the arrow, tap
E
section with your hand to remove hook
F
locatedatthebedsurface.
○
Lastly, remove hook
G
locatedatthelowersideofthemachinejaw.
○
If needed, remove the switch/slide VR connector (CN17) and panel I/F con-
nector (CN19) from the main PCB. Then, remove the LED1 connector (CN208).
Fig.1
 Loading...