Do you have a question about the JVC GY-DV500U and is the answer not in the manual?
Numbered list of safety instructions for appliance usage.
Warnings against electric shock, fire, rain, and moisture.
Information on FCC and IC compliance for digital devices.
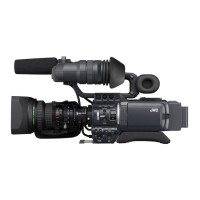
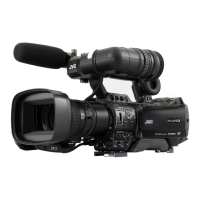
Key features of the DV Camcorder GY-DV500.
Describes the physical layout and components of the unit.
Guidelines for safe and correct operation of the unit.
Recommendations for cleaning and maintaining the equipment.
Specifies the type of videocassettes compatible with the unit.
Lists compatible battery pack types for power supply.
Explains condensation phenomena and remedies.
Describes visual artifacts like smear and blooming.
Details controls and connectors on the front of the camera.
Describes controls and indicators on the right side.
Details connectors and controls on the left side.
Explains controls located on the top of the unit.
Identifies ports and connectors on the rear of the unit.
Explains the information shown on the counter display.
Describes the controls and features of the optional lens.
Details the controls and adjustments for the optional viewfinder.
Explains the various indicators and displays within the viewfinder.
Overview diagram of system connections and accessories.
Step-by-step instructions for attaching an optional zoom lens.
Procedure for mounting the viewfinder onto the camera.
How to attach the supplied microphone to the unit.
Steps for attaching an optional microphone with a holder.
Instructions for securing the camera to a tripod using the base.
Guide for installing and replacing the backup lithium battery.
How to operate the unit using AC power.
Overview of operating the unit with battery packs.
Procedure for attaching a flat shape battery pack.
Steps for using Anton-Bauer battery packs with a holder.
Explains how to check and interpret battery power indicators.
Steps for powering on the unit and selecting operation modes.
Instructions for inserting and removing videocassettes.
Guide for setting the internal clock and date.
Initial settings for camera operation before shooting.
Adjusting the viewfinder for optimal viewing.
Procedure for adjusting color bars on an external monitor.
How to adjust the back focus for sharp telephoto and wide-angle images.
Guide for setting the correct white balance for lighting conditions.
Explains various switch functions related to VCR operation.
How to select audio input sources for recording.
Adjusting audio recording levels for optimal sound quality.
How to monitor audio signals while recording.
Step-by-step guide to starting and performing basic recording.
Details the VCR Save mode and its operation.
Explains the unit's behavior when left in record-pause mode.
How to check recorded content during record-pause mode.
Steps for playing back recorded videocassettes.
How to use fast-forward and rewind functions.
Instructions for searching through recorded tape.
How to display recorded time code information.
Guide for setting and recording time codes.
How to record time codes that continue existing tape data.
How to playback and view recorded time codes.
Overview of the Super Scene Finder function.
Detailed steps for using the S.S.F. function in CUE and MARK modes.
How to delete S.S.F. data from memory.
Procedure for resetting all S.S.F. data.
How to save S.S.F. data onto the tape.
Method for exporting S.S.F. data via VTR REMOTE connector.
Guide for connecting video components using a DV connector.
Instructions for connecting the unit to a PC for control.
Configuration options for the VCR section.
Visual guide to navigating the camera menu structure.
Step-by-step instructions for camera menu selection.
Options for customizing viewfinder display settings.
Settings related to camera operation modes and functions.
Settings for image processing functions.
Advanced image processing and color adjustment settings.
Controls for adjusting skin tone detail and color.
Options for storing and managing camera menu settings.
Settings for external sync signal and microphone power.
Procedure for resetting camera menu settings to defaults.
Explanation of the FAW function for automatic white balance.
How to adjust the lens iris for brightness control.
Technique for aligning shutter speed with computer monitor refresh rates.
Adjusting camera gain for low-light conditions.
How switch settings adapt to lighting and subject conditions.
Adjusting contour emphasis in skin tone areas.
Guidance on diagnosing and resolving unit issues.
How to display and use the accumulated head drum running time.
Technical specifications of the camera and its components.