41
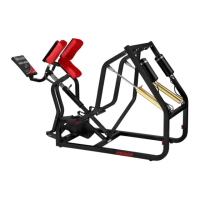
LEG PRESS
CYLINDER ADJUSTMENT
NOTICE: CYLINDERS ARE FACTORY-ADJUSTED AND REQUIRE NO
FURTHER ADJUSTMENT UNLESS THEY ARE REPLACED. Please contact
KEISER if you have any questions concerning adjustments or repairs.
1. Check the condition of the rubber crutch tips that the exercise arms against. These
must not be worn or damaged in any way. If they are worn replace them before
attempting to adjust a cylinder.
2. Adjust the left cylinder so that 7-9 threads are visible outside the jam nut (pg. 13
maintenance manual). Decrease the resistance all the way down and push the left
exercise arm all the way forward.
3. Push the right exercise arm all the way forward and engage the arm lock. Adjust the
right cylinder to make the lock work smoothly.
SPRING PINS
1. When installing the spring pin 3/16 X 7/8 (item # 23) into the foot pedal (item # 22),
line up the hole in the foot pedal with the hole in the foot pedal shaft (item # 25).
Drive the spring pin in until the end is 1/16” into the foot pedal.