End of automatic adj. step 4
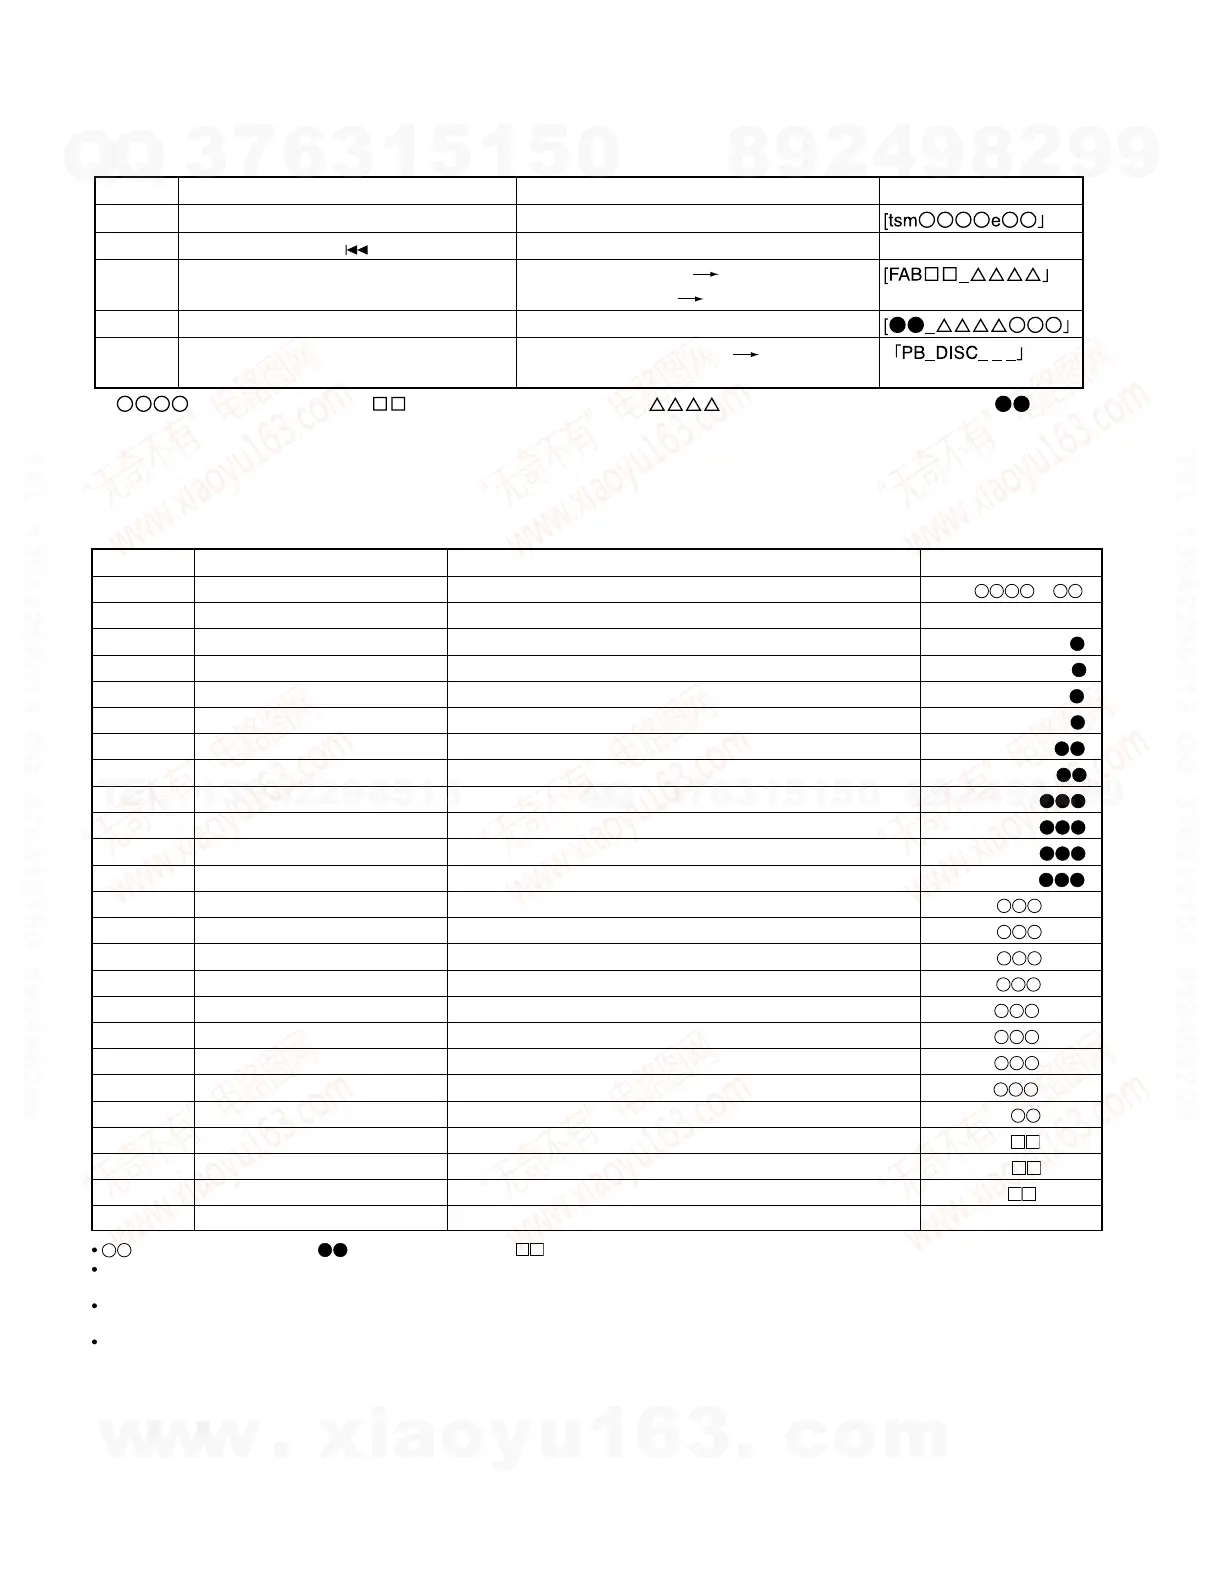
Step 1 Test mode STOP state [ t s m e ]
Step 2
Press the SKIP DOWN(4) button 4 times.
RESULT sub-menu [ _ R S T _ Y O B I _ ]
Step 3 Press once the MD PLAY button. Indication of measurement value [ R F G : _ _ __ _ ]
Step 4
Press once the SKIP DOWN(4) button.
Indication of measurement value [ R C G : _ _ __ _ ]
Step 5
Press once the SKIP DOWN(4) button.
Indication of measurement value [ P T G : _ _ _ _ _ ]
Step 6
Press once the SKIP DOWN(4) button.
Indication of measurement value [ G T G : _ _ _ _ _ ]
Step 7
Press once the SKIP DOWN(4) button.
Indication of measurement value [ P C H : _ _ _ _ ]
Step 8
Press once the SKIP DOWN(4) button.
Indication of measurement value [ G C H : _ _ _ _ ]
Step 9
Press once the SKIP DOWN(4) button.
Indication of measurement value [ S A G : _ _ _ ]
Step 10
Press once the SKIP DOWN(4) button.
Indication of measurement value [ S B G : _ _ _ ]
Step 11
Press once the SKIP DOWN(4) button.
Indication of measurement value [ S E G : _ _ _ ]
Step 12
Press once the SKIP DOWN(4) button.
Indication of measurement value [ S F G : _ _ _ ]
Step 13
Press once the SKIP DOWN(4) button.
Indication of measurement value [ H A O : _ _ _]
Step 14
Press once the SKIP DOWN(4) button.
Indication of measurement value [ H B O : _ _ _]
Step 15
Press once the SKIP DOWN(4) button.
Indication of measurement value [ H E O : _ _ _]
Step 16
Press once the SKIP DOWN(4) button.
Indication of measurement value [ H F O : _ _ _]
Step 17
Press once the SKIP DOWN(4) button.
Indication of measurement value [ L A O : _ _ _]
Step 18
Press once the SKIP DOWN(4) button.
Indication of measurement value [ L B O : _ _ _]
Step 19
Press once the SKIP DOWN(4) button.
Indication of measurement value [ L E O : _ _ _]
Step 20
Press once the SKIP DOWN(4) button.
Indication of measurement value [ L F O : _ _ _]
Step 21
Press once the SKIP DOWN(4) button.
Indication of measurement value [ T C O : _ _ _ _]
Step 22
Press once the SKIP DOWN(4) button.
Indication of adjustment error sequence No. [ Y O B : _ _ _ _]
Step 23
Press once the SKIP DOWN(4) button.
Indication of adjustment status [ D I F : _ _ _ _]
Step 24
Press once the SKIP DOWN(4) button.
Indication of pre-adjustment not completed (00)/completed (4B) [ A D J : _ _ _ _]
Step 25 Press once the MD STOP button. RESULT sub-menu state [ _ R S T _ Y O B I _ ]
4. RESULT sub-mode
Step No.
Setting Method
Remarks Display
: Measurement value, : Adjustment value, : Other various informations
When the (¡)button in remote controller is pressed while the setting is displayed, the setting increases,
and a new setting is stored in RAM.
When the (1)button in remote controller is pressed while the setting is displayed, the setting increases,
and a new setting is stored in RAM.
When the (¡) or (1)button in remote controller is pressed continously, steps is change by 100ms period.
 Loading...