Hub
®
Seating - Ganger Kit
Assembly Instructions
Assemble units as described herein only. To do otherwise
may result in instability. All screws, nuts and bolts must be
tightened securely and must be checked periodically after
assembly. Failure to assemble properly, or to secure parts
may result in assembly failure and personal injury.
11
adjoining Hub modular
seating units
(on back)
#10 x 1”
Phillips
screw
ganging plate
assembly pair
ganging plate
assembly pair
wedge
(45 )°
Figure 3
#10 x 1”
Phillips
screw
wedge
(45 )°
Figure 4
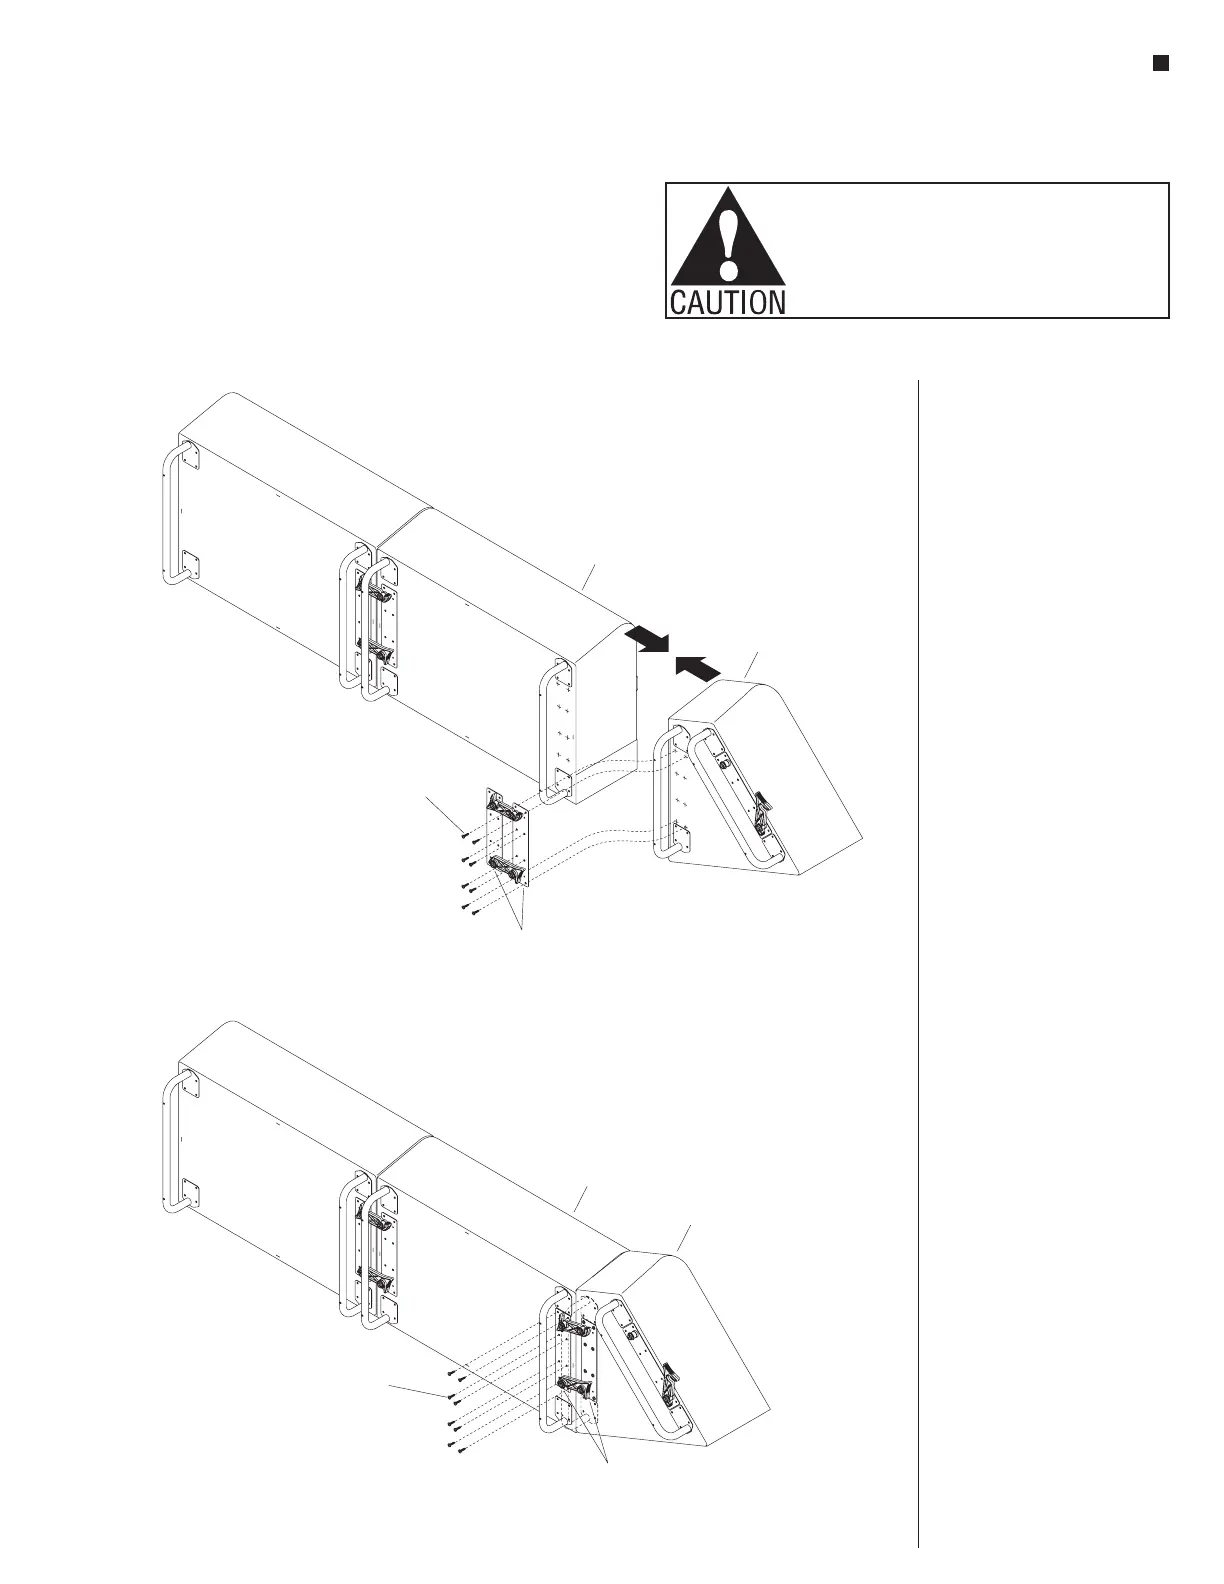
4. Position and secure the mounting plate of the
ganger half to the bottom of the wedge or table unit
where required using a drill driver, #2 bit and all
eight #10 x 1 Phillips screws provided (Figure 4).
Note: Seating units which will attach to table,
ottoman or wedge units must first be un-hooked
from any other seating units prior to attaching
ganging plates from tables, ottomans or wedges
(Figure 5).
5. With the units upright, position the table, ottoman
or wedge next to the seating unit it will secure to,
carefully sliding the protruding ganger plate half
under the seat to be joined to. Hold units firmly
together, alined properly, confirming final assembly
position and mark drilling holes to the underside of
the adjoining seating unit. Then, carefully tip the
seating unit to it’s back and position the table or
wedge onto it’s side and pre-drill and secure the
protruding ganger plate half to the underside of the
seating unit (Figure 5).
Final Alignment & Installation
1. Gently and slowly, rotate the ganged seating onto
the legs (two-three units maximum) and position the
units as desired, carefully moving them across the
floor rather than picking them up.
Note: Damage to the gangers is possible if ganged
units are picked up and suspended off the floor.
2. Once all gangers have been mounted underneath
the seats and in the upright position, gang seating
together by reaching underneath the seats and
locking the hooks to the pegs to tightly join all
seating, table, ottoman or wedge units.
adjoining Hub modular
seating units
(on back)
adjoining Hub modular
seating units
(on back)
#10 x 1”
Phillips
screw
ganging plate
assembly pair
ganging plate
assembly pair
#10 x 1”
Phillips
screw
wedge
(45 )°
Figure 4
4. Position and secure the mounting plate of the
ganger half to the bottom of the wedge or table unit
where required using a drill driver, #2 bit and all
eight #10 x 1 Phillips screws provided (Figure 4).
Note: Seating units which will attach to table,
ottoman or wedge units must first be un-hooked
from any other seating units prior to attaching
ganging plates from tables, ottomans or wedges
(Figure 5).
5. With the units upright, position the table, ottoman
or wedge next to the seating unit it will secure to,
carefully sliding the protruding ganger plate half
under the seat to be joined to. Hold units firmly
together, alined properly, confirming final assembly
position and mark drilling holes to the underside of
the adjoining seating unit. Then, carefully tip the
seating unit to it’s back and position the table or
wedge onto it’s side and pre-drill and secure the
protruding ganger plate half to the underside of the
seating unit (Figure 5).
Final Alignment & Installation
1. Gently and slowly, rotate the ganged seating onto
the legs (two-three units maximum) and position the
units as desired, carefully moving them across the
floor rather than picking them up.
Note: Damage to the gangers is possible if ganged
units are picked up and suspended off the floor.
2. Once all gangers have been mounted underneath
the seats and in the upright position, gang seating
together by reaching underneath the seats and
locking the hooks to the pegs to tightly join all
seating, table, ottoman or wedge units.
adjoining Hub modular
seating units
(on back)
3. Carefully turn the adjoining Hub
modular seating unit(s) (which
will receive wedge, table or
ottoman unit) onto their back side
as illustrated. With care, slide the
protruding half of the ganging
plate assembly pair under the
bottom of the seating unit it will
attach to. Press units together
tightly and hold the unit properly
in position following Details E, F,
G or H. Using the ganging plate
as a “drill template”, pre-drill all
eight holes to the underside of the
seating unit using a
1
/
8
” diameter
drill bit. Secure the mounting
plate to the seating unit using a
drill driver, #2 Phillips bit and all
eight #10 x 1” screws provided
(Figure 3).
Note: Any seating units which
are hooked to one side of a
wedge, table or ottoman unit,
must be un-hooked from the unit
if another seating unit is to then
be aligned, installed and hooked
to that wedge, table or ottoman
unit on another side. Un-hooking
of units longer than two or three
is also necessary before turning
joined units from their back-side
to the upright position.
4. Using two people or more, gently
and slowly rotate the ganged
seating onto their legs (two
to three units maximum) and
position the units as desired,
carefully moving them across the
floor rather than picking them up.
Note: Damage to
hooked-together ganging
assemblies is possible if joined,
upright units are lifted off the floor
and moved. Careful sliding of
joined units is advised.
5. Once all units are rotated to their
upright position, gang together
any un-hooked seating by
reaching under the units and latch
all hooks to the pegs tightly.
 Loading...