5
treatment.
6. INSTALLATION
WARNING: The work must be carried out under
adequate hygienic conditions, taking the neces-
sary precautions with everything related to the
materials that are going to be in contact with the water
to be treated or consumed.
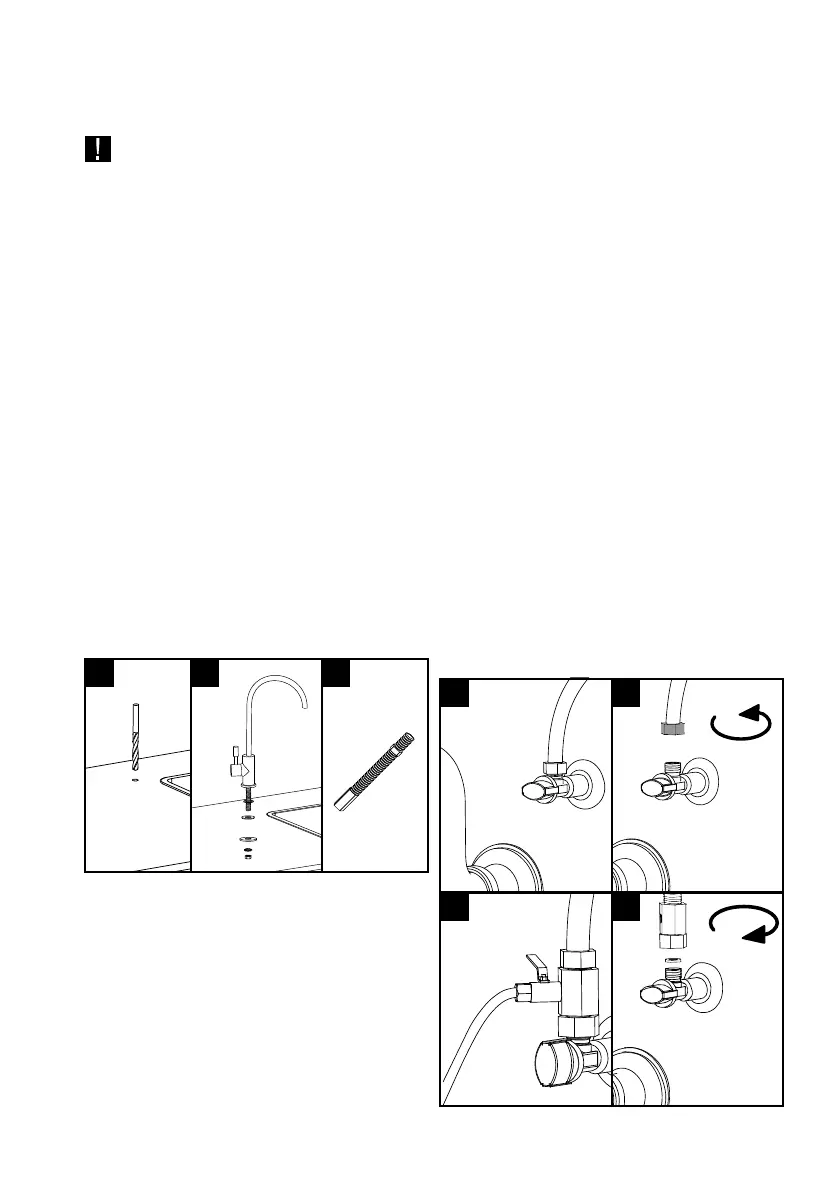
6.1. INSTALLATION OF 1 WAY TAP
1. Once the location of the tap has been chosen between
the counter-top or the sink (usually in the corner), drill a
hole with the 12mm bit to insert the threaded stud of the
tap (image 1). Use the metal trim to choose the location
of the drill. If due to the geometric shape of the counter-
top or sink, you have trouble assembling the metal trim
of the tap, use the slim rubber joint supplied, instead of
the metal trim, to assemble the tap.
2. Prior to this, insert the metal trim and a thick flat rub-
ber joint (both on the upper part of the counter-top) in
the threaded stud. Then insert the threaded stud into
the hole. After completing this step, install the lower
parts of the threaded stud: the rigid plastic washer, the
spring washer and the hexagon nut.
They should be tightened together with a double socket
wrench no. 14/15mm, until the tap is completely static
and properly positioned. Put the tap in the right place
before the final tightening (it is recommended that the
tap handle is pointing towards the exterior of the coun-
ter-top) (image 2). If the counter-top is thicker than the
threaded stud of the tap, use the tap adaptor (image 3).
6.2. INSTALLATION GUIDE FOR 1 WAY TAP
1. Choose the filter location under the sink. Fix the filter
head so that it is easily accessible for maintenance and
replacement.
2. Close the valve located at the outlet of the cold water
(image 4). Depending on how old is the house installa-
tion, there may be no outlet valve, so it will be necessary
to close the general stopcock of the house. Immediately
afterwards, relieve the pressure of the installation by
opening the tap of the sink and wait until water stops
coming out of it.
1 2 3
3. Unscrew the connection of the hose or flexible pipe
(image 5). Have a container or cleaning cloth ready to
collect or wipe up the water that may come out of the
flexible pipe when unscrewed. Place the 3/8" wall adap-
tor with the 1/4" tube valve between the wall adaptor
and the valve or flexible pipe (image 6). The built-in 3/8"
flat joint makes it unnecessary to use a sealant (Teflon
wire, liquid Teflon, hemp twine, etc.) (image 7). Connect
the cold water female flexible pipe to the male fitting of
the 3/8" adaptor.
4. Then, connect the 1/4" white tube between the sup-
ply valve and the 1/4" inlet connection of the filter head.
Make sure the tube is properly inserted.
5. Once the inlet connection is done, connect the 1/4"
white tube between the female adaptor and the 1/4"
outlet of the head. Make sure the tube is properly in-
serted.
Before opening the supply valve, install the supplied fil-
ter: remove its protective cap and insert the filter into
the head while turning it to the right.
Once the filter has been installed and everything is con-
nected, open the main supply valve and check for leaks
in connections. Then open the 1/4" valve key of the fil-
tration inlet and check again for leaks.
After completing the necessary verifications, open the
tap on the counter-top to bleed any air that may be in-
side (beware of any splashes of water).
Then open the filtration tap and purge the carbon dust:
let the water flow for about 1 minute to clean all dust.
Once the cleaning is completed, you can drink the water.
CLOSED
CLOSED
OPEN
4
6
5
7