REMOTE
CONTROL
RECEPTACLE
the
controls
and
their
functions
AUTOMATIC
TIMER
LEVELING FOOT DISSOLVE
CO
NTROL SELECTOR SWITCH
RECEPTACLE
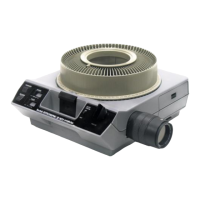
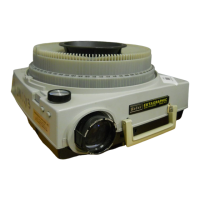
FIGURE 1
Remote Control Receptacle (Figure
1)
This 5-pin receptacle is for the connector
on
the remote-
control cable. The connector
must
be
oriented correctly
(colored dot
on
the connector facin'g up,
see
Figure 3)
be-
fore you insert it into the receptacle.
Dissolve Control Receptacle
Each
KODAK
Dissolve Control projector cord has a 7-prong
connector which fits the remote control receptacle.
Selector Switch
When
this
switch is at
FAN
, the cooling fan and mechanism
will operate but the projection lamp will not
be
lighted. At
HIGH, the
ELH
projection lamp provides
full
illumination
(rated lamp
life-35
hours). At
LOW
,
65%
of
full
illumina-
tion is provided (average lamp
life-200
hours).
Automatic Timer
The triangle
on
the serrated bar
for
the
timer
can
be
moved
to any of four settings:
"M
"
for
manual control; " 5
,"
"8,"
or
"15"
for
an
automatic interval of 5, 8,
or
15 seconds.
Focus
Knob (Figure
2)
Only
the
first
image
requires
focusing;
the remaining images
will
be
automatically focused. Turning the focus knob will
focus the image
on
the screen . When intermixed glass- and
cardboard-mounted slides are projected, focus sharply
on
a
cardboard-mounted slide to maintain best focus. Moving
the knob toward the side of the projector releases the focus-
ing mechanism and permits quick insertion and removal of
the lens. The focus knob and the focus lever
on
the rem
ote
control function independently.
4
FIGURE 2
"
.'11"
"
"'"\
FORWARD
BUTTON
REMOTE CONTROL
FORWARD BUTTON
REMOTE CONTROL
FOCUS
LEVER
REMOTE CONTROL
REVERSE BUTTON
FIGURE 3
Forward and Reverse Buttons
WHITE ORIENTATION DOT
These buttons are at-the-projector controls
for
forward or
reverse movement of the slide tray, one slide space at a
time
_
Select Button
When the select button is depressed and held down, the
slide tray can
be
rotated to select any slide
for
projection.
Another use of
this
control is
for
the showing of single slides
without a slide tray,
or
retrieving a slide fr
om
the gate_
Elevating Wheel
When
this
device is turned, it raises or lowers the
front
of
the projector
for
verti
ca
l adjustment of the screen image.
The range of elevation is from 0
to
6
1
/
2
degrees_
Leveling
Foot
(Figure
1)
Turning the leveling-foot wheel raises or lowers the left side
of the image
on
the screen _
Remote Control Forward Button (Figure
3)
Depressing the button rotates the slide tray one slide space
at a
time
in the forward (counterclockwise) direction.
Remote Control
Reve.rse
Button
Firmly depressing the button rotates the slide tray one slide
space in the reverse (clockwise) direction.
Remote Control Focus Lever
Forward and backward movement of
this
lever focuses the
screen image. The remote focusing control will override the
automatic focusing device until the lever is released, then
automatic focus is reinstated .
 Loading...