Section 1: Assembly & Set-Up
Table of Contents
RCF3096, RCF3010, & RCFM3010 Rotary Cutters 326-566M
24
11/8/18
Hitch Hook-Up (Semi-Mount)
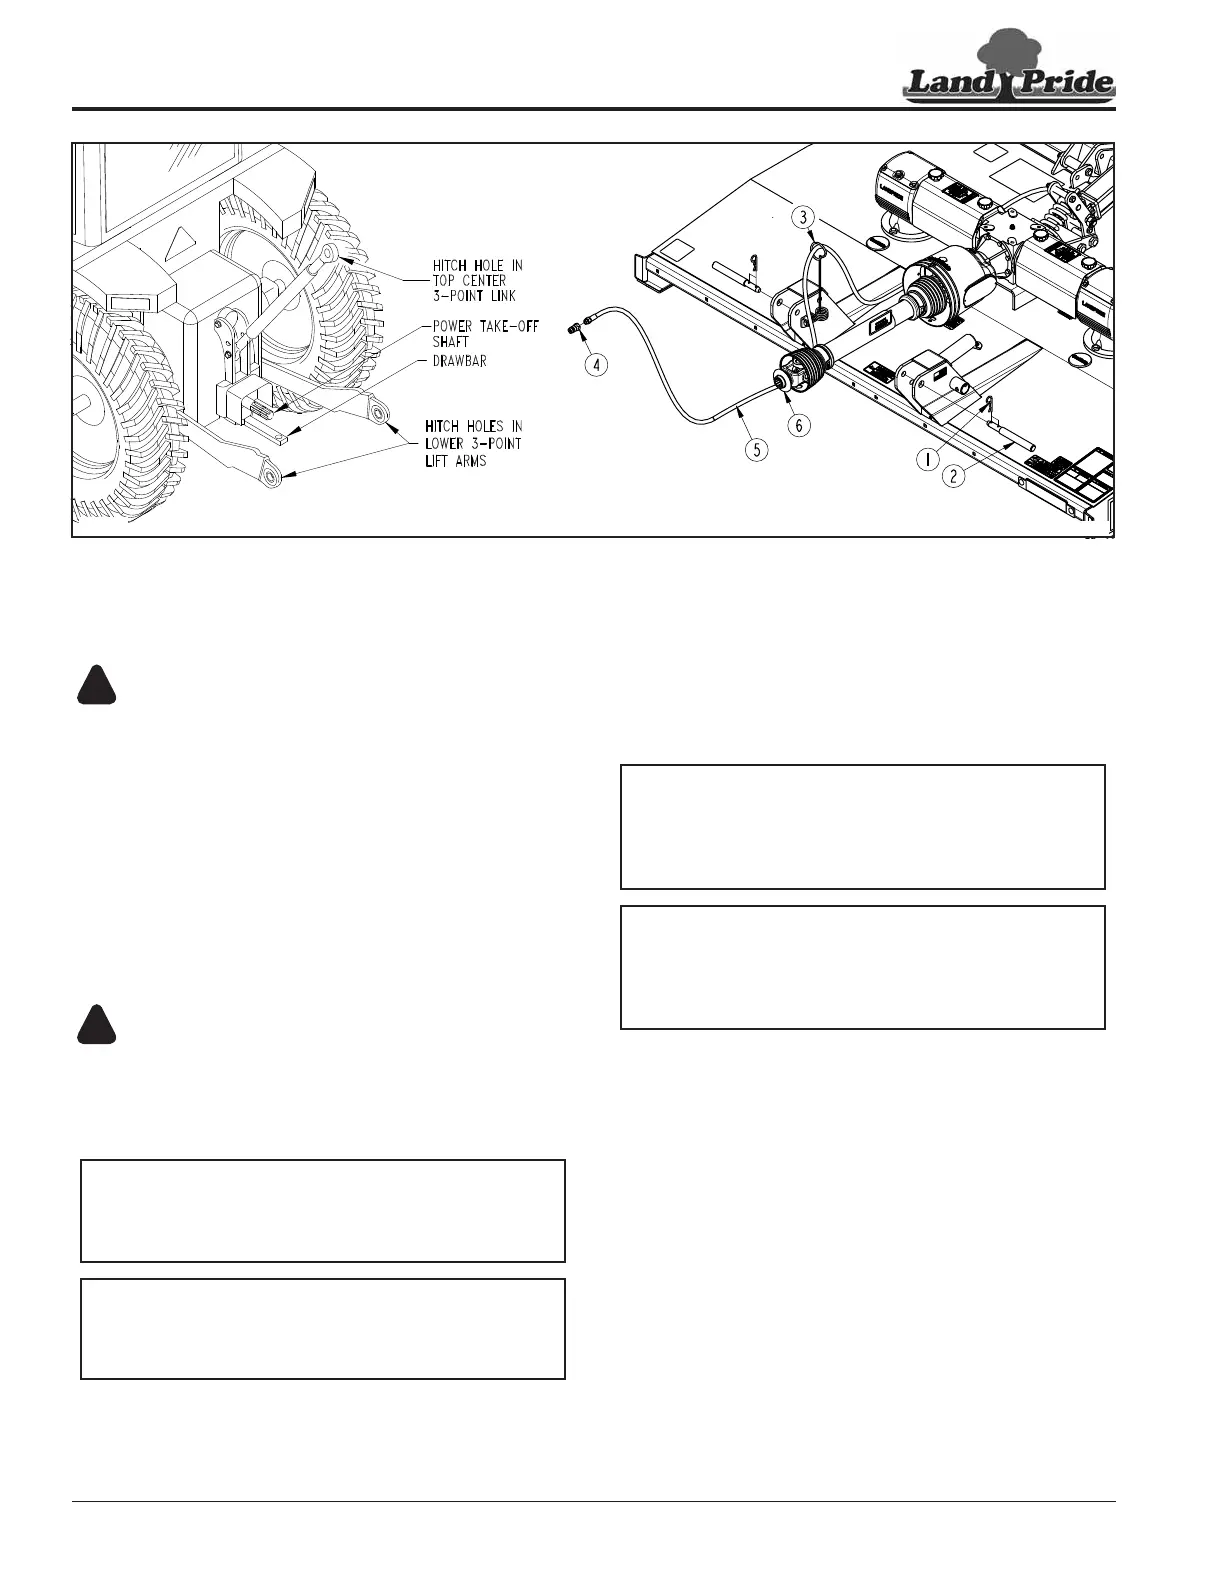
Refer to Figure 1-17 on page 24:
DANGER
!
To avoid serious injury or death:
• A crushing hazard exists while hooking-up and unhooking
implement. Keep people and animals away while backing-
up to implement or pulling away from implement. Do not
operate hydraulic controls while a person or animal is
directly behind the power machine or near the implement.
• All guards and shields must be installed and in good
working condition while operating the implement.
• Do not engage power take-off while hooking-up or
unhooking the driveline, or while someone is standing near
the driveline. A person’s body and/or clothing can become
entangled in the driveline.
WARNING
!
To avoid serious injury or death:
Always shut tractor down using “Tractor Shutdown
Procedure” provided in this manual before dismounting
tractor.
Refer to Figure 1-17:
1. Make sure you have read and follow all Safety Alerts
and Important Notes listed above before continuing.
IMPORTANT: The tractor’s lower 3-point arms must
be stabilized to prevent side-to-side movement.
Most tractors have sway blocks or adjustable chains
for this purpose.
NOTE: Land Pride’s Quick Hitch can be attached to
the tractor to provide quick and easy 3-point hook-
up and detachment. See your nearest Land Pride
dealer to purchase a Quick-Hitch.
Semi-Mount Hook-Up
Figure 1-17
37298
35046
2. Locate cutter on a flat level surface.
3. The cutter is equipped with Cat. I, II, & III hitches.
Make sure your tractor’s hitch is compatible with the
cutter’s hitch.
4. Remove lower hairpin cotters (#1) and hitch
pins (#2).
5. Slowly back tractor to cutter while using tractor’s
3-point hydraulic control lever to align holes in lower
3-point lift arms with clevis hitch pin holes.
6. Engage tractor park brake, shut tractor engine off,
and remove key before dismounting from tractor.
7. Attach lower 3-point arms to clevises with hitch
pins (#2) and secure hitch pins as follows:
• RCF3096: With hairpin cotters (#1) as shown.
• RCF(M)3010, Refer to Figure 1-10 on page 17:
With linchpins (#5) in hitch pins (#1).
8. Manually adjust one of the lower 3-point lift arms up
or down to level the cutter from left to right. Detailed
leveling instructions are provided later. Refer to
“Deck Leveling & Height Adjustment” on page 40.
9. Adjust stabilizers on the tractor’s lower 3-point arms
to stop lateral float. Please consult your tractor’s
manual for adjusting instructions.
NOTE: All Cat. I and most Cat. II 3-point lift arms are
positioned inside the clevis hitch plates. Refer to
“Hitch Pin Modification (3-Point & Semi)” on page
19 if hooking-up Cat. II 3-point lift arms or Cat. II
quick hitch outside the clevis hitch plates.
NOTE: The spring hose loop (#3) may need to be
moved if using a Quick Hitch and the Quick Hitch
interferes with spring hose loop mounting bolt. See
“Spring Hose Loop Assembly (3-Point)” on page
13 for alternate location.




 To Next Page