12
SECTION 1 (CONTINUED) / SECTION 1 (SUITE) / SECCIÓN 1 (CONTINUACIÓN)
TOOLS AND HARDWARE REQUIRED / OUTILS ET QUINCAILLERIE REQUIS / INSTRUMENTAL Y HERRAJE REQUERIDOS
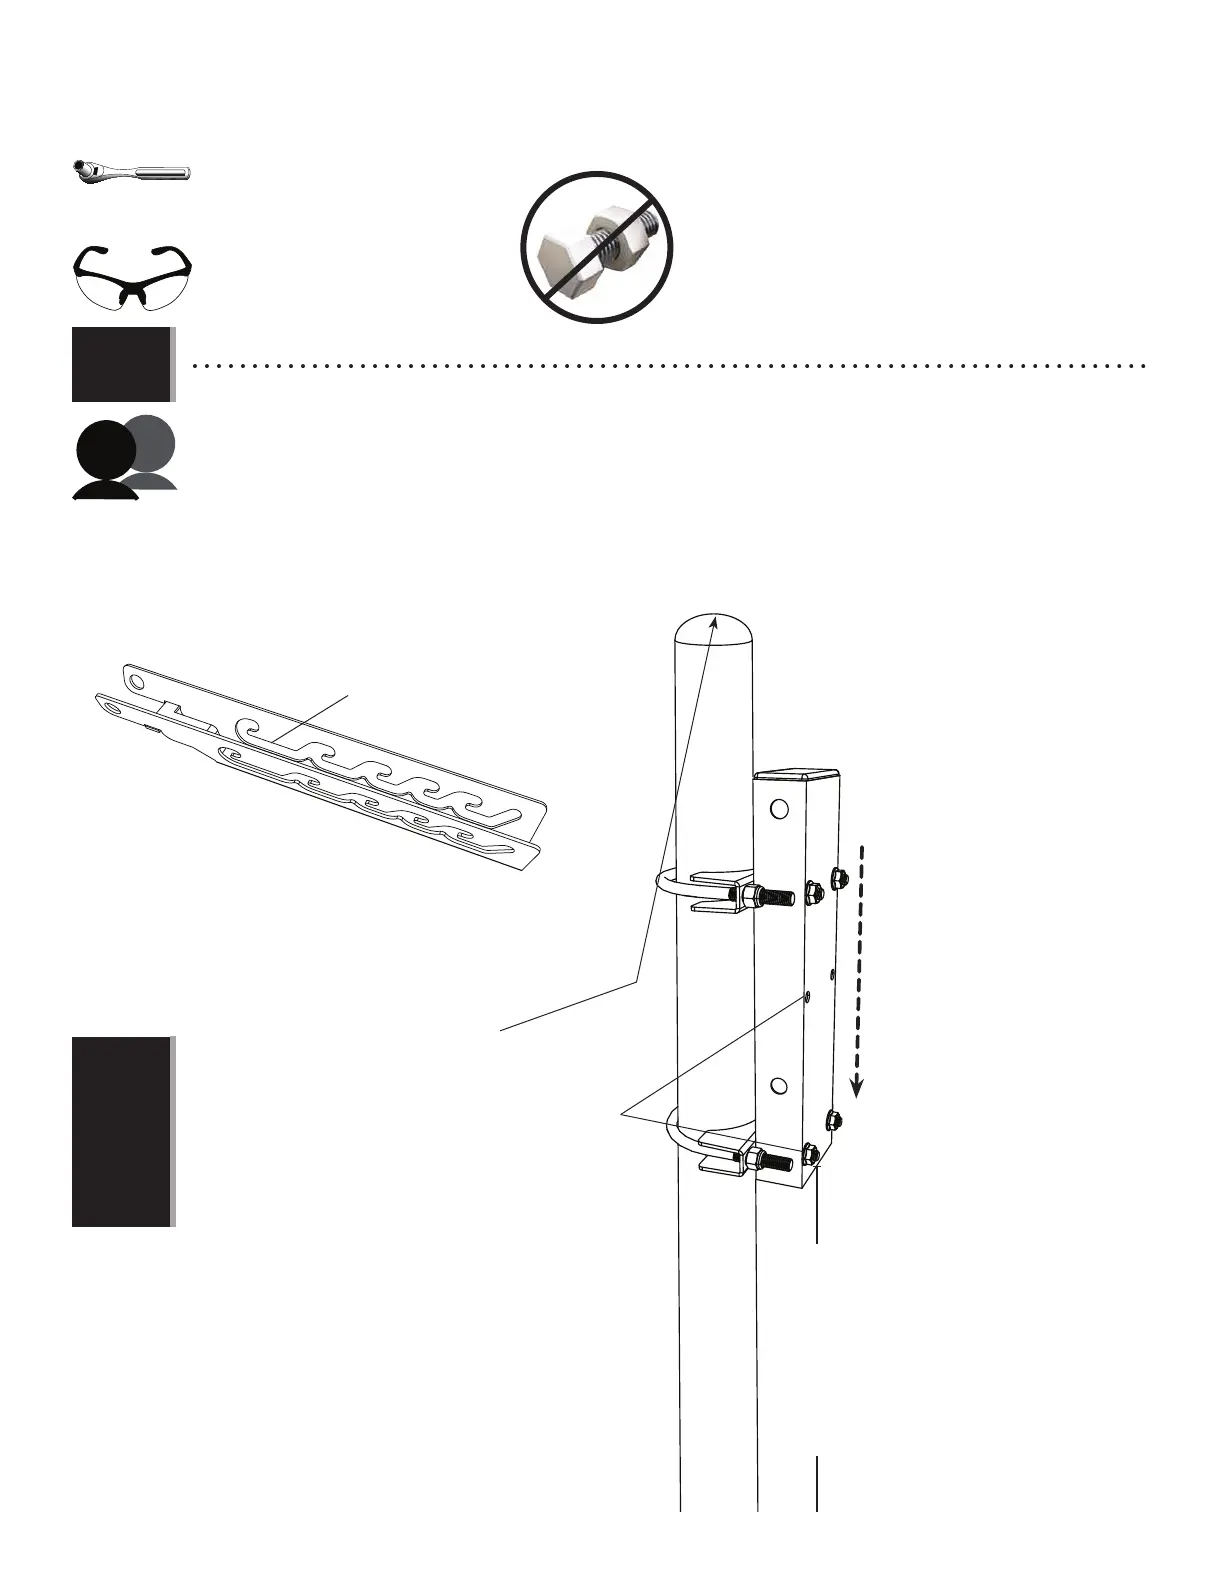
• Slide the assembly down over the pole until the bottom of the mounting tube is at 8' 1" (97") (≈246,38 cm) from the playing
surface. Note the orientation of the holes. Tighten securely. If the bottom of the mounting tube is not at 8' 1" (97") (≈246,38 cm), the rim will not
be at the correct heights when adjusted. Now go to the last page in this section.
• Faire glisser l'assemblage sur le poteau jusqu'à ce que le fond du tube de montage soit à ≈246,38 cm (8 pi 1 po) de la
surface de jeu. Noter l’orientation des trous. Bien serrer. Si le fond du tube de montage n'est pas à ≈246,38 cm (8 pi 1 po (97 po)), l'anneau ne
sera pas aux hauteurs correctes lors du réglage. Aller maintenant à la dernière page de cette section.
• Deslizar el conjunto sobre el poste hasta que el fondo del tubo de montaje esté a ≈246,38 cm [(8 ft 1 in) (97 in)] de la
superfi cie de juego. Notar la orientación de los agujeros. Apretar bien. Si el fondo del tubo de montaje no está a ≈246,38 cm [(8 ft 1 in) (97
in)], el aro no estará a las alturas correctas cuando se ajuste. Ahora, ir a la última página de esta sección.
1.5a
!
8' 1" (97") (≈246,38 cm)
• Remember: If mounting the system to a pole extending less than 107" (8' 11")
out of the ground, use the bottom and middle sets of holes in the mounting
tube.
• Ne pas oublier : En montant le système sur un poteau s'étendant à moins
de 107 po (8 pi 11 po) (≈2,7 m) du sol, utiliser le jeu de trous inférieur et du
milieu dans le tube de montage.
• Recordar: En caso de que se monte el sistema en un poste con una extensión
menor a ≈2,71m [107 in (8 ft 11 in)] desde el piso, usar el conjunto de
agujeros inferior y del medio en el tubo de montaje.
9/16 in/po (≈14 mm)
(x1)
FOR THOSE NOT USING THE HEIGHT STOP / POUR CEUX QUI N’UTILISENT PAS L’ARRÊT DE HAUTEUR / PARA LOS QUE NO UTILIZAN EL TOPE DE ALTURA
• Follow Step 1.5a ONLY when not using the height stop on the Quick Adjust
®
.
• Suivre l’étape 1.5a UNIQUEMENT lors de n’utiliser pas l’arrêt de hauteur sur le Quick Adjust
®
.
• Seguir el paso 1.5a SÓLO al no usar la traba de altura en el Quick Adjust
®
.
• WITHOUT the height stop (see pages 3–4)
• SANS l’arrêt de hauteur (voir les pagee 3 – 4)
• SIN la traba de altura (ver las páginas 3–4)
• Note: the correct mounting height WITHOUT the “height stop” is 8' 1" (≈246 cm). When installed
in this manner the system will have the following 6 rim-height adjustments: 8' 0" (≈244 cm), 8'
5" (≈257 cm) (Lowest), 8' 10" (≈269 cm), 9' 2" (≈279 cm), 9' 7" (≈292 cm) and 10' (≈305 cm)
(Highest).
• Remarque : le correct mounting height SANS « l’arrêt de hauteur » est 8 pieds 6 po (≈260 cm). Lors
de l’installer de cette façon, le système aura les 6 ajustements d’anneau suivants : 8 pieds 0 po
(≈244 cm), 8 pieds 5 po (≈257 cm) (le plus bas), 8 pieds 10 po (≈269 cm), 9 pieds 2 po (≈279 cm),
9 pieds 7 po (≈292 cm) et 10 pieds (≈305 cm) (le plus haut).
• Nota: la altura de montaje correcta SIN la «traba de altura» es 8 ft 6 in (≈260 cm). Al instalar el
tubo de montaje de esta manera, el Quick Adjust
®
tendrá los siguientes 6 ajustes de altura del aro:
8 ft 0 po (≈244 cm), 8 ft 5 in (≈257 cm) (más bajo), 8 ft 10 in (≈269 cm), 9 ft 2 in (≈279 cm),
9 ft 7 in (≈292 cm) y 10 ft (≈305 cm) (más alto).