Do you have a question about the LSC Atom 24/48 and is the answer not in the manual?
How to record the current output as a Scene into the current page.
How to record the current output into the Grab master.
Steps to record a Chase in the current page, adding steps.
How to play back a recorded Chase or Scene by fading up the Submaster.
How to edit a chase to control its rate, fade, mode, and direction.
Actions associated with specific keys for controlling chases.
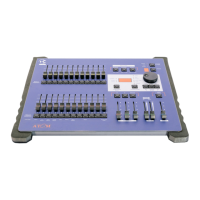
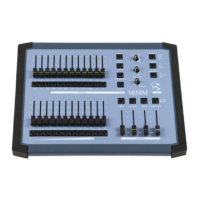
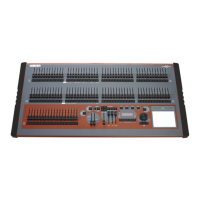
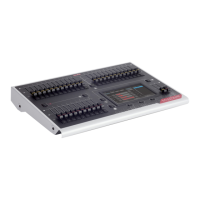
Lists the key features incorporated by the Atom lighting control desk.
Details optional features like floppy disk drive, VGA output, and desk lamp.
Provides essential precautions for maintaining and protecting the Atom desk.
Recommends methods for labeling fader areas to identify functions.
Describes the two models, Atom 12/24 and Atom 24/48, and their channel differences.
Explains the specific keystroke conventions used throughout the manual.
Discusses the Atom's software version, policy of improvement, and copyright.
Instructions for connecting the Atom to the mains power supply and setting voltage.
How to connect the DMX512 output to external equipment like dimmers.
How to connect a VGA monitor to the Atom for visual display.
Steps to power on the Atom and the initial startup procedure.
Controls the levels of channels 1 to 12 (or 24) using the Yellow fader bank.
Controls the overall level of the Yellow preset faders or the single wide preset.
Selects the operating mode for the Red preset faders: PRESET, WIDE Preset, or SCENE.
Faders with different functions depending on the selected MODE (PRESET, WIDE, SCENE).
Controls the overall level of Red preset faders in PRESET/SCENE modes.
Multi-purpose keys used for soloing, bumping, numeric entry, and secondary functions.
Used to solo or bump preset masters, with LED brightness indicating level.
Controls the overall level of the Grab master's contents (Grab, Scene, or Chase).
Solos the Grab master and performs the "GRAB" function with the RECORD key.
Control the fade times for Preset masters and the Grab master.
Sets the level for soloing channels, Submasters, or masters.
Toggles between ADD mode (soloing adds to output) and KILL mode (soloing kills other output).
Selects pages of memory for scenes/chases and previewing.
Displays the currently selected page number.
Records current output into a Scene or adds steps to a Chase.
Records a Chase or completes the recording of a Chase.
Copies scenes/chases or deletes steps in a chase.
Shows messages, prompts, and numbers, with LEDs defining the displayed information.
Enters Preview/Edit mode to review or edit channels, scenes, chases, or patch.
Accesses time settings, toggles functions, and selects secondary functions.
Rotatable wheel used for setting times, levels, and chase rates during recording or editing.
Indicates when the Edit Wheel is active and shows parameter variation.
Advances chases forward, increments dimmer numbers, and answers "YES".
Advances chases in reverse, decrements dimmer numbers, and answers "NO".
Stops a running chase or steps a stopped chase.
Instructions for performing a system or total reset on the Atom desk.
Guides on creating lighting looks, presetting, and crossfading between looks.
Detailed steps for recording a scene, including rapid and fade-time methods.
How to select Scene mode and replay recorded scenes using Submasters.
Step-by-step guide to recording a chase by adding individual steps.
How to replay chases in Scene mode and control their parameters.
Explains the two preset fader banks and the functions of the Red preset in different modes.
Details how to use two identical presets for creating and crossfading lighting looks.
Utilises both fader banks as a single manual preset of 24 (48) channels.
Red preset faders become Submasters for controlling scenes or chases.
Defines a Scene as recorded output with fade times, stored in battery-backed memory.
Explains methods for recording scenes, including rapid and detailed fade time settings.
How to replay scenes using Submasters in Scene mode or the Grab master.
How to preview and edit channel levels and fade times of recorded scenes.
Steps to copy a scene to another page/scene number or the Grab master.
Procedure for deleting a scene, including confirmation.
Defines a Chase as a list of steps replayed sequentially, stored in memory.
Detailed steps for recording a chase by adding individual steps.
Explains how to select pages of memory for recording or replaying chases.
How to set and adjust the rate (BPM) of a chase.
How to synchronise chase stepping to an audio input signal (Sound To Light).
How to record or set crossfade times between chase steps.
How to replay chases using Submasters or the Grab master.
How the overall level of a chase is controlled by its Submaster or Grab master.
Procedure for deleting a chase, including confirmation.
How to preview and edit chase steps, channel levels, and parameters.
Steps to insert a new step into an existing chase.
Steps to delete a specific step from a chase.
How to copy a chase to another page/chase number or the Grab master.
Describes the Grab master's multi-functionality as a Grab, Scene, or Chase master.
Explains how to "Grab" the Atom's current output to maintain it.
How to copy scenes to the Grab master to use it as a Scene master.
How to copy or record chases into the Grab master to use it as a Chase master.
Explains how SOLO/ASSIGN keys and Master SOLO keys control channels or masters.
How to select ADD or KILL mode to affect soloing behavior on the Atom.
Sets the percentage level for soloed channels and its effect on scenes.
Explains the fixed "1 to 1" patch and the programmable "Softpatch" feature.
How to enable or disable patch selection and choose between 1:1 and Softpatch.
Details the conditions and facilities for patching dimmers to channels.
Steps to select the Softpatch functionality on the Atom.
How to clear existing Softpatch settings to program a new patch.
Step-by-step guide to patching dimmer outputs to desk channels using Softpatch.
Procedure for deleting a specific patch connection between a dimmer and a channel.
How to preview the Softpatch to see channel-to-dimmer or dimmer-to-channel connections.
Provides instructions for system reset and total reset functions on the Atom.
How to invert the Yellow Preset master's operation using a DIP switch.
How to print memory contents to a serial printer or computer.
Steps for sending memory contents to a connected serial printer.
How to capture and save memory contents to a computer via serial port.
Recommendations for viewing and printing exported Atom data using a word processor.
Information on using VGA monitors, video terminals, or PCs for Atom output display.
Details on connecting and using a VGA monitor for dynamic displays and prompts.
How to connect and configure a video terminal or PC for TTY preview.
How to set the Atom for TTY preview and select the terminal type.
Information on the optional floppy disk drive for saving and loading shows.
Steps for formatting a disk to prepare it for saving Atom data.
Instructions for running diagnostic tests on keys, LEDs, faders, and the edit wheel.
Location and replacement procedure for the mains fuse.
Details on connecting a VGA monitor for visual displays and fade times.
Functions of the RS232C port for terminals, computers, and printers.
Connection for the optional desk lamp and its fuse.
Information on optional analogue outputs for controlling older dimmers.
Function of rear panel DIP switches for modes and softpatch selection.
Details on the audio input for synchronising chases to music.
Explains the DMX512 standard for digital control signals in lighting.
Lists the benefits and applications of using DMX512 control.
Methods for controlling analogue dimmers from the Atom using outputs or demultiplexers.
Describes optional analogue outputs for controlling analogue dimmers.
How demultiplexers convert DMX to analogue signals for analogue dimmers.
Illustrates typical setups using DMX512, including daisy-chaining and demultiplexers.
Details the pin configuration for the DB15 connector module for analogue outputs.
Details the pin configuration for the DB25 connector module for analogue outputs.
Details the pin configuration for the DIN 8 connector module for analogue outputs.
| Brand | LSC |
|---|---|
| Model | Atom 24/48 |
| Category | Lighting Equipment |
| Language | English |