Fig. 9
DOOR INSTALLATION
INSTALLATION OF LOWER PLATES AND WATERPROOF STRIPS
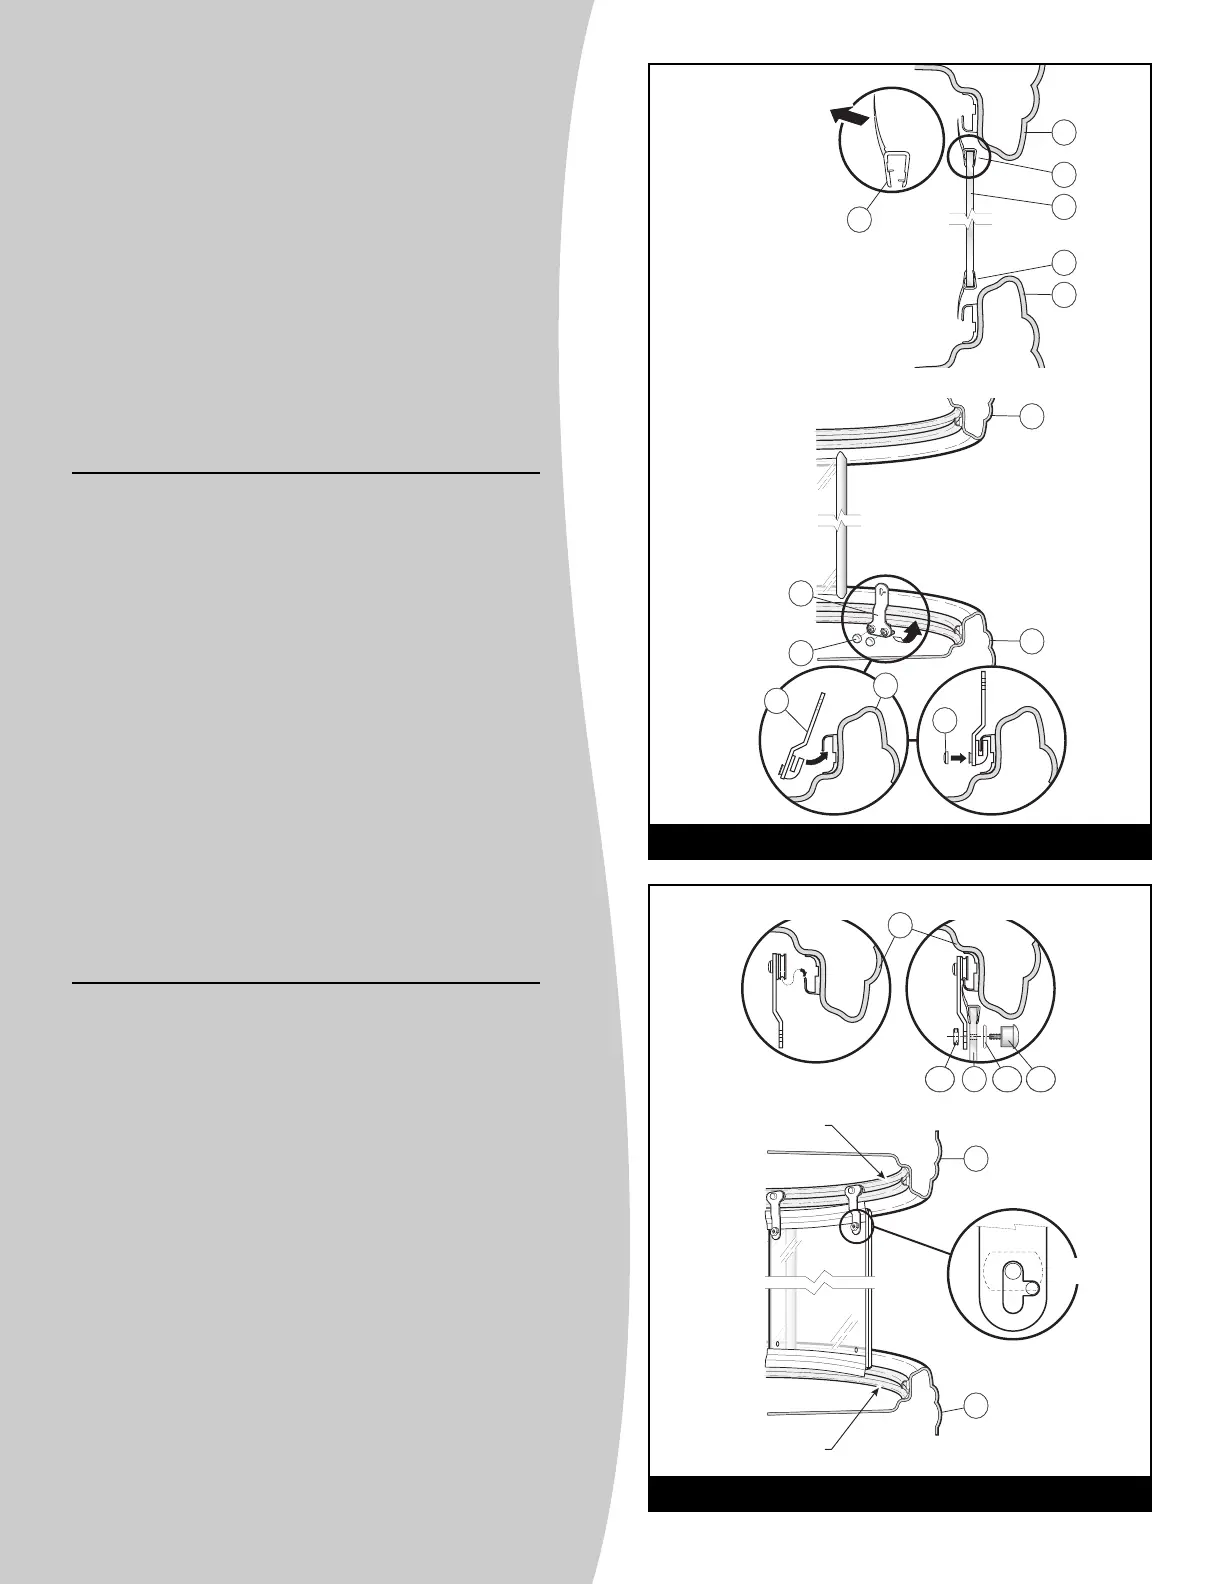
• Install a waterproof joint (14) on both ends of sliding
panel (12). The largest section of joint must be
installed towards the interior of door.
Fig. 8.1.
• Insert lower plates (17) into shower base (1). Snap on
screw caps (18).
Fig. 8.2.
INSTALLATION OF UPPER PLATES AND SLIDING PANEL
• Hang upper plates (16) to rail of roofcap (3). (Fig. 9.1)
• Bring sliding panel (12) into shower stall and place it on top
of lower rail, with door handle same side as faucet.
• Align holes on sliding panel with holes on upper plates
and tighten loosely. (
Fig. 9.2) Set sliding panel as high
as possible. (
Fig. 9.3)
• Insert washers (16d) and Allen screws (16e) into holes.
Tighten with nuts (16b). (
Fig. 9.2)
Important: see next step on how to proceed to adjust door.
INSTALLATION DE LA PORTE
INSTALLATION DES PLAQUETTES INFÉRIEURES ET
DES BANDES D
'ÉTANCHÉITÉ
• Installer un joint d'étanchéité (14) à chaque extrémité du
panneau mobile (12). La lèvre flexible du joint doit être du
côté intérieur de la porte. (
Fig. 8.1)
• Insérez les plaquettes du bas (17) dans le rail de la base
(1). Ajoutez les cache-vis (18).
Fig. 8.2.
I
NSTALLATION DES PLAQUETTES SUPÉRIEURES ET DU
PANNEAU MOBILE
• Suspendez les plaquettes supérieures (16) au rail du toit
(3). (
Fig. 9.1).
• Insérez le panneau mobile (12) à l'intérieur de la douche, en
le déposant sur le dessus du rail inférieur, la poignée du
même côté que la robinetterie.
• Alignez les trous du panneau mobile avec les trous des
plaquettes supérieures et serrez légèrement. (
Fig. 9.2) Placez
le panneau mobile en l'ajustant le plus haut possible. (
Fig. 9.3)
• Placez les rondelles (16d) et insérez les vis excentriques (16e)
dans les trous. Serrez avec les écrous (16b). (
Fig. 9.2)
Important : pour l'ajustement de la porte, voir l'étape suivante.
INSTALACIÓN DE LA MAMPARA
INSTALACIÓN DE LAS PLACAS INFERIORES Y DE LAS
BANDAS IMPERMEABLES
• Colocar una junta de impermeabilidad (14) sobre cada uno del
panel corredizo (10). El borde más ancho de la junta debe
colocarse por el lado interior de la puerta. (
Fig. 10.1)
• Inserte las placas de abajo (17) en el riel de la base (1).
Ponga los cubre-tornillos (18).
Fig. 8.2.
INSTALACIÓN DE LAS PLACAS SUPERIORES Y DEL
PANEL MÓVIL
• Suspenda las placas superiores (16) en el riel del techo
(3). (
Fig. 9.1)
• Inserte el panel móvil (12) en el interior de la ducha,
colocándolo encima del riel inferior la agarradera del
panel móvil debe estar del mismo lado de las llaves.
• Alinear los orificios del panel móvil con los hoyos de las placas
superiores y apretar ligeramente. (
Fig. 9.2). Coloque el panel
móvil ajustándolo lo más alto posible (
Fig. 9.3).
• Coloque las rondanas (16d) e inserte los tornillos
excéntricos (16e) en los hoyos y apriete con las tuercas
(16b) (
Fig. 9.2)
Importante : para el ajuste de la puerta, ver la etapa
siguiente.
12
 Loading...