12 ENGLISH
Indicating the remaining battery
capacity
Only for battery cartridges with the indicator
►Fig.3: 1. Indicator lamps 2.Checkbutton
Pressthecheckbuttononthebatterycartridgetoindi-
catetheremainingbatterycapacity.Theindicatorlamps
light up for a few seconds.
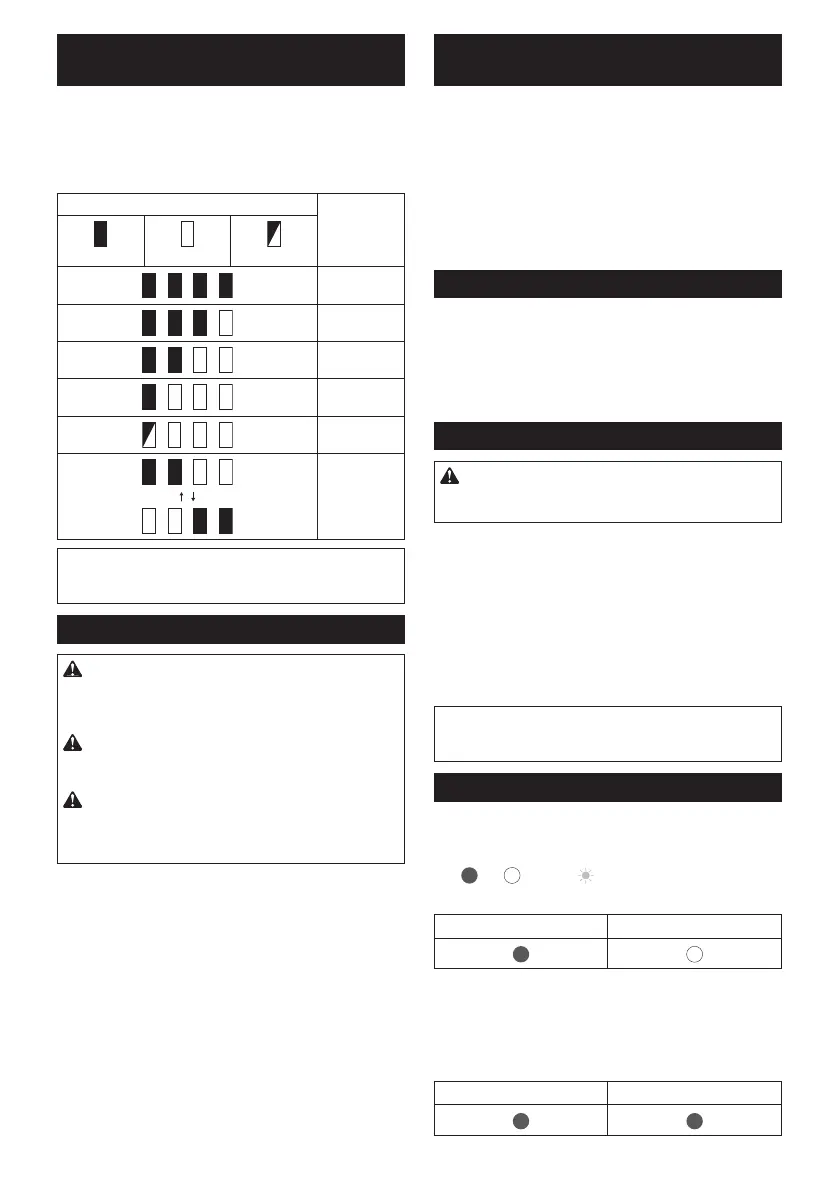
Indicator lamps Remaining
capacity
Lighted Off Blinking
75% to 100%
50% to 75%
25% to 50%
0% to 25%
Charge the
battery.
Thebattery
may have
malfunctioned.
NOTE: Depending on the conditions of use and the
ambienttemperature,theindicationmaydifferslightly
from the actual capacity.
Switch action
CAUTION: Before connecting the battery to
the shears, always check to see that the switch
trigger actuates properly and returns to the “OFF”
position when released.
CAUTION: When not operating the tool,
always make sure that the I/O switch is on the "O"
side.
CAUTION: Do not press the I/O switch to the
“I” (on) position while pulling the switch trigger.
Thebladeclosesslightlyanditmaycausepersonal
injury.
To turn on the tool, perform as follows:
1. Connecttheswitchbox,connectioncord,and
shears. (Refer to “Installing the connection cord”.)
2. Holdtheshearsrmly,andpresstheI/Oswitchto
the “I” (on) position. The green pilot lamp lights up.
►Fig.4: 1. I/O switch 2. Pilot lamp (green) 3. Pilot
lamp (red)
3. Theshearbladesarelocked-modewhentheI/O
switch is on. To release the lock, pull the switch trigger
twotimes.Theuppershearbladeopensautomatically.
4. Toclosetheshearblade,pulltheswitchtrigger.
►Fig.5: 1. Switch trigger
Auto locked-mode and shut-off
mode shift
For safety reasons, the tool shifts into locked-mode or
shut-off mode automatically if the tool is left untouched
for a certain period of time.
After 5 minutes: The tool shifts into locked-mode. Pull
the switch trigger two times to release the lock.
After 15 minutes: The tool is shift into shut-off mode,
and the green pilot lamp turns off. Press the I/O switch
to the “O” (off) position once, and press the I/O switch
to the “I” (on) position again, then pull the switch trigger
two times to release the lock.
Opening angle selector lever
►Fig.6: 1. Opening angle selector lever
By tilting the opening angle selector lever to the left
side,youcanopentheuppershearbladewider.
Tolimittheuppershearbladeopeningangle,rstpull
the switch trigger fully, and then return the opening
angle selector lever to straight position.
Cutting depth adjustment
CAUTION: Do not let your hands or part of
body close to the shear blades. Otherwise per-
sonal injury may result.
Aftersharpeningorreplacingtheshearblade,adjust
cutting depth if necessary.
Turn on the tool, and pull the switch trigger two times to
opentheshearblades,andthenpresstheI/Oswitchto
the “O” (off) position.
To deepen the cutting depth, turn the cutting depth
adjustingscrewclockwisewiththehexwrench.Andto
make the cutting depth shallower, turn the cutting depth
adjustingscrewcounterclockwise.
►Fig.7: 1.Cuttingdepthadjustingscrew
NOTE:Checkthecuttingdepthafteradjustment.If
thecuttingdepthistooshallow,thebranchmaynot
cut fully.
Pilot lamps on the switch box
►Fig.8: 1. I/O switch 2. Pilot lamp (green) 3. Pilot
lamp (red)
The green and red lamps indicate as follows:
(On:
Off: Blinking: )
• Green lamp lights up: the tool is turned on.
Green Red
•
Green lamp and red lamp light up: if you insert the
batterytothebatteryholderwhenI/Oswitchis“I”(on)
position,bothofthelampslightupandthebladedoes
not move though you pull the switch trigger. In this situ-
ation, press the I/O switch to the “O” (off) position once,
and press the I/O switch to the “I” (on) position again.
Green Red
 Loading...