648970 IT-EN-NO (18/06/2018)
MRT-X 2150 Privilege Plus ST3A S2 / MRT 2150 Privilege Plus ST4 S2 / MRT-X 2550 Privilege Plus ST3A S2 / MRT 2550 Privilege Plus ST4 S2
3-62
IT
EN
NO
E6 - Change the dry air filter cartridge
In case of use in very dusty environments,
reduce the cartridge replacement frequen-
cy (up to 250 hours in very dusty
environments).
Replace the cartridge in a clean environ-
ment and with the I.C. engine switched
off.
Never use the forklift truck with the cartri-
dge removed or damaged.
If the air filter clogging indicator lights up
, replace the cartridge in the
shortest possible time (maximum 1 hour).
Never use the forklift truck without the air
filter or with a damaged air filter.
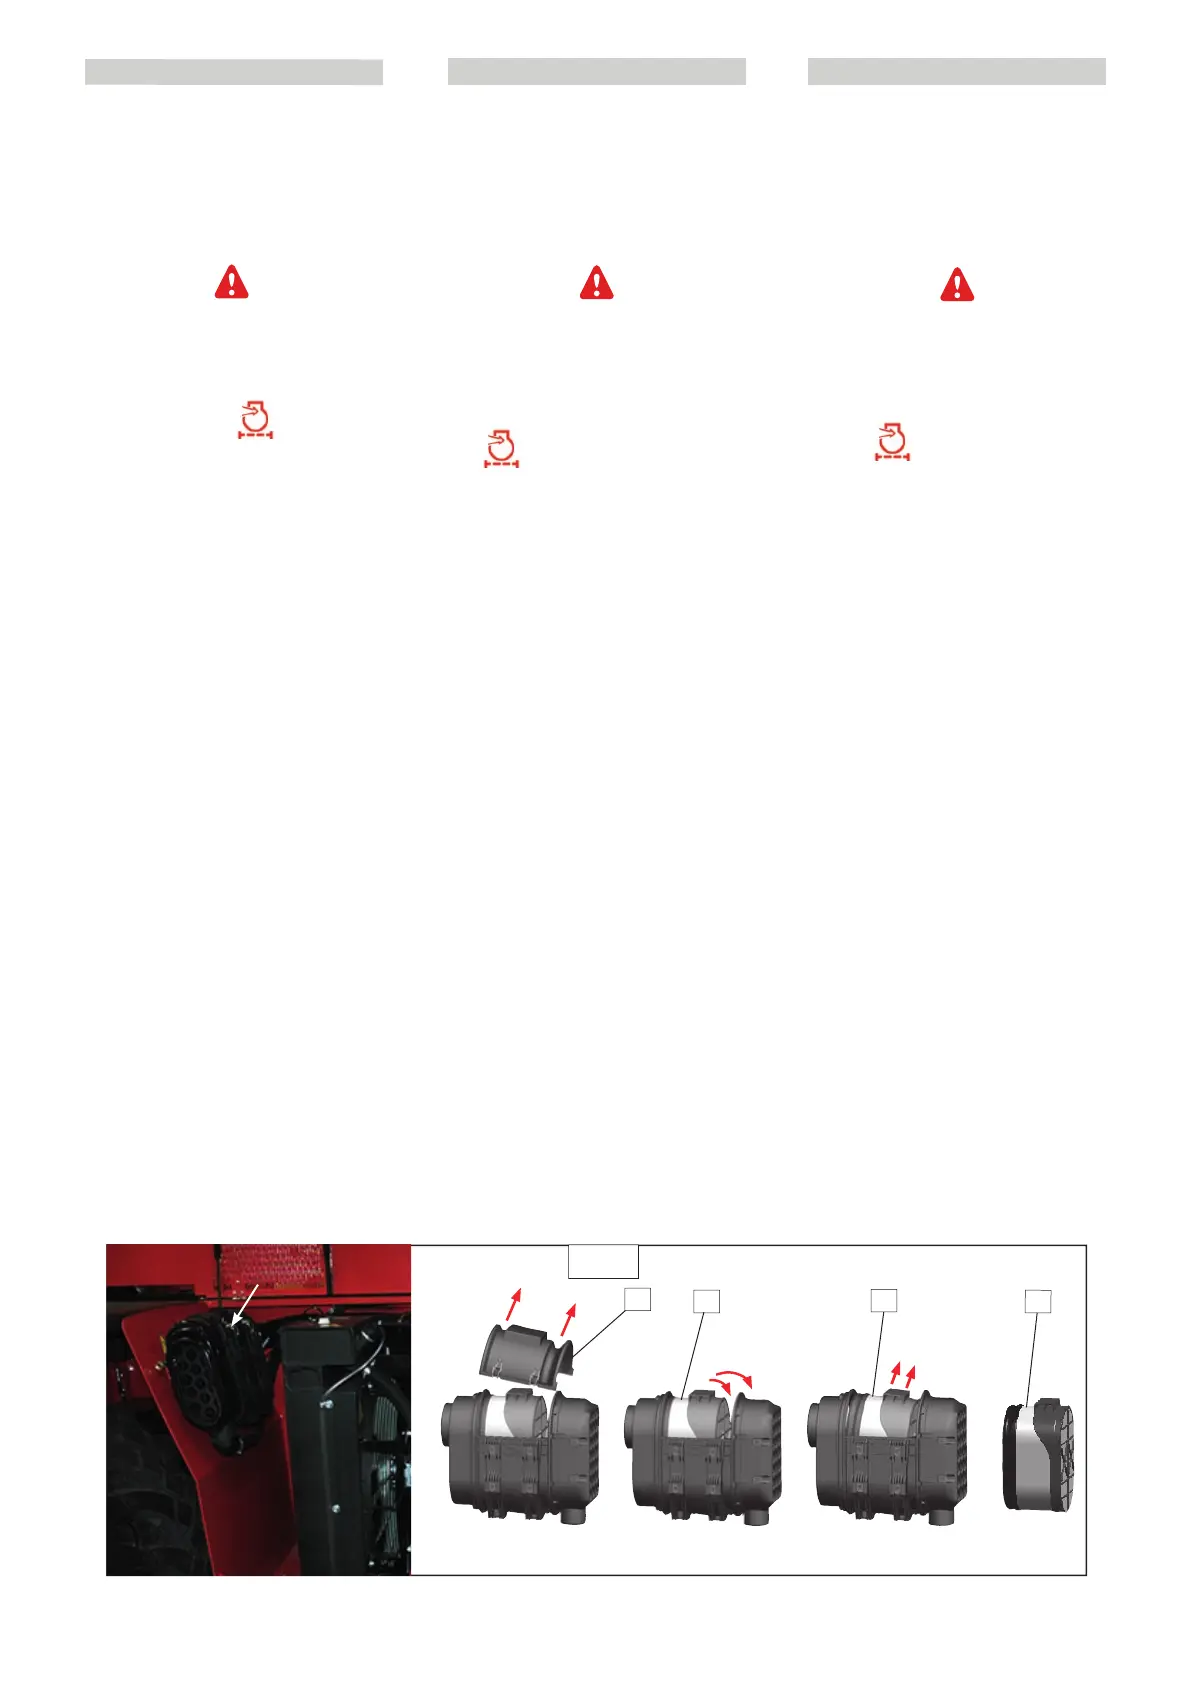
- Open the engine hood.
- Free the blocks and remove the cover “1”
(Fig. E1). Carefully rotate the cartridge “2”
(Fig. E1), forwards, to reduce dust leakage
as far as possible.
- Remove cartridge “3” (Fig. E1).
- Do not remove the safety cartridge.
- Carefully clean the following parts with a
wet clean cloth that does not leave lint.
- The inside of the filter and cover.
- The inside of the filter inlet piping.
- The seats of the gaskets in the filter and
cover.
- Check the state and fixing of the con-
necting pipe to the I.C. engine, and the
connection and the conditions of the filter
clogging indicator.
- Before the assembly, check the state of
the new filter cartridge “4” (Fig.E1) (see: 3
– MAINTENANCE: FILTER ELEMENTS AND
BELTS).
- Incline the cartridge forwards by about
5°, insert it in the filter and position it by
pressing on the edge of the cartridge and
not in the centre.
- Refit the cover and check to make sure
the clips are secured correctly. It must
be possible to install the cover easily; if
necessary, check the correct positioning
of the filter cartridge.
1
2
3
4
E6
E6 - Sostituire la cartuccia del filtro a
secco dell’aria
In caso di utilizzo in atmosfera molto
polverosa, gli intervalli di sostituzione della
cartuccia devono essere ridotti (fino a 250
ore in atmosfera molto polverosa).
Sostituire la cartuccia in un ambiente
pulito e con il motore termico spento.
Non utilizzare mai il carrello elevatore con
una cartuccia smontata o danneggiata.
Se la spia di intasamento del filtro
dell’aria si accende
, sostituire la
cartuccia nel più breve tempo possibile
(massimo 1 ora).
Non utilizzare mai il carrello elevatore
senza il filtro dell’aria, o con un filtro
dell’aria danneggiato.
- Aprire il cofano motore.
- Liberare i blocchi e togliere il coperchio
“1” (fig.E1).
- Ruotare con precauzione la cartuccia “2”
(fig.E6) in avanti, per ridurre al minimo la
fuoriuscita di polvere.
- Estrarre la cartuccia “3” (fig.E6).
- Non rimuovere la cartuccia di sicurezza.
- Pulire con cura le parti seguenti con uno
straccio umido, pulito e che non lasci
filacce.
- L’interno del filtro e del coperchio.
- L’interno della tubazione di entrata del
filtro.
- Le sedi delle guarnizioni nel filtro e nel
coperchio.
- Verificare lo stato e il fissaggio delle
tubazioni di raccordo al motore termico,
e il collegamento e le condizioni
dell’indicatore di intasamento del filtro.
- Prima del montaggio, controllare lo stato
della nuova cartuccia filtrante “4” (fig.E6)
(vedere: 3 - MANUTENZIONE: ELEMENTI
FILTRANTI E CINGHIE).
- Inclinare la cartuccia di circa 5° in avanti,
introdurla nel filtro e posizionarla
premendo sul bordo della cartuccia e non
al centro.
- Rimontare il coperchio e verificare
il corretto bloccaggio delle clip. Il
coperchio deve essere installabile senza
difficoltà, altrimenti controllare il corretto
posizionamento delle cartucce nel filtro.
E6 - Skifte patron i tørt luftfilter
Om den brukes i et veldig støvete miljø
må perioden før skifte av innsats reduseres
(opp til 250 timer i veldig støvete
omgivelser).
Skift ut filterinnsatsen på et rent sted og
med termomotoren stanset.
Ikke bruk gaffeltrucken uten patron eller
med en skadet patron.
Hvis kontrollampen for tilstoppet luftfilter
tennes
, skift ut patronen så snart
som mulig (maks. 1 time).
Bruk aldri trucken uten luftfilter eller med
et skadet luftfilter.
- Åpne motorpanseret.
- Løsne låsemekanismene og fjern dekselet
“1” (fig.E1).
- Drei patronen “2” (fig.E6) forsiktig forover
for å hindre at det kommer for mye støv
ut.
- Ta ut patronen “3” (fig.E6).
- Ikke ta ut sikkerhetspatronen.
- Følgende deler må rengjøres grundig med
en fuktig, ren fille som ikke loer.
- Innsiden av filter og lokket.
- Innsiden av filterets inntaksslange.
- Pakningsflatene på filteret og på lokket.
- Kontroller at forbindelsesrør til
termomotoren er i god stand og godt
festet, og koblingen og tilstanden på
indikatoren for tilstopping av filter.
- Før montering må du kontrollere tilstanden
på den nye filterpatronen “4” (fig.E6) (se:
3 - VEDLIKEHOLD: FILTERELEMENTER OG
REIMER).
- Vipp patronen cirka 5° forover, sett den inn
i filteret og plasser den ved å presse på
kanten og ikke midt på.
- Sett lokket på igjen og pass på at klipsene
er låst. Dekselet må være enkelt å løfte,
ellers må det sjekkes at innsatsene sitter
riktig i filteret.
 Loading...