3-60
IT
EN
648870 IT-EN-PL (04/05/2015)
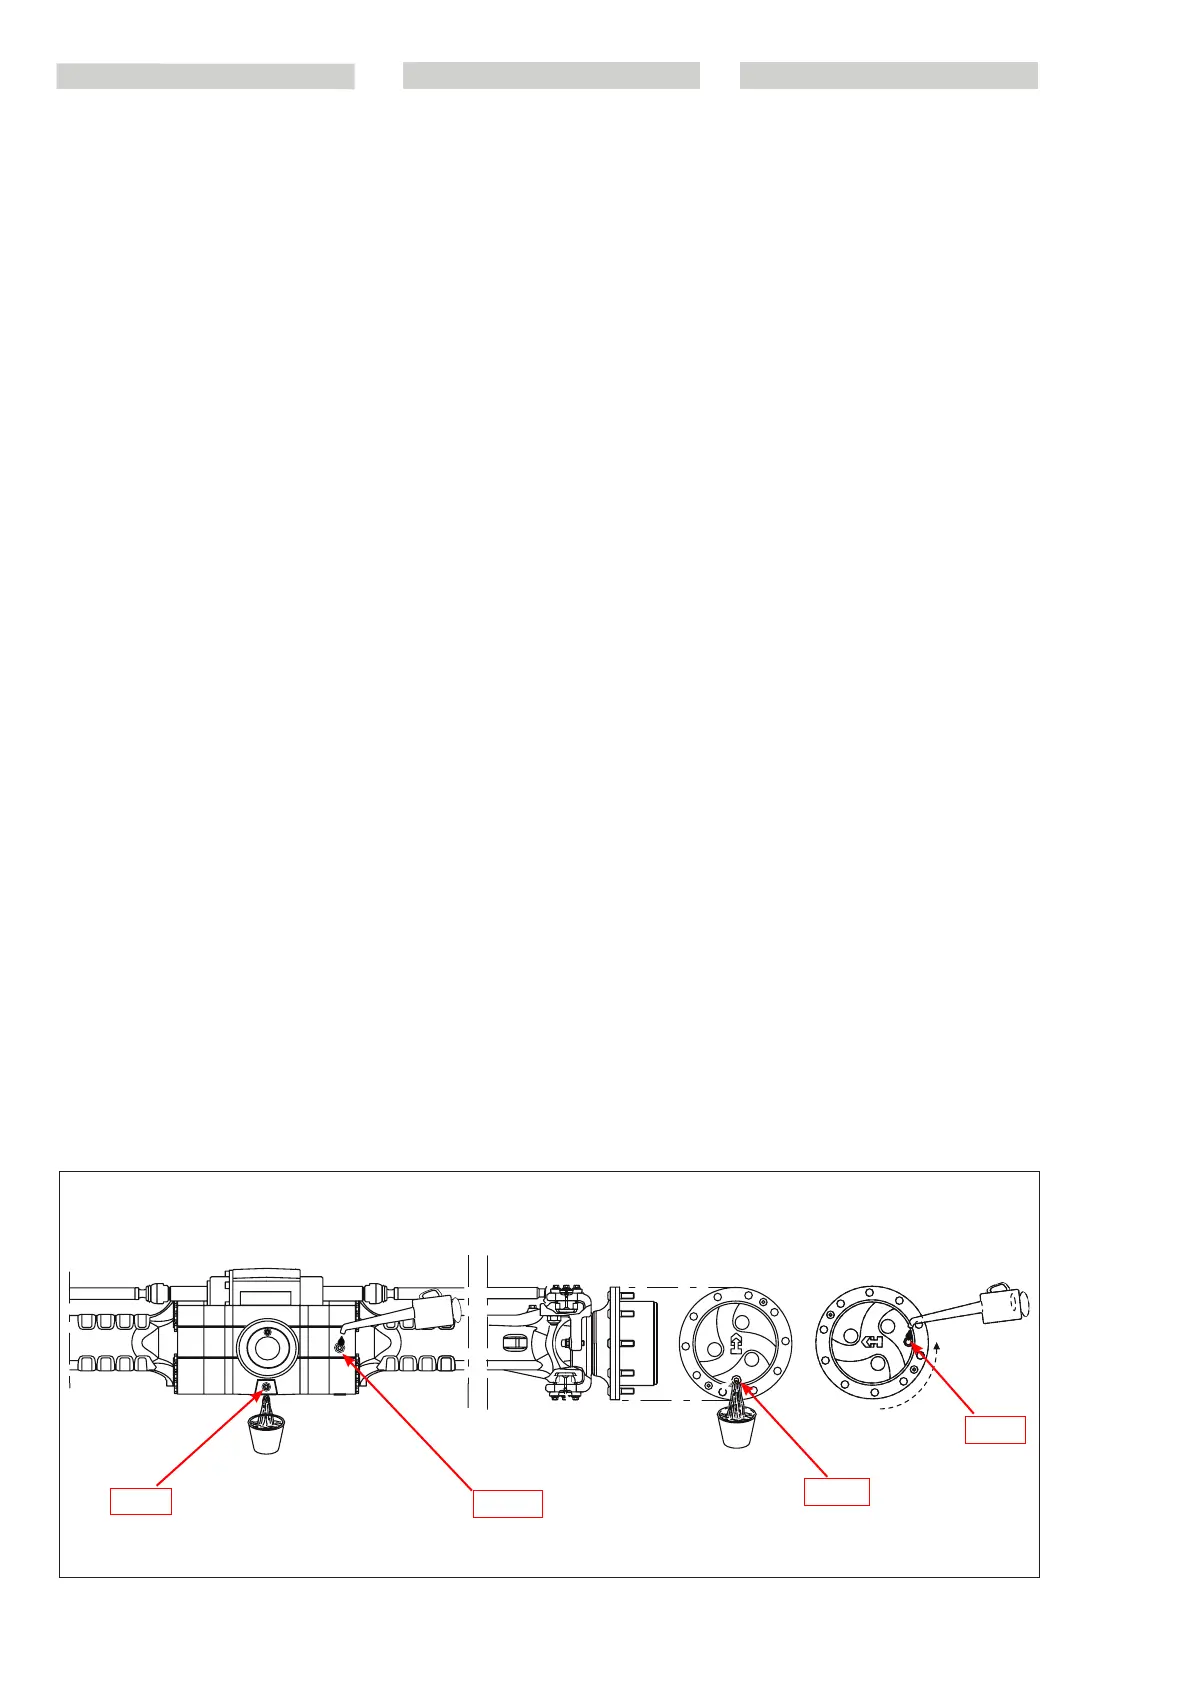
E3 - Change front and rear axle
differential oil
Position the forklift truck on a level surface,
with the engine switched off and the diffe-
rential oil still hot.
Place a container under the drainage plug
(E3/1) and let the oil flow out. Remove the
level and filler plug (E3/2) to ensure the oil
is drained out completely. Fit and tighten
the plug (E3/1).
Fill oil through the filler hole (E3/2).
The level is correct when the oil reaches the
level hole (E3/2).
Check for leakage from the drainage plugs.
Fit and tighten the level and filler plug
(E3/2).
Repeat the operation for the front and rear
differential.
E4 – Change the front and rear wheels
gear oil
Position the forklift truck on a level surface,
with the engine switched off and the gear
oil still hot.
Make sure the drainage and level plug
(E4/1) faces downwards to allow the oil to
drain out easily.
Place a container (E4/1) under the drainage
plug and unscrew the plug.
Let all the oil drain out.
Bring the outlet hole to the horizontal posi-
tion to check the oil level.
Fill oil (E4/2) through level hole
1 (fig. E4). The level is correct when the oil
reaches the hole 1 (fig.E4).
Refit drainage plug 1 (fig.E4) and tighten it.
Repeat this operation for each gear.
E3/2
E3/1
E4/1
E4/2
E3 - Sostituire olio differenziale assale
anteriore e posteriore
Posizionare il carrello su di una superficie
orizzontale con il motore fermo e l’olio del
differenziale ancora caldo.
Porre una recipiente sotto il tappo di svuo-
tamento (E3/1) e lasciare defluire l’olio.
Togliere il tappo di livello e carico (E3/2)
per assicurare uno svuotamento completo.
Montare e serrare i tappi (E3/1). Caricare
l’olio attraverso il foro di carico (E3/2).
Il livello è corretto quando l’olio affiora al
foro di livello (E3/2).
Controllare eventuali perdite dai tappi di
scarico.
Montare e serrare il tappo di livello e carico
(E3/2).
Effettuare la stessa operazione per il diffe-
renziale anteriore e posteriore.
E4 - Sostituire olio riduttore ruote ante-
riore e posteriore
Posizionare il carrello su di una superficie
piana, con il motore fermo e l’olio dei ridut-
tori ancora caldo.
Accertarsi che il tappo di scarico e livello
(E4/1) sia orientato verso il basso per far
defluire meglio l’olio.
Collocare un recipiente (E4/1) sotto il tappo
di scarico e svitarlo. Lasciare defluire tutto
l’olio. Portare il foro d’uscita in posizione
orizzontale, per poter controllare successi-
vamente il livello di olio.
Metter l’olio (E4/2) (vedere
“LUBRIFICANTI”) attraverso il foro di livello
1 (fig. E4). Il livello è corretto quando l’olio
affiora dal foro 1 (fig.E4).
Rimettere il tappo di svuotamento 1 (fig.E4)
e serrarlo. Ripetere questa
operazione per ciascun riduttore.
PL
E3 - Wymienić olej mechanizmu różni-
cowego osi przedniej i tylnej
Na poziomej powierzchni ustawić wózek
z zatrzymanym silnikiem i jeszcze ciepłym
olejem mechanizmu różnicowego.
Pod korkiem spustowym (E3/1) umieścić
pojemnik i spuścić olej. Wyjąć korek kon-
troli poziomu i napełniania (E3/2) w celu
zapewnienia dokładnego opróżnienia.
Założyć i dokręcić korki (E3/1). Wlać olej
przez otwór wlewowy (E3/2).
Poziom jest prawidłowy, kiedy olej dochod-
zi do krawędzi otworu kontroli poziomu
(E3/2).
Sprawdzić ewentualne wycieki spod
korków spustowych.
Założyć i dokręcić korek kontroli poziomu i
wlewu (E3/2).
Wykonać tę operacje dla przedniego i tyl-
nego mechanizmu różnicowego.
E4 - Wymienić olej zwolnicy kół przed-
nich i tylnych
Ustawić wózek na równym podłożu z
zatrzymanym silnikiem i jeszcze ciepłym
olejem zwolnic.
Upewnić się, czy korek spustu i kontroli
poziomu (E4/1) jest skierowany w dół, aby
olej mógł łatwiej spływać.
Pod korkiem spustowym umieścić pojem-
nik (E4/1) i odkręcić korek. Pozwolić, aby
spłynął cały olej. Ustawić otwór wylotowy
w pozycji poziomej, aby móc następnie
sprawdzić poziom oleju.
Wlać olej (E4/2) (patrz “ŚRODKI SMARNE”)
przez otwór kontroli poziomu 1 (rys. E4).
Poziom jest prawidłowy, kiedy olej dochod-
zi do krawędzi otworu 1 (rys.E4).
Wkręcić korek spustowy 1 (rys. E4) i dokrę-
cić go. Powtórzyć tę
operację dla każdej zwolnicy.
648870 IT-EN-PL (04/05/2015)