3-62
IT
EN
648870 IT-EN-PL (04/05/2015)
E6 - Change the dry air filter cartridge
In case of use in very dusty environments,
reduce the cartridge replacement frequen-
cy (up to 250 hours in very dusty
environments).
Replace the cartridge in a clean environ-
ment and with the I.C. engine switched
off.
Never use the forklift truck with the
cartridge removed or damaged.
If the air filter clogging indicator lights up
, replace the cartridge in the
shortest possible time (maximum 1 hour).
Never use the forklift truck without the air
filter or with a damaged air filter.
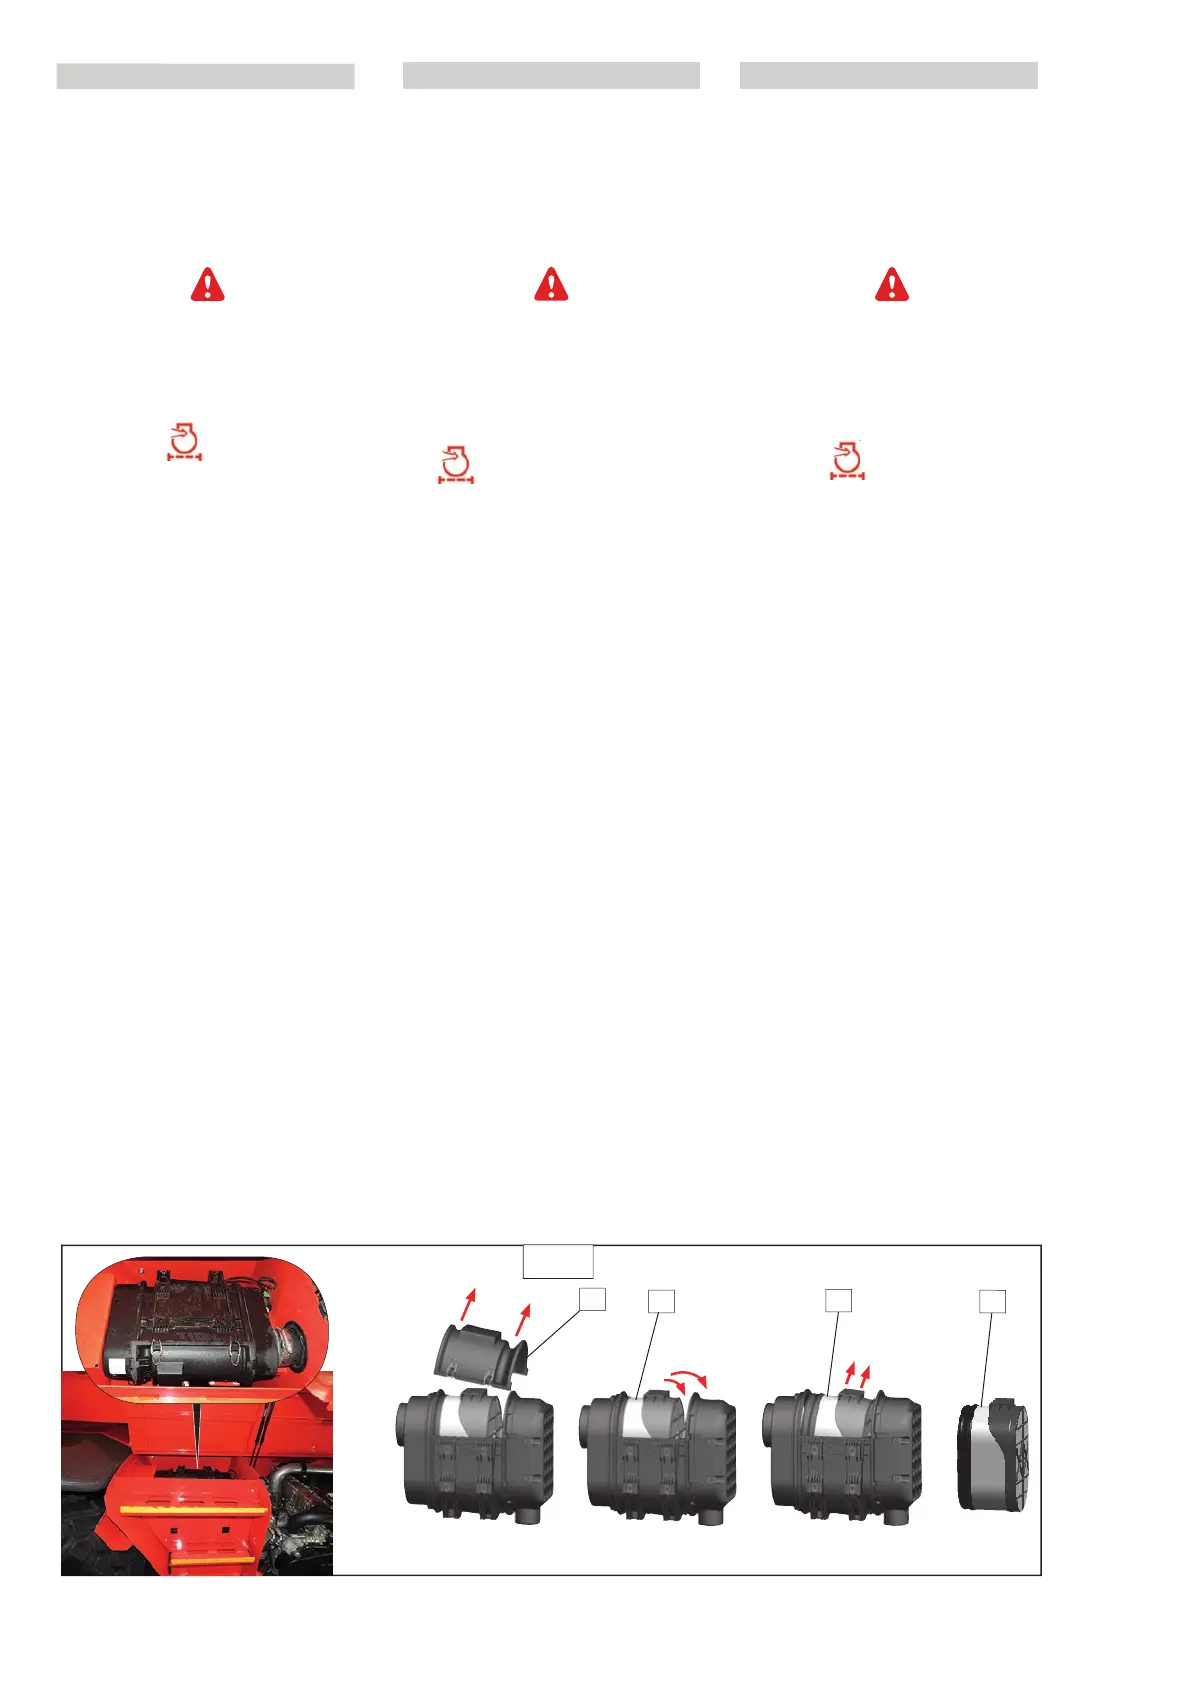
- Open the engine hood.
- Free the blocks and remove the cover “1”
(Fig. E1). Carefully rotate the cartridge “2”
(Fig. E6), forwards, to reduce dust leakage
as far as possible.
- Remove cartridge “3” (Fig. E6).
- Do not remove the safety cartridge.
- Carefully clean the following parts with a
wet clean cloth that does not leave lint.
- The inside of the filter and cover.
- The inside of the filter inlet piping.
- The seats of the gaskets in the filter and
cover.
- Check the state and fixing of the con-
necting pipe to the I.C. engine, and the
connection and the conditions of the filter
clogging indicator.
- Before the assembly, check the state of
the new filter cartridge “4” (Fig.E1) (see:
3 – MAINTENANCE: FILTER ELEMENTS AND
BELTS).
- Incline the cartridge forwards by about
5°, insert it in the filter and position it by
pressing on the edge of the cartridge and
not in the centre.
- Refit the cover and check to make sure
the clips are secured correctly. It must
be possible to install the cover easily; if
necessary, check the correct positioning
of the filter cartridge.
1
2
3
4
E6
E6 - Sostituire la cartuccia del filtro a
secco dell’aria
In caso di utilizzo in atmosfera molto pol-
verosa, gli intervalli di sostituzione della
cartuccia devono essere ridotti (fino a 250
ore in atmosfera molto polverosa).
Sostituire la cartuccia in un ambiente
pulito e con il motore termico spento.
Non utilizzare mai il carrello elevatore con
una cartuccia smontata o danneggiata.
Se la spia di intasamento del filtro dell’a-
ria si accende
, sostituire la cartuc-
cia nel più breve tempo possibile
(massimo 1 ora).
Non utilizzare mai il carrello elevatore
senza il filtro dell’aria, o con un filtro del-
l’aria danneggiato.
- Aprire il cofano motore.
- Liberare i blocchi e togliere il coperchio
“1” (fig.E1).
- Ruotare con precauzione la cartuccia “2”
(fig.E6) in avanti, per ridurre al minimo la
fuoriuscita di polvere.
- Estrarre la cartuccia “3” (fig.E6).
- Non rimuovere la cartuccia di sicurezza.
- Pulire con cura le parti seguenti con uno
straccio umido, pulito e che non lasci
filacce.
- L’interno del filtro e del coperchio.
- L’interno della tubazione di entrata del
filtro.
- Le sedi delle guarnizioni nel filtro e nel
coperchio.
- Verificare lo stato e il fissaggio delle tubazi-
oni di raccordo al motore termico, e il col-
legamento e le condizioni dell’indicatore
di intasamento del filtro.
- Prima del montaggio, controllare lo stato
della nuova cartuccia filtrante “4” (fig.E6)
(vedere: 3 - MANUTENZIONE: ELEMENTI
FILTRANTI E CINGHIE) .
- Inclinare la cartuccia di circa 5° in avanti,
introdurla nel filtro e posizionarla pre-
mendo sul bordo della cartuccia e non
al centro.
- Rimontare il coperchio e verificare il cor-
retto bloccaggio delle clip. Il coperchio
deve essere installabile senza difficoltà,
altrimenti controllare il corretto posiziona-
mento delle cartucce nel filtro.
PL
E6 - Wymienić wkład suchego filtra
powietrza
W przypadku użytkowania w bardzo zapy-
lonej atmosferze należy zwiększyć częstot-
liwość wymiany (do 250 godzin w bardzo
zapylonej atmosferze).
Wymieniać wkład w miejscu czystym i
przy wyłączonym silniku.
Nigdy nie używać wózka podnośnikowe-
go z wymontowanym lub uszkodzonym
wkładem filtra.
Jeśli zaświeci się kontrolka zatkania filtra
powietrza
Jeśli zaświeci się kontrolka zatkania filtra
, jak najszybciej wymie-
nić wkład
(maksimum 1 godzina).
Nigdy nie używać wózka podnośnikowego
bez filtra powietrza lub z uszkodzonym
filtrem powietrza.
- Otworzyć pokrywę silnika.
- Zwolnić blokady i zdjąć pokrywę 1 (rys.
E1).
- Obracać ostrożnie wkład 2 (rys. E6)
wysuwając go do przodu i starając się,
aby nie wysypać z niego kurzu.
- Wyjąć wkład “3” (rys. E6).
- Pozostawić wkład bezpieczeństwa na
miejscu.
- Wyczyścić starannie niżej wymienione
części wilgotną, niepozostawiającą włó-
kien szmatką.
- Wnętrze i pokrywę filtra.
- Wnętrze przewodu wlotowego filtra.
- Gniazda uszczelek w filtrze i pokrywie.
- Sprawdzić stan i zamocowanie prze-
wodów rurowych podłączonych do silni-
ka spalinowego a także podłączenie i stan
wskaźnika zatkania filtra.
- Przed zamontowaniem sprawdzić stan
nowego wkładu filtra „4” (rys. E6) (patrz:
3 - KONSERWACJA: WKŁADY FILTRÓW I
PASY).
- Nachylić wkład pod kątem około 5° do
przodu, wsunąć go w filtr i ustawić nacis-
kając na obrzeże wkładu a nie na środek.
- Założyć pokrywę i sprawdzić prawidłowe
zablokowanie zacisków. Pokrywa powin-
na dać się zamontować bez problemów.
Jeżeli tak nie jest, sprawdzić prawidłowe
ułożenie wkładów w filtrze.
648870 IT-EN-PL (04/05/2015)