IM 1068 / Page 5 of 32
Wall Box 007–012 64 89 102 127 152 178 203 229 254
“B” Dimension 019 64 89 114 140 165 191 216 241 267
007–012 267 292 305 330 356 381 406 432 457
Overall Length
019 298 324 349 375 400 425 451 476 502
Wall Box 007–012 2
1
⁄
2
3
1
⁄
2
4 5 6 7 8 9 10
“B” Dimension 019 2
1
⁄
2
3
1
⁄
2
4
1
⁄
2
5
1
⁄
2
6
1
⁄
2
7
1
⁄
2
8
1
⁄
2
9
1
⁄
2
10
1
⁄
2
007–012 10
1
⁄
2
11
1
⁄
2
12 13 14 15 16 17 18
Overall Length
019 11
3
⁄
4
12
3
⁄
4
13
3
⁄
4
14
3
⁄
4
15
3
⁄
4
16
3
⁄
4
17
3
⁄
4
18
3
⁄
4
19
3
⁄
4
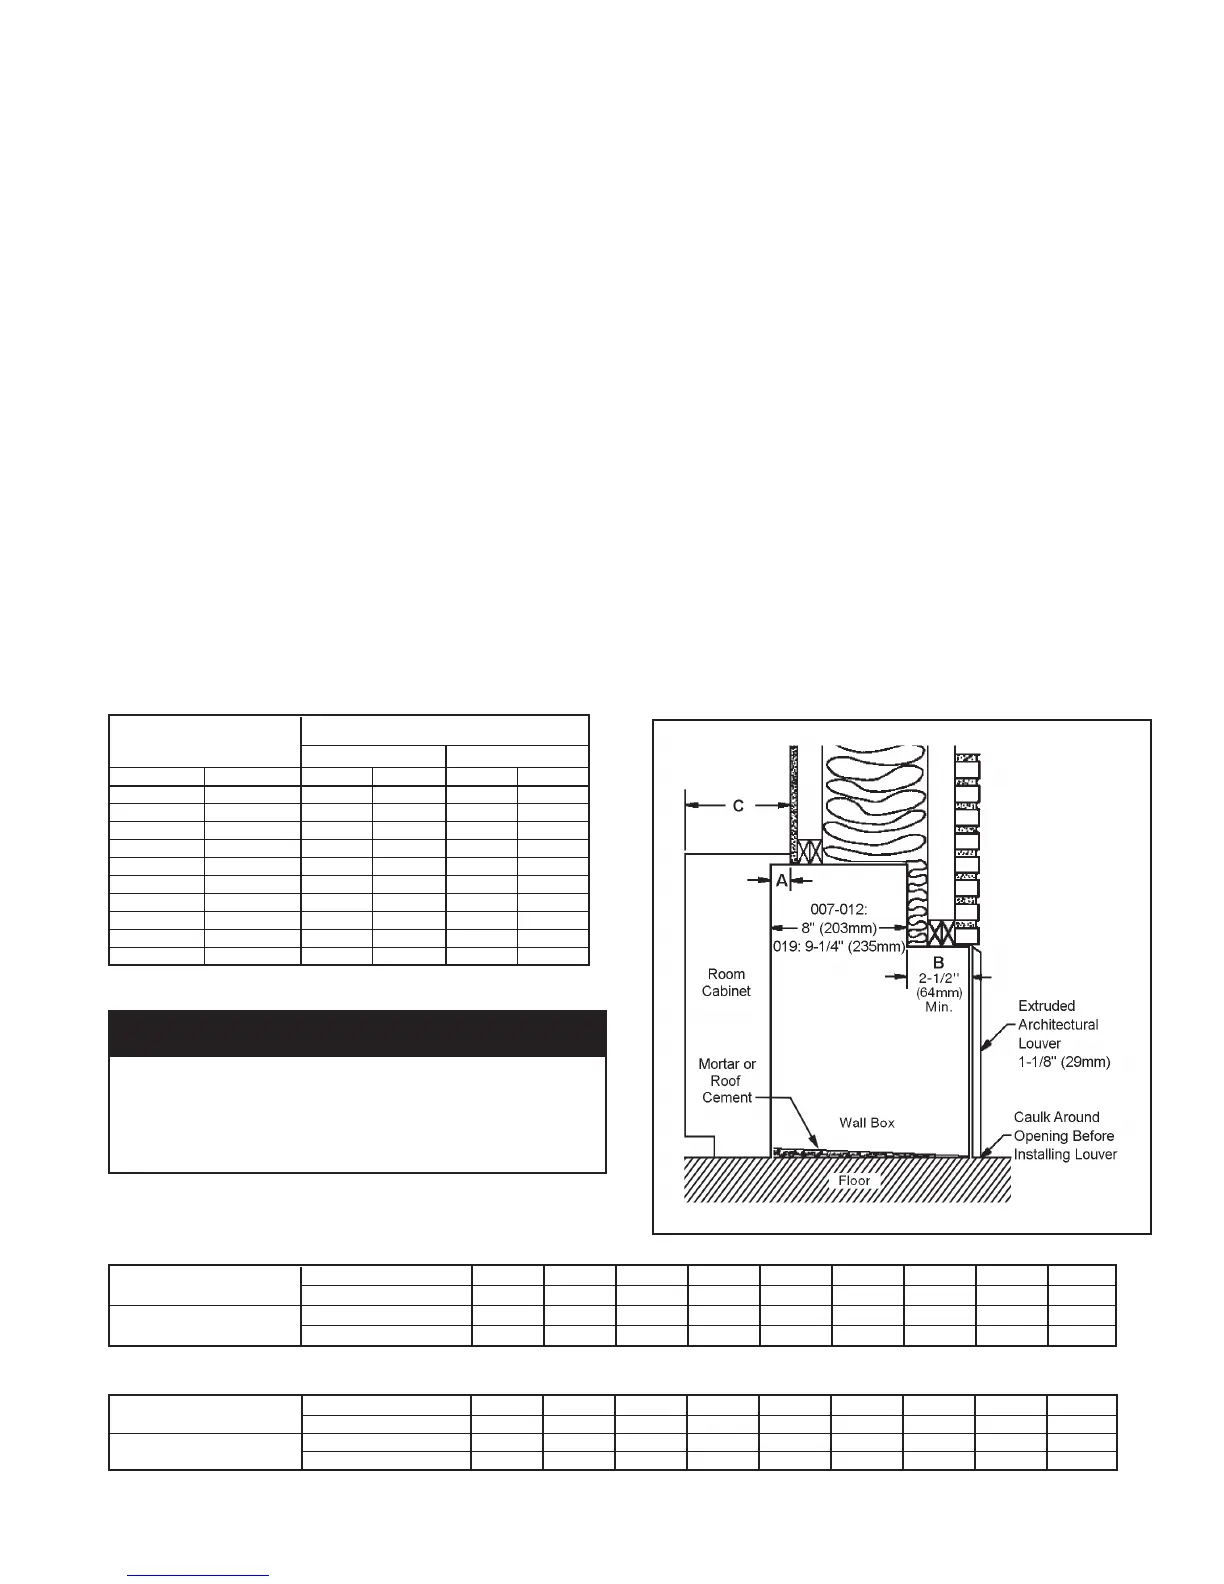
Dimension “C” – Cabinet Depth
Dimension “A”
007–012 019
in. mm in. mm in. mm
0 to -1 0 to -25 8
1
⁄
4
210 — —
0 to +1 0 to +25 9
1
⁄
4
235 8
1
⁄
2
216
1 to 2 25 to 51 10
1
⁄
4
260 9
1
⁄
2
241
2 to 3 51 to 76 11
1
⁄
4
286 10
1
⁄
2
267
3 to 4 76 to 102 12
1
⁄
4
311 11
1
⁄
2
292
4 to 5 102 to 127 13
1
⁄
4
327 12
1
⁄
2
318
5 to 6 127 to 152 14
1
⁄
4
362 13
1
⁄
2
343
6 to 7 152 to 178 15
1
⁄
4
387 14
1
⁄
2
368
7 to 8 178 to 203 16
1
⁄
4
413 15
1
⁄
2
394
8 to 9 203 to 229 17
1
⁄
4
438 16
1
⁄
2
419
Dimension “B” will vary by the thickness of the wall, the louver, the amount
the louver is recessed into the wall (if any) and the amount the wall box extends
into the room. The minimum “B” dimension is 2
1
⁄
2
'' (64mm). The wall box can
be factory furnished in increments between 2
1
⁄
2
'' (64mm) and 10'' (254mm).
Wall box extensions in 1'' (25mm) increments can also be provided to attach
to the rear of the wall box.
Figure 3: Wall Box End View (Drawing Not To Scale)
Table 2: Wall Box Dimensions
Dimensions — inches
Table 3: Wall Box “B” Dimension
Dimensions — mm
NOTICE
Wall Box Installation
The wall thickness will determine how much, if any, of the
wall box will protrude into the room. Figure 3 shows a typical
installation in a frame and brick wall. These instructions will
vary by depth of wall, but not by wall material. Do not
remove the weather panel at any time during the installation
of the wall box. Premature removal of this panel could
result in improper leveling or sealing. Install the wall box as
follows:
1. If the wall opening has not been made, cut and break
through using care to leave interior and exterior surfaces
undamaged. See wall opening requirements on page 4 for
proper size.
2. Install lintels as shown on the plans and specications.
3. If the wall opening has already been made, measure it to
be certain it has adequate clearance for the wall box. Be
sure to allow extra clearance for insulation around the
wall box to reduce sound and heat transfer. Continue with
step #4.
4. Apply a layer of mortar or roong cement to the bottom
surface of the opening (see Figure 3).
5. Place 2'' (51mm) berglass batt or 1" (25mm) Styrofoam
insulation around the top and sides of the wall box.
6. Locate the wall box in the wall opening with the weather
panel to the outside. Use the top edge of the wall box for
horizontal leveling. The wall box must also be vertically
plumb. Shim the wall box to accomplish this. Recess so
louver is ush with outside wall.
7. Drill four (4) holes in the sides of the wall box and attach
it to the walls securely using appropriate fasteners.
Note: Never drill through bottom of wall box.
8. If face brick is being installed, continue coursing up the
wall until the wall box is completely surrounded and
becomes an integral part of the wall.
9. Caulk interior and exterior perimeter weather tight where
the box meets the wall. Use a non hardening, waterproof
caulk such as silicone.
Note: For rooms with thick carpet, wall box should be
installed 1/2'' (13mm) above concrete oor to facilitate
future chassis installation and removal.
 Loading...