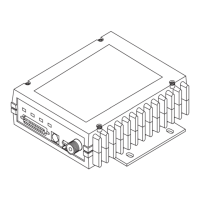
12 MDS 4710B/9710B I/O Guide MDS 05-3316A01, Rev. E
3.0 OPERATION
This section contains procedures and information regarding the setup
and configuration of the transceiver.
3.1 Initial Start-up
If all parameters are correctly set, operation of the radio can be started
by following these steps:
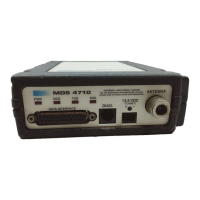
1. Apply DC power to the transceiver.
2. Observe the LED status panel for the proper indications (Table 6).
15 OUT Remote RTU Reset. This line can be used to reset an RTU
from a command issued remotely with MDS InSite software.
See “Remote RTU Reset” on page 14 for additional information.
This pin can be toggled remotely, using InSite software or
locally using the radio configuration software. The required
signal levels are either a nominal +10 Vdc or –10 Vdc and the
signal source must be capable of supplying 20 ma.
16 -- PTT
—Push to Talk. This line is used to key the radio with an
active-low signal of 0 Vdc.
17 -- Do not connect—Reserved for future use.
18 IN/OUT Accessory Power. Unregulated Input/Output. Provides a
source of input power for low current accessories. Excessive
drain on this connection will trip self-resetting fuse F1 on the
transceiver PC board. The voltage at this pin will match the input
voltage to the transceiver.
19 OUT 9.9 Vdc Regulated Output. Provides a source of regulated
voltage at 100 mA for low power accessories.
20 -- Do not connect—Reserved for future use.
21 OUT RSSI—Received Signal Strength Indication. A DC voltmeter
may be connected to this pin to read the relative strength of the
incoming signal. Figure 9 is a chart showing RSSI vs. DC
voltage.
22 -- Do not connect—Reserved for future use.
23 IN Diagnostic Channel Enable. A ground on this pin causes the
radio’s microcontroller to open the DB-25 DATA INTERFACE
for diagnostics and control instead of the normal RJ-11
diagnostics connection.
24 -- Do not connect—Reserved for future use.
25 OUT Alarm. A logic low (less than 0.5 volts) on this pin indicates
normal operation. A logic high (greater than 4 volts) indicates
that some alarm condition is present. This pin can be used as
an alarm output, provided the internal series resistance of 1 kΩ
is considered.
Table 5. Data interface connector pinouts (Continued)
Pin
Number
Input/
Output Pin Description