MVR/MVRPRO-UG01-EN-200727
<10>
MVR / MVR Pro User Guide - English
MVR Pro only
The integrated touchscreen monitor
serves to operate MVR Pro and for
easy access to settings.
Touchscreen Monitor
The touchscreen position
can be changed by
pressing the release button
on the left side.
Front Panel
The unit is for exclusive interconnection with IEC60601 certied equipment in the patient environment and IEC60XXX
certied equipment outside of the patient environment.
A certied power supply cord set must be used with this equipment. The relevant national installation and/or equipment regulations
shall be considered. The power supply cord shall be not less robust than an ordinary tough rubber-sheathed exible cord according
to IEC 60245 (designation 53) or ordinary polyvinyl chloride sheathed exible cord according to IEC 60227 (designation 53).
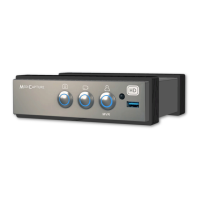
Front Panel
Capture Photo button
Captures the image on the
monitor to storage(s).
New Patient button
Press before each patient study. Opens a
new folder / new study to store the patient’s
images and videos. End of study. Closes the
active recording study.
USB Drive Connector
Connect a USB drive here.
Images and videos are
captured to the drive.
Record Video button
Records video clips of
what is displayed on
monitor. Press once to start
recording and again to stop.
IR Receiver
Light Rings
Flash blue when ready for recording or when a new study can be created.
Blue LED light ring indicates which function is available at the moment.
USB
WiFi / BT WiFi
PC
HDMI out
Input 1 (4K / HD)
Input 2 (HD)
H/SRemote
LAN
Back Panel MVR / MVR Pro
Footswitch /
Remote cable
Headset /
Microphone
USB connectors (2)
for optional accessories.
PC connector
(USB type-C)
Service interface and for
external control (RS-232).
Equipotential
Pole
HDMI Output
for connection to
an HD monitor or
optional touchscreen.
Antenna connector 1
for Bluetooth and Wi-Fi.
Wired Network
connection (LAN)
HDMI Input 1
for an HD camera
with HDMI connector
(DVI with adapter).
HDMI Input 2
for an HD camera with
HDMI connector
(DVI with adapter).
Power connector
Use supplied power cable to
connect 100V-240V outlet.
l=On
(connection to
power supply,
mains)
O=Off
(no connection
to power supply,
mains)
Power Switch
Antenna connector 2
2nd antenna for Wi-Fi.