EasyManua.ls Logo

Metra Electronics 99-7804B User Manual

Metra Electronics 99-7804B
10 pages
To Next Page IconTo Next Page
Page #1 background imageLoading...
Page #1 background image
CAUTION: Metra recommends disconnecting the
negative battery terminal before beginning any
installation. All accessories, switches, and especially
air bag indicator lights must be plugged in before
reconnecting the battery or cycling the ignition.
NOTE: Refer to the instructions included with the
aftermarket radio.
Installation Instructions for 99-7804B
• ISO DIN radio provision with pocket
• DDIN radio provision
Painted two tone to match factory
• Retains factory color screen
A) Radio housing trim panel • B) Brackets • C) Top bracket • D) Pocket • E) (6) White panel clips
• F) (8) #6 x 3/8” Phillips screws • G) (8) #8 x 3/8” Phillips screws • H) Display retention interface and harness (not shown)
KIT FEATURES
KIT COMPONENTS
WIRING & ANTENNA CONNECTIONS (sold separately)
Wiring Harness: • Included
Antenna Adapter: • 40-HD11
• Panel removal tool • Phillips screwdriver
TOOLS REQUIRED
Honda Accord 2013-up
99-7804B
A
F
B
G
C D E
Question and Answer IconNeed help?

Do you have a question about the Metra Electronics 99-7804B and is the answer not in the manual?

Metra Electronics 99-7804B Specifications

General IconGeneral
BrandMetra Electronics
Model99-7804B
CategoryAutomobile Accessories
LanguageEnglish

Summary

Dash Disassembly

Remove Side Trim Panels

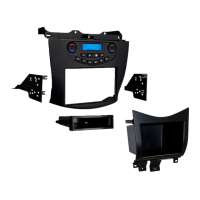
Unclip and remove the side trim panels from the vehicle's console.

Remove Console Pocket

Remove two Phillips screws and then detach the pocket from the console.

Remove Radio Chassis Screws

Remove two 8mm screws from the bottom of the radio chassis.

Remove Center Trim Panel

Unclip and remove the trim panel located between the radio and steering column.

Dash Disassembly (cont.)

Remove Top Radio Screws

Remove two Phillips screws located on the top of the radio assembly.

Kit Assembly - ISO DIN

Connect Wiring & Install

Locate factory harness, follow wiring section, mount radio assembly, and reassemble dash.

Kit Assembly - DDIN

Connect Wiring & Reassemble

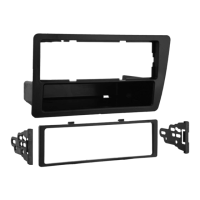
Locate factory harness, follow wiring section, and reassemble dash.

Wiring Instructions

Connections to Aftermarket Radio

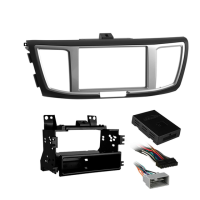
Specific wire-to-wire connections from Honda connectors to the aftermarket radio.

Wiring Instructions (cont.)

Connections from 14-pin Black Connector

Wiring connections from the 14-pin black connector to the aftermarket radio.

ASWC-1 Installation

Instructions for installing and initializing the ASWC-1 steering wheel control interface.

Touch Screen Instructions

Initialization Procedure

Steps for initial setup, including waiting for the clock screen and entering system settings.

Personalization Menu Procedure

Guide to accessing and navigating the personalization menu using steering wheel controls.

Steering Wheel Control Functions

Defines how steering wheel controls are used to navigate the personalization menu.

Related product manuals