3Microlife BP A3 Plus
EN
The pulse display is not suitable for checking the
frequency of heart pacemakers!
If you are pregnant, you should monitor your blood pressure
regularly as it can change drastically during this time.
A number of factors can affect the accuracy of
measurements taken on the wrist. In some cases, the
result may differ from the measurement taken on the upper
arm. We therefore advise you to compare these values with
those produced by the upper arm measurement and
discuss them with your doctor.
How do I evaluate my blood pressure
Table for classifying home blood pressure values in adults in
accordance with the international Guidelines (ESH, ESC, JSH).
Data in mmHg.
2. Using the device for the first time
Inserting the batteries
After you have unpacked your device, first insert the batteries. The
battery compartment 4 is on the bottom of the device. Insert the
batteries (4 x 1.5 V, size AA), thereby observing the indicated
polarity.
Setting the date and time
1. After the new batteries are fitted, the year number flashes in the
display. You can set the year by pressing the M-button AT. To
confirm and then set the month, press the time button 8.
2. Press the M-button to set the month. Press the time button to
confirm and then set the day.
3. Follow the instructions above to set the day, hour and minutes.
4. Once you have set the minutes and pressed the time button, the
date and time are set and the time is displayed.
5. If you want to change the date and time, press and hold the time
button for approx. 3 seconds until the year number starts to
flash. Now you can enter the new values as described above.
Selecting the correct cuff
Microlife offers different cuff sizes. Select the cuff size to match the
circumference of your upper arms (measured by close fitting in the
centre of the upper arm).
Pre-shaped cuffs are optionally available.
Only use Microlife cuffs.
Contact your local Microlife Service if the enclosed cuff 6 does
not fit.
Connect the cuff to the device by inserting the cuff connector 7
into the cuff socket 3 as far as it will go.
Selecting the user
This device allows to store the results for 2 individual users.
Before each measurement, set the user switch 9 for the
intended user: user 1 or user 2.
User 1: slide the user switch 9 upwards to the user 1 icon.
User 2: slide the user switch 9 downwards to the user 2 icon.
The first person to measure should select user 1.
Selecting standard or MAM mode
This device enables you to select either standard (standard single
measurement) or MAM mode (automatic triple measurement). To
select standard mode, slide the MAM switch 8 on the side of the
device downwards to position «1» and to select MAM mode, slide
this switch upwards to position «3».
MAM mode (highly recommended)
In MAM mode, 3 measurements are automatically taken in
succession and the result is then automatically analysed and
displayed. Because the blood pressure constantly fluctuates, a
Range Systolic Diastolic Recommendation
1. blood pressure
normal
< 120 < 74 Self-check
2. blood pressure
optimum
120 - 129 74 - 79 Self-check
3. blood pressure
elevated
130 - 134 80 - 84 Self-check
4. blood pressure
too high
135 - 159 85 - 99 Seek medical
advice
5. blood pressure
dangerously
high
≥ 160 ≥ 100 Urgently seek
medical advice!
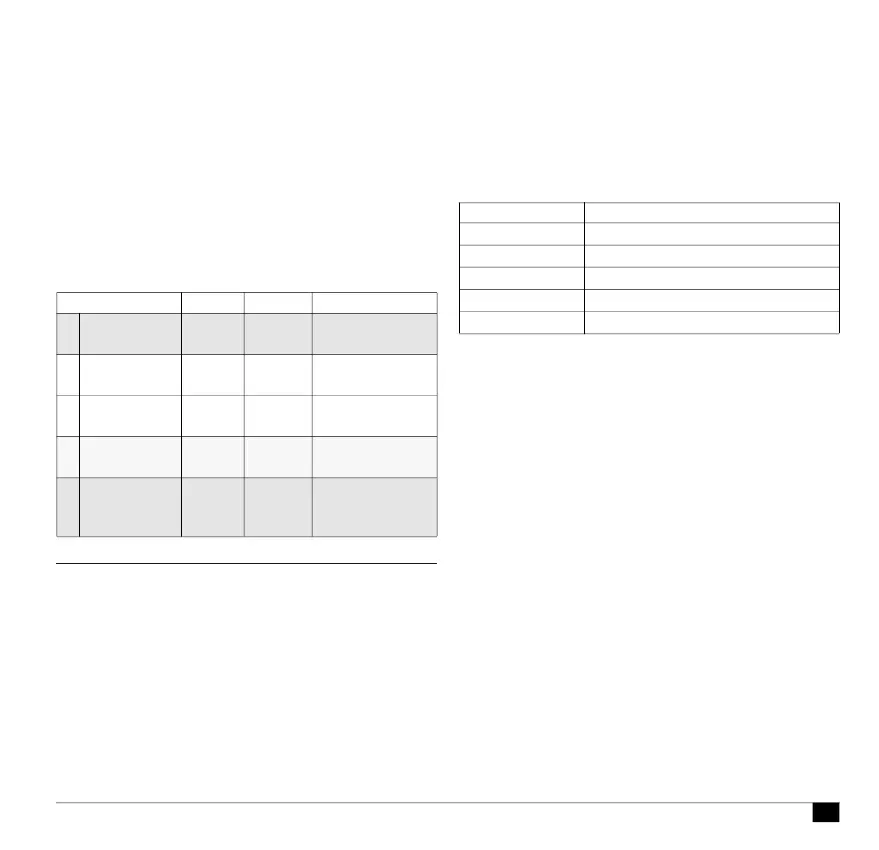
Cuff size for circumference of upper arm
S 17 - 22 cm
M 22 - 32 cm
M - L 22 - 42 cm
L 32 - 42 cm
L - XL 32 - 52 cm