Model A
Connect the wire from the display panel of the indoor unit to a connecting cable. Then connect the other
side of the connecting cable to the remote control.
Model B
1 indoor unit
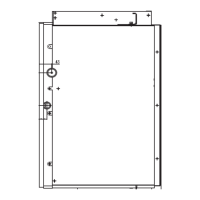
Notch the part for the wiring to pass through with nippers, etc.
Connect the terminals on the wired controller (HA ,HB), and the terminals of the indoor unit (HA ,HB).
(HA and HB do not have polarity.)
For some units, the wired controller connects to the unit HA and HB ports through the HA and HB ports.
There is no polarity between HA and HB. SeeFig. 3-9
41
NOTE:
•
DO NOT allow water to enter the wired control.
Use the trap and putty to seal the wires.
•
Connecting wires must be fixed reliably and cannot be pulled.
Fig 3-7
Fig 3-8
4-core wire
The connective wires group
shielded wire(some units)
Mainboard
4-core wire
Adaptor board
Display board
The connection cable A
X
Y
E
5V/12V
White
Yellow
Brown
Red
The connection cable D
Applicable to split-type air conditioner
Applicable to Light Commercial air conditioner
HA HB
Indoor Unit
Wired Controller
Fig.3-9

 Loading...