Operation Manual S3000 Operating Instructions
6-1
6. PREPARATION FOR USE
1. To safeguard the fuse against failure, always switch the power supply off before connecting or
disconnecting the power cord.
2. Check to make sure that the Power Switch on the generator is turned OFF.
3. Connect the Power Cord to the receptacle on the rear of the generator and plug it into a
grounded power outlet.
4. If the Sonicator
has been left in a very cold environment for a prolonged period of time, do not
operate the unit until it has reached room temperature. Turn the power switch ON, without
processing any samples, for 20 minutes before using, to warm-up the electronics faster.
5. The horn and its flat tip were assembled and attached to the convertor at the factory, but it is
recommended that you check the tightness of the horn and flat tip by using the wrenches
provided and referring to 6-3 & 6-4 of this manual. An insufficiently tightened horn or tip might
cause damage to the generator circuitry or parts of the convertor and horn.
NEVER
assemble
or disassemble the probe by holding the convertor in a vise or while power is on. ALWAYS use
the wrenches supplied with the unit.
6. When replacing horns or horn tips, clean the mating surfaces of the convertor and probe or
stepped microtip as well as the threaded stud and hole. Check that the stud is tight. Do NOT
apply grease to mating surfaces or threads of the convertor, horn, replaceable flat tip or
microtip probe.
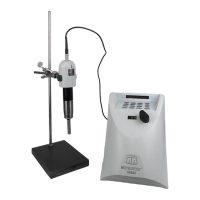
7. Mount the convertor and horn into the sleeve on the top of the SONABOX™ Acoustic
Enclosure (Part # 432B) or use the Convertor Stand and Positioner (Part # 438) to hold the
convertor and horn in position. Support the convertor only by clamping around the outer case
(See 6-2).
Do NOT hold or clamp the convertor, on the black portion or the titanium horn itself.
9. Connect either end of the coaxial HIGH FREQUENCY cable to the rear of the chassis and the
other end to the receptacle on the convertor. Push the connectors in and turn the chrome rings
clockwise ¼ turn to secure the connectors.
10. If a foot switch or timer switch is used, plug it into the FOOT SWITCH CONNECTOR. Make
sure that the plug is inserted properly.
11. If you will be using a MICROTIP or Extender, remove the Flat Tip on the end of the horn, then
attach the MICROTIP or Extender in its place. (See 6-3, 6-4)