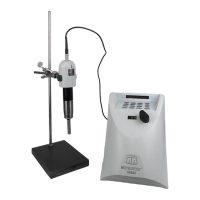
Operation Manual S3000 Operating Instructions
6-3
ATTACHMENT AND REMOVAL OF HORNS AND TIPS
To connect a horn to the convertor or a tip to a horn:
1. Thread pieces together by hand until all joints mate smoothly and are hand tight.
If resistance is met, avoid cross threading by loosening and rethreading by hand.
2. Do NOT force the threads by wrenching.
3. Tighten using wrenches as explained below, being sure to apply even and firm pressure.
To attach or remove a horn:
1. Insert the pin of the pin spanner wrench supplied with the Sonicator
(as shown in the
diagram on page 6-4) into one of the holes at the base of the horn.
2. Insert the pin of the second pin spanner wrench into one of the holes in the front driver
(black portion) of the convertor.
3. Apply even and firm pressure in the appropriate direction.
To attach or remove a Flat Tip, Microtip or Extender:
1. Insert the pin of a pin spanner wrench into one of the holes at the base of the horn.
2. Place the 7/16" open-end wrench on the wrench flats of the Flat Tip, MICROTIP or
Extender.
3. Apply even and firm pressure in the appropriate direction (see next page for diagram).
CAUTION!
An insufficiently tightened horn, probe or tip will impede the transmission of ultrasonic energy and may
cause damage to the generator circuitry or mating parts of the convertor and horn.
Warning: An improperly tightened horn or horn tip may heat up and fail prematurely. NEVER
assemble or disassemble the probe by holding the convertor in a vise. Always use the tools provided
with the unit and place a firm mat or towel underneath the convertor and horn to prevent slippage or
damage. Avoid pressing the sides of a MICROTIP or Extender down into a counter top when tightening
or removing, as this may damage the tip.
A loud, high piercing sound emanating from the horn or probe indicates that one of the components
may be loose or possibly cracked. STOP processing immediately. Turn off the generator and check
the tightness of the horn to the convertor, and the tip or probe to the horn if applicable. If the loud
noise persists, contact MISONIX for assistance.
See diagram on next page