Operation Manual Accessories
8-1
8. ACCESSORIES
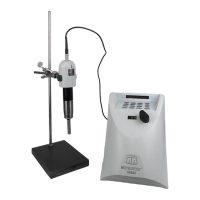
CUP HORN
Installation
1) Install and hand tighten the cup horn onto the convertor.
2) Tighten the horn with the pin spanner wrenches.
3) Support the convertor and cup horn in the Sonabox
TM
Acoustic Enclosure or in a lab stand
using two clamps on the convertor case only. DO NOT place a clamp at the base of the
horn. This will dampen the transmission of ultrasonic energy from the convertor and will
cause permanent damage to the generator (see diagram in section 6-2).
4) Install fittings (plugs and/or hose adapters) to inlet, outlet and overflow ports. Be careful not
to over-tighten any attachments. At the bottom of the cup horn there are O-rings and a fitting
port. Be careful not to over-tighten this fitting because it can cause O-ring leakage.
5)
Water should be filled up to the midpoint between the top of the horn and top of the acrylic cup.
Please allow room for displacement when sample is added.
For constant flow cooling, use hose adapters with soft tubing. Provide pinch clamps on the inlet and
outlet tubes to control flow. An open-bath recirculating chiller is recommended for maximum cooling.
The flow required is about 500 ml/min. Place a flat plate on the cup to avoid splashing if the coolant
flow is turned too high.
For static cold water use, close off all three ports with the plugs provided and fill the cup. If sonication
is brief, the heat generated in the cup is insignificant to affect the sample. If the water temperature
rises, pour it out and refill the cup with cold water. To further lower the temperature, add crushed ice
to the water. Immerse the sample vessel below the ice level so that sample vessel is fully exposed to
the face of the horn, below the ice.
Another method of operation is to fit the outlet port with the hose adapter, soft tubing and a pinch
clamp. Run the tubing, without bends or loops, directly to a drain. Add ice and water to the cup. After
the ice melts, drain the cup and refill with ice and water. If the fittings leak, place TEFLON tape
around the fitting threads. If coolant splashes into the shield, tip the shield edge to drain it.
For maximum transmission of acoustic energy into the sample vessel, use a cavitation-resistant fluid
such as a water-glycol mixture, pure ethylene or propylene glycol. The sonication intensity will be
greatly increased, in proportion to the glycol concentration.