OPERATION
FOR
AUTOMATIC
CORNER
STITCHING
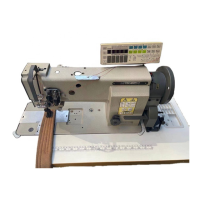
1 Setting
of
switches and
counters
on
the
control panel
AUTO-CHANGER
fOWER
START EMD
A B I C 0
fill
I « f I
mrimm
I'
I
unriKB
•
«®fT:s8£Hi
12348679
3333
I8I
23233232
START WHO
t£rr/Rf6H7
SeiECTOR
JUHOKT
«waja«8a8Miii)ja»tigBi4i
{1)
Set the start
backtacking
"START"
switch
(?) to "ON"
and
set
number
of
forward
stitch
"A"
and
backward stitch
"8"
on counter (3) .
(2) Set the end backtacking "END" switch (2) to "ON" and set number of forward stitch "C" and backward
stitch "D" on counter (4) .
(3) Set the
"CORNER
SEWING"
switch (5) to "ON".
Note:
When
this
switch is
"OFF",
usual
doudle-needle
stitching
is possible.
(4) Set
the
"NUMBER"
(number of corner stitching steps) within a range from 1 step to 8 steps on
counter
o
The
number
of
the
next
corner
stitching
steps
is
displayed
by
LED.
When
all
preset
steps
are
completed,
the
counter
is
reset
to
"1
(5) Set
number
of stitchesto becompleted with
single-needle
stitching ineachstep on counter (7)
Note:
When
number
of
single-needle
stitches
is
set
to
"0",
deep
pedal heeling
down
causes single-needle
one
stitch
and,
after
the
fabric
is
turned,
double-needle
stitching
immediately
starts
without
signle-needle
stitching.
(See
the
right
figure)
' I ^
//
///
.cT
Single-needle
stitching
(6)
Set
the
direction of
turn
at each end of corner stitching step on
LEFT/RIGHT
SELECTOR switch.
(Maximum eight
turns
may be set.)
•
The
direction
of
turn
is
displayed
by
LED
colour
For
leftward
turn
(^
),set
switch
red
LED
will
light.
For
rightward
turn ( |l ).set
switch
_
green
LED
will
light.

 Loading...