EasyManua.ls Logo

Mocka Kitchen User Manual

Mocka Kitchen
14 pages
To Next Page IconTo Next Page
Page #1 background imageLoading...
Page #1 background image
28x long
screw
12x
screw
A
B C D
G
E F
H J K L MI
22x
dowel
54x small
screw
1x
screw
1x
screw
P
Q
R
1x wall
ancho
r
1x
spacer
8x
wedge
4x
hinge
4x
hinge
4x
latch
4x roller
catch
8x shelf
support
2x
clip
4x
hook
Wall
Attachment
Phillips screwdriver and hammer required
Hardware Supplied
*We recommend using a Flathead screwdriver to tighten all locking nuts 100% before first use.
Please clear any loose wood from the locking nut holes before inserting the nut to ensure it locks 100%.
WARNING: Any furniture that is not anchored to a wall has the
potential to tip over in certain circumstances, i.e. if a child attempts
to climb up on the furniture or in the event of an earthquake.
Accordingly, we recommend that all furniture is anchored to a wall.
We supply a free safety wall anchor with all furniture sold and we
recommend these are used to prevent your product tipping. The
fixing device provided should fit most wall types, but please note
that different wall materials may require different fixing devices
from those supplied.
For quicker assembly, we recommend the
use of a power drill on a low-speed setting.
Mocka Kitchen
1
mocka.co.nz | mocka.com.au | PO BOX 6171, Maroochydore, QLD, 4558
Assembly Instructions
Thank you for your purchase.
Please follow the instructions below for correct assembly.
Question and Answer IconNeed help?

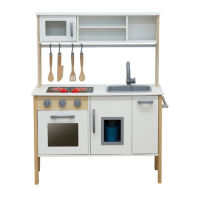
Do you have a question about the Mocka Kitchen and is the answer not in the manual?

Mocka Kitchen Specifications

General IconGeneral
BrandMocka
ModelKitchen
CategoryBaby & Toddler Furniture
LanguageEnglish

Summary

Mocka Kitchen Assembly Introduction and Safety

Important Safety Warning

Read critical safety advice regarding furniture tipping and wall anchoring.

Initial Panel Assembly Steps

Step 1: Insert Dowels

Insert 22 dowels (G) into specified panels for structural integrity.

Step 2: Attach Shelf Supports and Clips

Attach shelf supports (K) and clips (L) to panels using screws.

Side Panel Attachments and Supports

Step 3: Attach Roller Catches and Shelf Supports

Attach roller catches (I) and shelf supports (K) to panels [6] and [11].

Step 4: Attach Shelf Supports to Panels

Attach shelf supports (K) to panels [20] and [22] with screws.

Joining Base and Side Panels

Step 5: Attach Panel [8] to Panel [9]

Attach panel [8] to panel [9] using two screws (A).

Step 6: Attach Side Panels to Base

Attach panels [6] and [11] to panel [9] using four screws (A).

Connecting Back and Base Panels

Securing Rear Panels and Base

Upper Structure Assembly

Attaching Hinges and Latches

Connecting Main Cabinet Sections

Integrating Internal Components

Door Hinge and Panel Installation

Final Hinge and Panel Attachments

Attaching Final Components

Final Assembly and Wall Anchoring

Step 26: Wall Anchoring and Final Check

Anchor kitchen to wall using provided hardware for stability.

Related product manuals