Assembly
1. Turn the LP off and disconnect power.
2. Remove the screws shown below. When removing LP screws, be sure to note which screws are sharp, self-tapping
screws and which are not. The self-tapping screws connect to the back extrusion of the LP. The front three screws are dull
machine screws. Make notes for re-assembly.
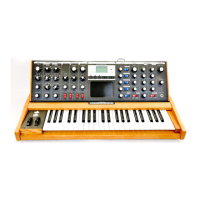
3. Set a thick soft cloth on the keyboard (to protect the keys from scratches) and carefully pull the bottom of the panel
forward to open it up. Lean the panel forward onto the cloth (shown below). Un-hook the cables and one grounding screw
from the inside of the front panel and set the front panel face-down on a soft surface away from the LP chassis.
4. Remove right plastic side piece screws and remove right side piece and metal side shield.
5. Assemble new right side assembly.
a. Put overlay onto side piece (you may want to clean with alcohol before applying).
b. Mount CV Out PCB onto side piece with jack-nuts. Tighten them with 15 mm hex wrench.
c. Screw right side piece onto LP with modified right side shield first. See picture below. Do not insert screw closest to
Volume knob. This will be used later to secure front panel.
 Loading...