SECTION 6: DUCT CONNECTOR INSTALLATION
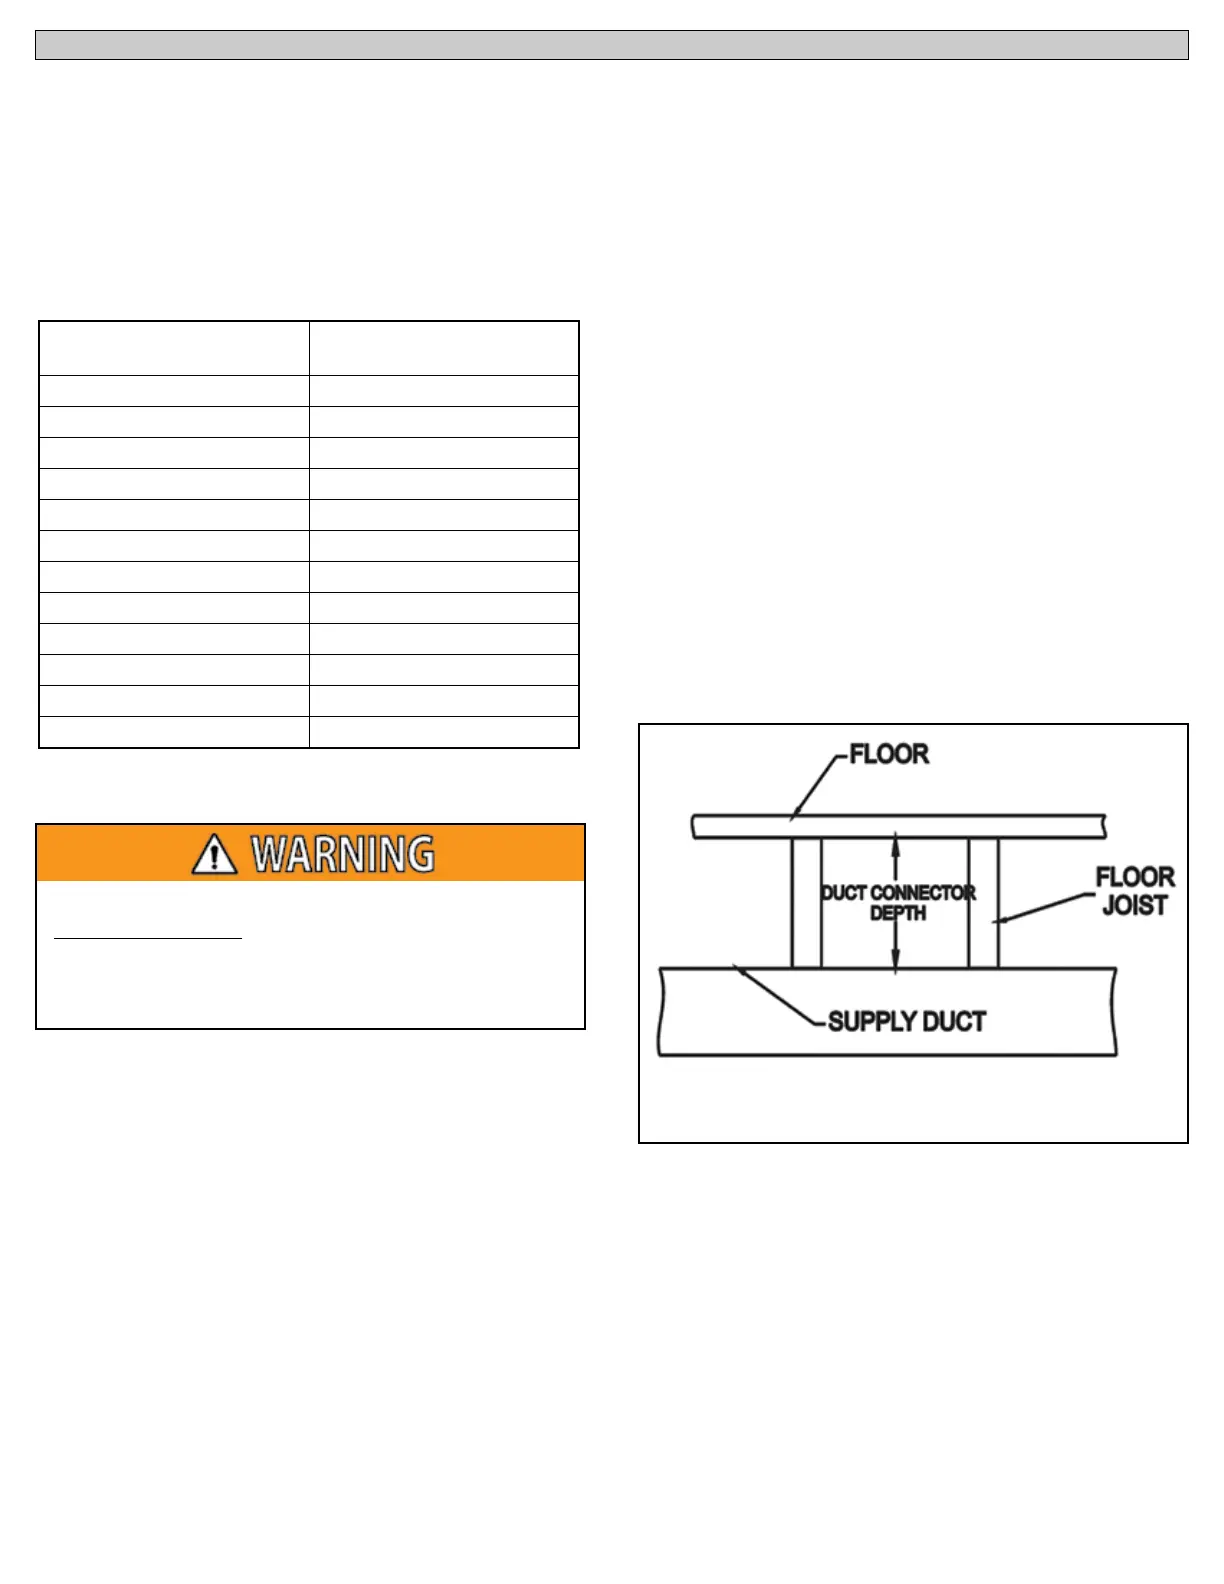
D E P T H F R O M F L O O R
T O D U C T - i n ( m m )
D U C T C O N N E C T O R
M O D E L N U M B E R
1 i n ( 2 5 .4 m m ) 9 0 - D C U O - 0 1
2 i n ( 5 0 .8 m m ) 9 0 - D C U O - 0 1
3 i n ( 7 6 .2 m m ) 9 0 - D C U O - 0 1
4 i n ( 1 0 1 .6 m m ) 9 0 - D C U O - 0 1
5 i n ( 1 2 7 .0 m m ) 9 0 - D C U O - 0 2
6 i n ( 1 5 2 .4 m m ) 9 0 - D C U O - 0 2
7 i n ( 1 7 7 .8 m m ) 9 0 - D C U O - 0 2
8 i n ( 2 0 3 .2 m m ) 9 0 - D C U O - 0 2
9 i n ( 2 2 8 .6 m m ) 9 0 - D C U O - 0 3
1 0 i n ( 2 5 4 .0 m m ) 9 0 - D C U O - 0 3
1 1 i n ( 2 7 9 .4 m m ) 9 0 - D C U O - 0 3
1 2 i n ( 3 0 4 .8 m m ) 9 0 - D C U O - 0 3
Duct Connectors
90-DCU0-XX Duct Connectors
A duct connector is used to provide a sealed connection
between the furnace base and a below the floor supply duct
system. The duct connector allows the furnace to be installed
on a combustible floor without the use of a separate sub-base
providing insulation is placed between the duct connector and
the combustible floor. Table 5 shows the duct connector needed
for various applications.
MORTEX PRODUCTS INC. 501 TERMINAL RD FORT WORTH, TX 76106 Page 7
Table 5: Duct Connector Models
Figure 8: Duct Connector Depths
A duct connector can be installed on combustible flooring
except for carpeting. It is recommended to use insulation
having a rating of R-12 or higher between the floor base
and the combustible floor to prevent the combustible floor
from getting too hot.
Installing the Duct Connector
1. Refer to Figures 8 – 11 for dimensions necessary for duct
connector installation.
2. Attach the four (seal-strip) foam tape gaskets provided with the
duct connector around the perimeter of the duct opening in
the main supply duct trunk to seal between the duct
connector and the top of the duct opening.
3. Insert the duct connector through the opening in the floor
and attach the duct connector to the top of the main trunk
by inserting the tabs through the opening in the top of the
duct and bending the tabs back 90 degrees against the inside
of the duct. Confirm the seal-strip has sealed the area around
the duct connector where it attaches to the main supply duct
trunk.
4. Slit the corners of the duct connector that extend above the
floor and then bend the sides over onto the floor surface.
5. It is recommended to place insulation between the floor base
and the floor when used on a combustible floor to prevent the
combustible floor from getting too hot. Cut the insulation
around the perimeter of the duct connector opening.
6. Install the floor base over the floor opening with the flanges in
the opening facing downward.
7. Insert the four screws provided in the kit through the four holes
in the floor base and drive the screws into the floor to secure
the floor base to the floor.
Additional Duct Connector Installation Information
The duct connector is designed to be installed in place of an
existing duct connector and is designed for use on ducts wider
than 12 inches (304.8mm). When using the duct connector on
narrower ducts, there will be insufficient clearance to bend the
tabs on four sides of the duct connector. Some of the tabs on
the duct connector may need to remain unbent so it fits into
the main trunk. In these cases, the tabs may be attached to the
sides of the main trunk by using sheet metal screws or other
suitable fasteners. Add holes in the tabs for sheet metal screws
by drilling the required screw holes in 3 tabs on each side of the
duct connector. If more than three tabs are needed to provide a
more secure and air-tight connection, drill the remaining tabs so
the additional tabs can also be fastened to the duct with screws.
Use a duct sealer to seal any air leaks between the duct and the
duct connector. High temperature metal tape can also be used
to provide an air seal. The tape should be approved by applicable
national or local codes.