ENGLISH
12
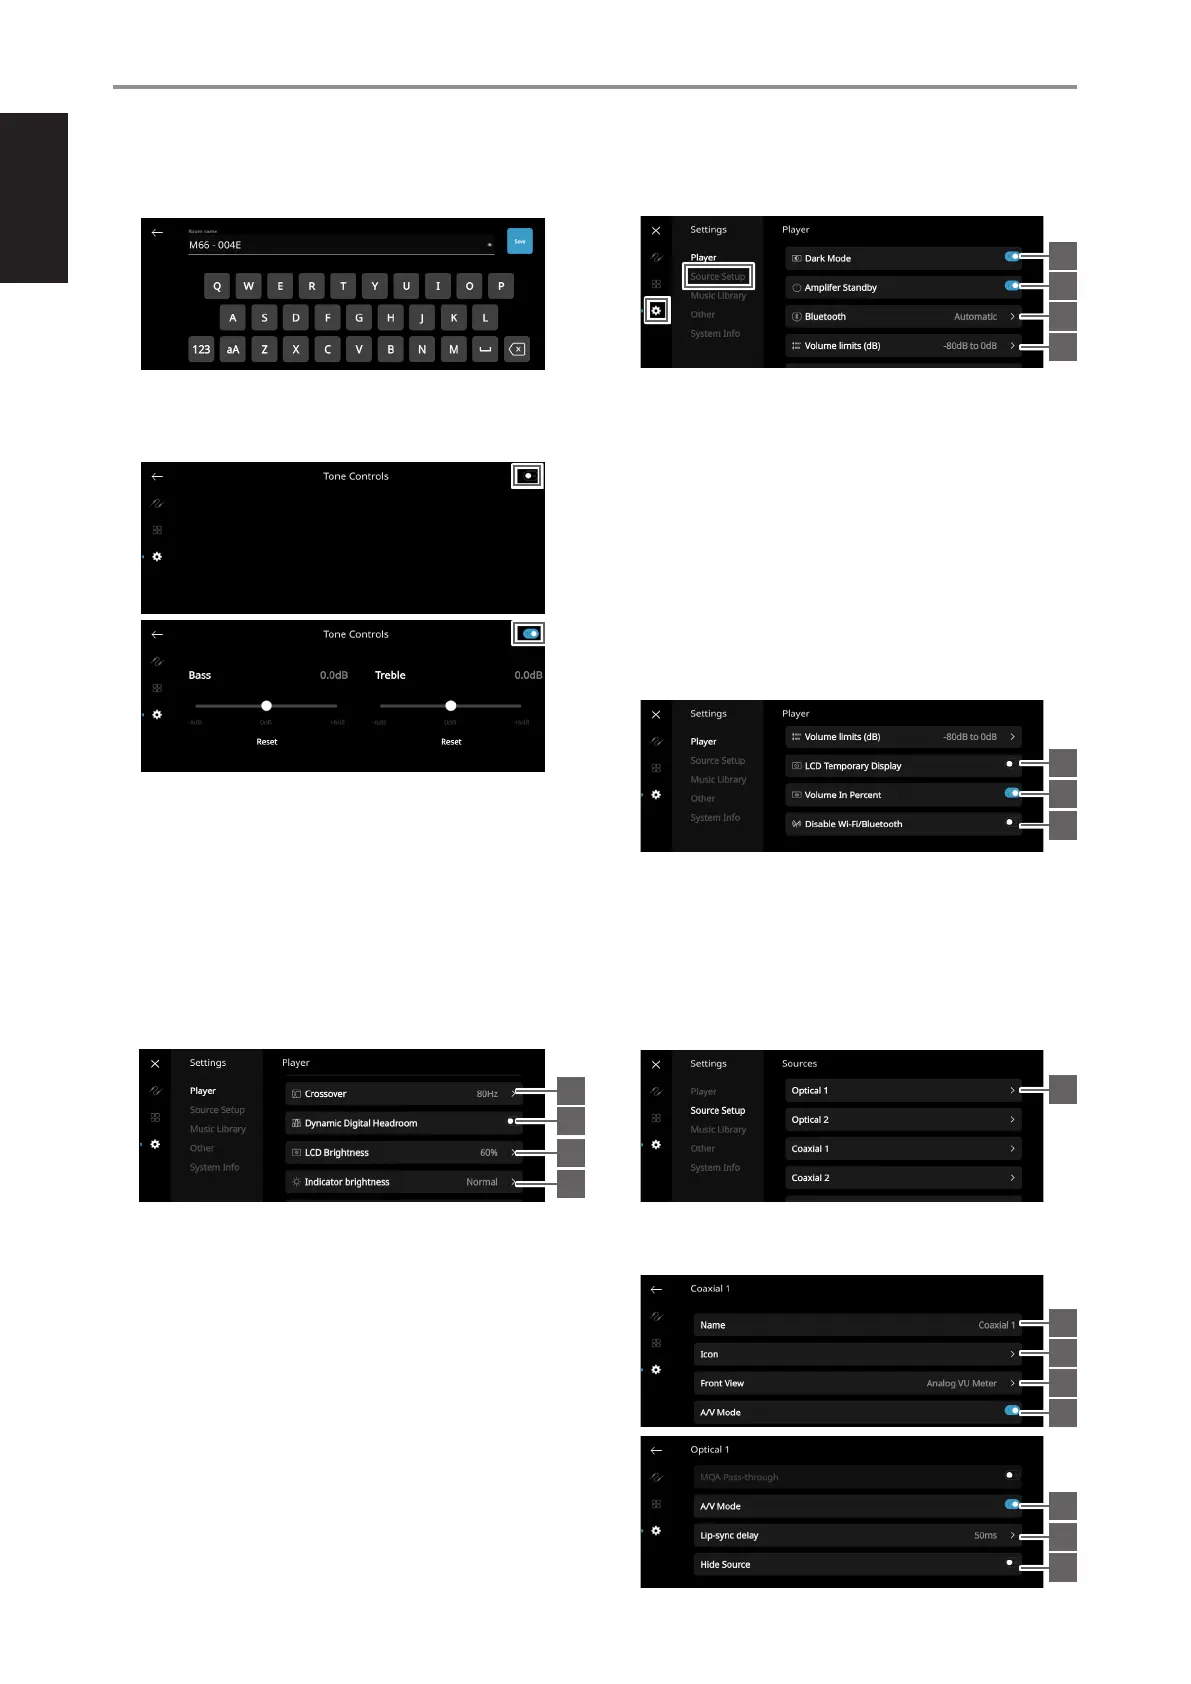
2 Room Name: Create a customized room name for the M66 using
the pop up keyboard
3 Tone Controls: Swipe to boost or reduce Bass and Treble response.
Tone Control levels, Bass and Treble, can be turned ON/OFF or
Reset.
4 Select Attached Speakers: Select corresponding option
depending upon the number of subwoofers connected.
1 Subwoofer – A subwoofer is connected to rear panel Subwoofer
Output port 1.
2 Subwoofers – A subwoofer is connected to each of the rear
panel Subwoofer Output ports 1 and 2.
3 Subwoofers – A subwoofer is connected to each of the rear
panel Subwoofer Output ports 1, 2 and 3.
4 Subwoofers – A subwoofer is connected to each of the rear
panel Subwoofer Output ports 1, 2, 3 and 4.
5 Crossover: The subwoofer will reproduce only low frequency
information below the selected crossover setting.
6 Digital Dynamic Headroom: With Digital Dynamic Headroom
(DDH) enabled, digital inter-sample peak clipping distortion
that can occur during digital-to-analog conversion with sudden
high-frequency transients is eliminated. The benefits are especially
noticeable with percussion instruments: rim shots are more impactful
but less strident; cymbals are more realistic and less splashy.
7 LCD Brightness: Adjust the brightness level of the front panel
display.
8 Indicator Brightness: Set indicator brightness level of Status
Indicator (NAD logo). There are 3 brightness level options – Normal,
Dim or Off.
Normal - Status Indicator (NAD logo) is at its brightest level.
Dim - Status Indicator (NAD logo) brightness level is less than
normal level.
O - Status Indicator (NAD logo) has no light.
9 Dark Mode: Background of Front View display for particular
source is either dark (enabled) or bright (disabled).
10 Amplier Standby: At enabled mode, unit will go into a low power
standby mode (no display, NAD logo lit) after 15 minutes of no
playback or user interface at the current Source. Touch the display
panel, resume playback or rotate the Volume knob to switch the
unit from low power standby mode to operating mode. At disabled
mode, unit will not go to standby mode even if there is no playback
or user interface at the current Source.
11 Bluetooth: Set Bluetooth connection to Manual, Automatic, Guest
or Disabled.
12 Volume Limits (dB): Set volume range from lowest to highest level
in dB units.
13 LCD Temporary Display: Enabled mode will turn off display
temporarily after 1 minute of non-user interface. Touch front panel
display to resume display. Disabled mode will keep display shown.
14 Volume In Percent: Volume level is displayed in percent when
enabled. At disabled mode, volume level is displayed in dB.
15 Disable Wi-Fi/Bluetooth: Enable to cutoff WiFi and Bluetooth
connections. Disable for WiFi and Bluetooth connections to be
reconnected or retain connections.
SOURCE SETUP
Select and configure Source
1 Sources: Select Source to configure
2 Name: Customize the Source’s Name using the pop-up keyboard
3 Icon: Select and assign icon for the selected Source
OPERATION
USING THE FRONT PANEL DISPLAY
9
10
11
13
1
2
3
4
5
7
6
8
12
14
15
5
6
7
8