Digital Video Recorder for Ness IQ-
NOTE
Please do not use jpeg format while archiving
lease do not change the settings by DVR or CMS, while back up
lease enter all the necessary information before Click
hen the targeted file size is over 2GB, press
continue to archive to another file with the extension of
is finished and press “ ” to contin
ue to the rest of progress
PLEASE DO NOT USE THE SPACE WHEN ENTER BACKUP FILE NAME.
WHILE BACKUP PROCEDURE, PLEASE DO NOT DETACH STORAGE DEVICE OR POWER OFF THE DVR. OTHERWISE, IT MAY
CAUSE PERMANENT DAMAGE TO THE DVR OR THE STORAGE DEVICE. IN SUCH CASE, USER MUST REBOOT THE DVR. IF THE
DVR DOES NOT OPERATE PROPERLY, USER MIGHT NEED
WHEN ARCHIVING IN AVI FORMAT, IT ONLY SUPPORTS 1CH AND DOES NOT SUPPORT AUDIO AND PASSWORD FEATURES.
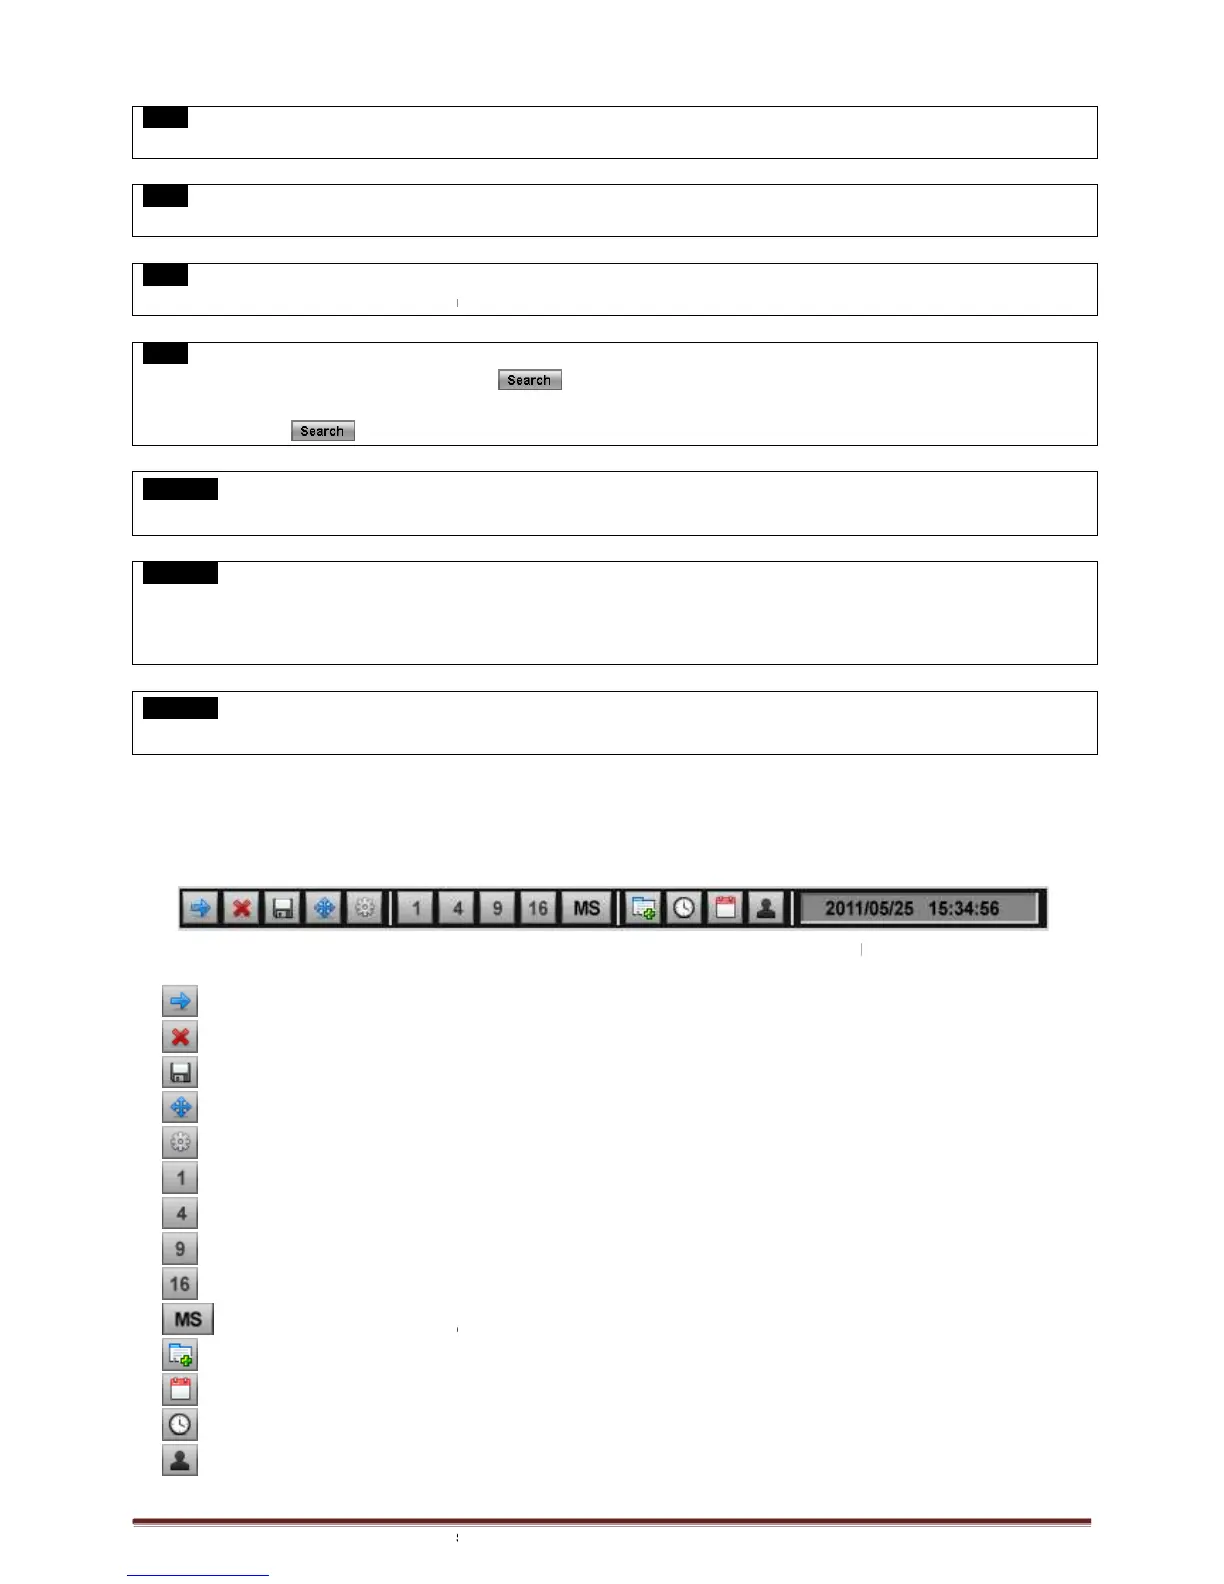
Menu bar enables users to control all function as front button on the OSD screen.
Move the mouse cursor to
bottom around Date and Time indication then Menu bar will show up on the live screen.
Each icon functions as below;
: Exit the Menu Bar
: Safely turn off the DVR
: Enter Archive mode
: Enter PTZ control mode
: Enter Setup mode
: Turn the display as 1 channel full screen. Additional click on full screen, it will change to next channel in sequence.
: Turn the display as 4 channels split screen
play as 8 channels split screen
: Turn the display as 16 channels split screen, There is no changes when additional click on 16 channels split screen.
: Select the multisport split m
ode by clicking MS and 1/4/9/16 buttons.
: Play Instant Playback
: Enter Calendar Search
: Date and Time Search
: Enter Event Search
lease do not change the settings by DVR or CMS, while back up
lease enter all the necessary information before Click
hen the targeted file size is over 2GB, press
“ ” button on the right again after the first
continue to archive to another file with the extension of
“-002” Automatically added. I
n case of DVD media, change the media after the first file
ue to the rest of progress
PLEASE DO NOT USE THE SPACE WHEN ENTER BACKUP FILE NAME.
WHILE BACKUP PROCEDURE, PLEASE DO NOT DETACH STORAGE DEVICE OR POWER OFF THE DVR. OTHERWISE, IT MAY
CAUSE PERMANENT DAMAGE TO THE DVR OR THE STORAGE DEVICE. IN SUCH CASE, USER MUST REBOOT THE DVR. IF THE
DVR DOES NOT OPERATE PROPERLY, USER MIGHT NEED
TO CONTACT SERVICE CENTER.
WHEN ARCHIVING IN AVI FORMAT, IT ONLY SUPPORTS 1CH AND DOES NOT SUPPORT AUDIO AND PASSWORD FEATURES.
Menu bar enables users to control all function as front button on the OSD screen.
bottom around Date and Time indication then Menu bar will show up on the live screen.
: Turn the display as 1 channel full screen. Additional click on full screen, it will change to next channel in sequence.
: Turn the display as 4 channels split screen
Additional click will change to the next four channels in sequence.
play as 8 channels split screen
Additional click will change to the next eight channels in sequence.
: Turn the display as 16 channels split screen, There is no changes when additional click on 16 channels split screen.
ode by clicking MS and 1/4/9/16 buttons.
n case of DVD media, change the media after the first file
WHILE BACKUP PROCEDURE, PLEASE DO NOT DETACH STORAGE DEVICE OR POWER OFF THE DVR. OTHERWISE, IT MAY
CAUSE PERMANENT DAMAGE TO THE DVR OR THE STORAGE DEVICE. IN SUCH CASE, USER MUST REBOOT THE DVR. IF THE
WHEN ARCHIVING IN AVI FORMAT, IT ONLY SUPPORTS 1CH AND DOES NOT SUPPORT AUDIO AND PASSWORD FEATURES.
bottom around Date and Time indication then Menu bar will show up on the live screen.
: Turn the display as 1 channel full screen. Additional click on full screen, it will change to next channel in sequence.
Additional click will change to the next four channels in sequence.
Additional click will change to the next eight channels in sequence.
: Turn the display as 16 channels split screen, There is no changes when additional click on 16 channels split screen.