Do you have a question about the New England Arbors Fairfield Arbor and is the answer not in the manual?
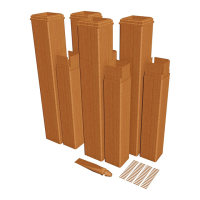
Verify all parts are present before starting assembly; contact customer service for missing or defective items.
Lists essential tools required for assembling the arbor, such as a hammer, tape measure, and drill.
Provides important general advice for assembly, including reading instructions and protecting surfaces.
Connect carrying beams and rafters using pre-drilled holes and screws, then attach end caps with glue.
Insert lattice, middle rails, and spindles into bottom rails, then slide top rails to complete side panel assemblies.
Insert assembled side panels into designated left and right posts, ensuring tabs snap securely into place.
Slide trim caps and base moldings into place, then glue and insert post caps onto the tops of the posts.
Position the assembled pergola top onto the posts and secure main carrying beams and rafters with screws.
Apply vinyl glue around posts and slide post trims back up to desired locations for secure attachment.
Explores options for completing side panel installation, including post extensions or specific mounting kits.
Details excavating post holes to a specific depth, marking locations, and preparing for secure ground installation.
Position the arbor, level the posts, and backfill the excavated holes with gravel or cement for stability.
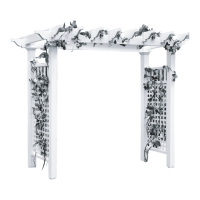
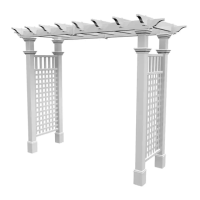
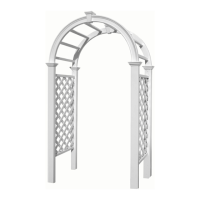
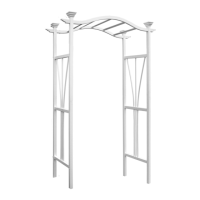
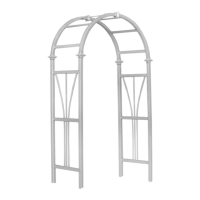
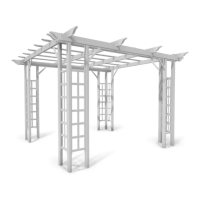
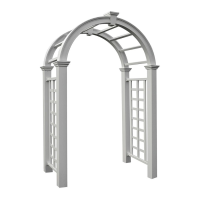
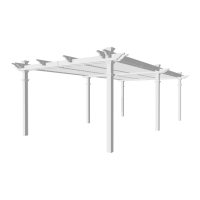
The Fairfield Arbor is a decorative outdoor structure designed to enhance gardens, pathways, and outdoor living spaces. It serves as an architectural accent, providing a focal point and a framework for climbing plants, creating a shaded walkway or an inviting entrance. The arbor's design incorporates a classic pergola-style top with side panels that feature a lattice and spindle pattern, offering both aesthetic appeal and structural support.
The primary function of the Fairfield Arbor is to provide an elegant and durable outdoor structure that can be used in various ways. Aesthetically, it adds a touch of sophistication and charm to any landscape, drawing the eye and defining outdoor areas. Functionally, it acts as a support system for climbing vines, roses, or other greenery, allowing plants to grow upwards and over the top, eventually creating a natural canopy of foliage. This green canopy can offer partial shade, making the area beneath the arbor a more comfortable spot during sunny days.
The arbor can be positioned over a pathway to create a grand entrance or a transition between different sections of a garden. When placed at the entrance to a garden, it welcomes visitors with its classic design. Along a path, it transforms a simple walk into a more immersive and beautiful experience, guiding the eye and providing visual interest. It can also be used to frame a seating area, such as a bench or a small patio, turning it into a more intimate and enclosed space. The structure's open design allows for light and air to pass through, maintaining an airy feel while still providing a sense of enclosure.
Constructed from durable materials, the Fairfield Arbor is designed to withstand various weather conditions, ensuring longevity and continued beauty with minimal degradation. The use of vinyl, as suggested by the inclusion of vinyl glue in the assembly kit, implies a material choice that resists rot, rust, and insect damage, common issues with traditional wood structures. This makes it a low-maintenance option for homeowners seeking a lasting outdoor feature.
The assembly process is designed to be straightforward, allowing individuals to construct the arbor with common household tools. The modular nature of the components, including rafters, carrying beams, posts, and side panels, facilitates a systematic build. The detailed instructions guide users through each step, from assembling the top pergola section to attaching the side panels and securing the entire structure into the ground.
The Fairfield Arbor is designed for versatile usage in various outdoor settings. Its modular construction allows for a relatively easy assembly process, typically requiring a few basic tools such as a hammer, tape measure, level, shovel or auger, and a cordless drill. The instructions emphasize checking the inside of the posts for all materials, indicating a thoughtful packaging approach to ensure all components are readily available.
The assembly begins with the arbor top, where rafters are positioned and fastened to carrying beams. The design incorporates self-auguring screws, which simplify the fastening process by drilling through internal ribs without pre-drilling. This feature streamlines assembly and reduces the need for additional tools. Pergola end caps are then glued into place, adding a finished look to the rafters.
Next, the side panels are assembled. These panels feature a lattice and spindle design, which are inserted into bottom, middle, and top rails. The instructions highlight specific hole counts on the rails, ensuring correct orientation and alignment of the lattice and spindles. This attention to detail in the design ensures a precise fit and a sturdy side panel structure. Once assembled, the side panels are attached to the main posts, with specific instructions for "L" and "R" posts to ensure correct orientation. Post trims and post caps are then added, providing decorative elements and a complete finish to the posts.
Connecting the pergola top to the posts is a critical step. The side panels are moved to their final location, and the opening width is adjusted to a specified dimension, ensuring the arbor's overall stability and aesthetic balance. The pre-assembled arbor top is then placed onto the posts, and the carrying beams and rafters are fastened to the posts using screws. This secure fastening ensures the entire structure is robust and stable. Post trims are then slid down, vinyl glue is applied around the post, and the trims are slid back up to their desired location, providing a clean, finished look and additional structural integrity.
For installation, the Fairfield Arbor offers multiple options to suit different ground conditions and desired levels of stability. One option involves using 4x4 Professional Post Extension Kits or 4x4x8' long wood posts, which are recommended for installation in concrete footings, especially in high-wind areas or when the arbor is to be used with fencing or a gate. This method involves excavating deep holes, placing the arbor, leveling it horizontally and vertically, and then backfilling with gravel or cement. This ensures maximum stability and prevents tipping.
Another option, suitable for stand-alone garden accents on level ground, involves using 4" EZ Mount Posts. These options highlight the arbor's adaptability to various installation requirements, from temporary decorative placements to permanent, robust structures. The emphasis on leveling the arbor both horizontally and vertically during installation is crucial for its appearance and structural integrity.
The Fairfield Arbor is designed with low maintenance in mind, primarily due to its likely construction from vinyl or similar durable, weather-resistant materials. The inclusion of vinyl glue in the assembly kit strongly suggests that the primary material is vinyl, which offers significant advantages in terms of upkeep compared to traditional wood.
Vinyl structures do not require painting, staining, or sealing, which eliminates the recurring effort and cost associated with maintaining wooden arbors. This material is inherently resistant to rot, decay, and insect infestation, common problems that can compromise the structural integrity and appearance of wood over time. This means users will not have to worry about termites, carpenter ants, or fungal growth, which can be a significant concern for outdoor wooden structures.
Cleaning the Fairfield Arbor is typically straightforward. Most dirt, dust, and environmental grime can be easily removed with a simple wash using water and mild soap. A garden hose can be used to rinse off the surface, and a soft brush or cloth can help dislodge more stubborn dirt. This ease of cleaning helps maintain the arbor's pristine appearance throughout its lifespan without the need for harsh chemicals or specialized cleaning agents.
The durable nature of the material also contributes to its long-term aesthetic appeal. Unlike wood, which can splinter, crack, or fade over time due to sun exposure and weathering, vinyl tends to retain its color and structural integrity for many years. This reduces the need for repairs or replacements of individual components due to material degradation.
The assembly instructions also implicitly support easy maintenance by recommending placing components on a non-abrasive surface during assembly to avoid scratching. This initial care helps preserve the surface finish, which in turn contributes to easier long-term cleaning and maintenance. The use of stainless steel screws for rafters further enhances durability, as stainless steel resists rust and corrosion, ensuring that the fasteners remain strong and functional even in outdoor conditions.
In summary, the Fairfield Arbor is designed to be a beautiful, functional, and remarkably low-maintenance addition to any outdoor space, providing lasting enjoyment with minimal effort required for its upkeep.
| Material | Vinyl |
|---|---|
| Color | White |
| Assembly Required | Yes |
| Weight | 45 lbs |
| Depth | 24 inches |