NI cDAQ-9178/9174 User Guide and Specifications 10 ni.com
7. Double-click the Measurement & Automation icon, shown at left, on the desktop to open MAX.
8. Expand Devices and Interfaces.
9. Check that your device appears under Devices and Interfaces. If your device does not appear,
press <F5> to refresh the view in MAX. If your device is still not recognized, refer to
ni.com/
support/install
for troubleshooting information.
10. Right-click your device and select Self-Test. If you need help during the self-test, select Help»
Help Topics»NI-DAQmx and click MAX Help for NI-DAQmx.
When the self-test finishes, a message indicates successful verification or an error. If an error
occurs, refer to ni.com/support/install for troubleshooting information.
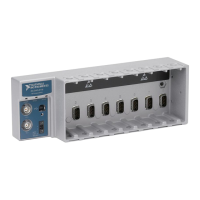
Note When in use, the NI cDAQ-9178/9174 chassis may become warm to the touch. This is normal.
Understanding LED Indications
Power LED
The Power LED indicates whether the NI cDAQ-9178/9174 is receiving power.
Ready LED
The Ready LED is lit when the NI cDAQ-9178/9174 chassis is ready for use. The color indicates
whether the USB connection is Full-Speed or Hi-Speed.
Active LED
The Active LED indicates whether the NI cDAQ-9178/9174 chassis is communicating over the
USB bus.
Table 1. Power LED
LED Definition
Green Power supplied
Off No power supplied
Table 2. Ready LED
LED Definition
Amber Hi-Speed (480 Mbit/sec)
Green Full-Speed (12 Mbit/sec)
Off USB connection is not established
Table 3. Active LED
LED Definition
Amber Power is applied, but USB connection is not established
Green USB traffic present
Off No USB traffic present