Store a program
If you are happy with an edit that you have made,
you should probably Store the program.
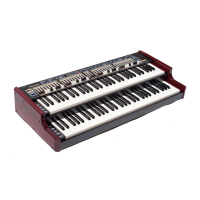
1 Press the Store button once, located to the
right of the display. The Store and Program
button LEDs starts flashing.
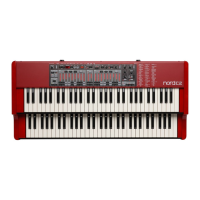
2 Use the Up/Down buttons to navigate to a new program location,
if you do not want to overwrite the original program.
3 Press the Store button a second time to Store the program.
The edited program has now replaced the previous one in the
location you specified. A program is stored with the active preset
selection in focus.
4 If you hold Shift and then press Store, you will get the possibility
to enter a name for your program. Move the cursor with Up/Down
and change the letter by pressing Shift + Up/Down. Then proceed
with step 2 and 3.
M To cancel the procedure, press the Shift button before you press
Store the second time.
M With Memory Protect set to Off, a double tap on the Store button
will store an edited Program in its original location.
The Live memory
The special Live buffer
can be described as a
“live program memory”.
If you activate Live, all
changes to the panel
settings you make will
be continuously saved.
If you switch the power off, or select another program, the settings are
still stored in a Live memory. When you power up next time (or return
to the Live memory) all settings will be exactly as they were when you
left them.
If a Live memory is selected and you decide you wish to store the
settings permanently as a program you can do so using the stan-
dard methods (see above). You can also store programs into the Live
memory location, in which case the program settings will replace the
current Live memory settings.
Full set of drawbars
There are two sets of nine drawbars, for each of the upper and lower
manuals and one smaller set in between these, for the pedals.
The drawbars are labeled Swell A (Preset), Swell B (Perc), Pedal, Great
A (Preset) and Great B. The drawbars become active if you press the
Drwb A or Drwb B buttons on the preset panel or the drawbar selec-
tors on the main panel below the drawbars.
Presets
The Preset buttons on the panels to the left of the keys are used to
select one of three presets or one of the two sets of drawbars for each
manual. This gives you access to several settings during a performance
in just one program.
Three of these settings are stored as presets and two are the draw-
bars. Pressing the Drwb A or 8 buttons gives you access to the two
sets of drawbars on the panel that can be manipulated in real time.
1 Most of the factory programs have the first Preset in focus, but the
very first program – 001 B3 Drawbar Panel
– has the drawbars labeled Swell and Great
A as the focused selection.
This is indicated with the LED to the right of
the 9th drawbar and the Drwb A LED on the
preset panel.
M A program that is stored with either Drwb A
or Drwb B in focus will always use the physi-
cal position of drawbars as on the panel when it is selected.
Edit a Preset
1 Press and hold the Up button to scroll to one of the last programs
in the C2D memory. These are the “Empty Programs”, where
you can experiment with Programs without risking to overwrite
anything that might be useful from the factory programs.
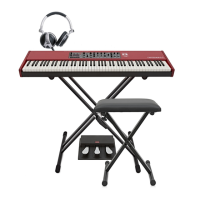
2 Press the Preset 1 button on the Swell manual’s Preset panel.
3 Note the LEDs that lights up above the first three of the Swell A
(Preset) drawbars.
4 Press and hold down the Swell manual’s Preset 1 button and
simultaneously push up one of the first three drawbars.
Notice that the sound will change while you are doing this. When
you have pushed the drawbar all the way up, the LED goes out
and that particular drawbar is not heard anymore.
5 Release the preset button. This will save the change that you just
made to this particular preset but you need to store the Program
as well if you want to use is the next time this Program is selected.
6 An alternative method to edit a preset is to double click on a
Preset button. The LED will start flashing to indicate that editing
is possible and you can change the drawbars. Click again to exit
editing.
Store to: 126
Empty Program
Chapter 4 GettiNG started | 9