6-2 IMPLANT SYSTEM
It is possible to choose programs that have been skipped using the Control Unit.
NOTICE
6-3 Calibration Function
The rotation resistance of a handpiece depends on the handpiece model, condition, and internal wear of the
handpiece gears. This Control Unit incorporates an automatic function to recognize the level of the resistance of the
attached handpiece and motor.
6-3-2 Conducting Calibration
NOTICE
CAUTION
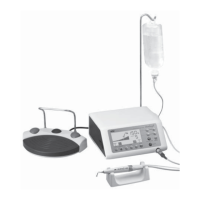
Fig.14
Surgic Pro Series can memorize 8 different IMPLANT SYSTEMs. Also, you can program 8 steps in one SYSTEM
number which you use. When you set the program, refer to values which Implant manufacture recommends.
When programming each IMPLANT SYSTEM, the SYSTEM number may be changed by pressing the PROGRAM (+)
and (-) Key simultaneously.
Calibration Bur
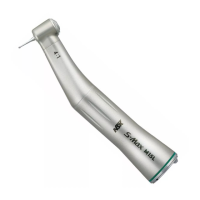
• This equipment is optimized to obtain the highest calibration accuracy at a gear ratio of 20:1. For calibration USE
ONLY the 20:1 reduction handpiece listed on “12. Contra Angle Handpieces and Accessories”.
• Micro saw handpiece should not be calibrated.
• Calibration should be performed only on NSK handpiece.
No-load calibration
…
torque display “L”
Hold the motor in your hand and make sure that “L” is displayed
on the torque display. Push [CAL] key without applying load. The
calibration bur will begin to rotate. Calibration is complete when
there is a beep and “donE” appears on the display.
Load calibration
…
torque display “H”
Make sure “H” is displayed on the torque display, plug the
calibration bur into the Torque Lord Push [CAL] key (The calibration
is done while applying torque load, so securely grasp the handpiece.
The calibration bur will begin to rotate. Calibration is complete when
there is a beep and “donE” appears on the display).
1)
2)
3) Speed calibration
Remove the bur from the Torque Lord then press the [CAL] key (Calibration bur should not touch anywhere).
The bur will begin to rotate at a slow speed. After rotating slowly for 8 seconds, the bur will rotate at high speed
for 8 seconds. There will a beep when calibration is complete. Calibration mode will finish automatically.
Do not apply load during no-load calibration. If load is applied, “FAIL” will appear on the LCD, and calibration will
stop.
Attach Gear Ratio (Reduction Ratio) 20:1 handpiece to the motor.
Attach the Calibration Bur to the handpiece.
Press the [CAL] key for about 2 seconds. There will be a beep
and the display will switch to Calibration Mode.
1)
2)
3)
6-3-1 Calibration preparation
13
English