EasyManua.ls Logo

Olympus DP12 - User Manual

Olympus DP12
48 pages
Print Icon
To Next Page IconTo Next Page
Loading...
INSTRUCTIONS
DP12
MICROSCOPE DIGITAL CAMERA SYSTEM
This instruction manual is for the Olympus DP12 Microscope Digital Camera System. To ensure the
safety, obtain optimum performance and familiarize yourself fully with the use of this system, we
recommend that you study this manual thoroughly before operating the system. Retain this
instruction manual in an easily accessible place near the work desk for future reference.
A X 6 2 7 2

Table of Contents

Questions and Answers

  • J
    Jacob LeJul 28, 2025
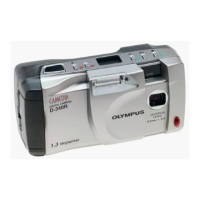
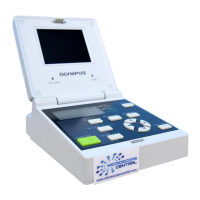
    How to fix hard to view LCD monitor on Olympus DP12 Digital Camera?
    • T
      Thomas JamesJul 29, 2025
      If the LCD monitor on your Olympus Digital Camera is hard to view, it may be due to direct light shining on the screen. Try turning off the direct light or shielding the screen. Also, check if the monitor brightness is properly adjusted and adjust it as needed.
  • D
    Daniel DavisAug 1, 2025
    Why is my Olympus DP12 picture too dark or bright?
    • J
      Jeffrey JamesAug 2, 2025
      The picture from your Olympus Digital Camera might be too dark or bright because the AE LOCK, EXP.ADJ., and/or SPOT settings are not properly configured. Adjust these settings accordingly. Also, check the illumination brightness and adjust it as needed. If you're using a fluorescent lamp, try using a different type of illumination.
  • D
    dawn55Aug 6, 2025
    What to do if the Olympus Digital Camera control box does not work?
    • A
      Angel BakerAug 6, 2025
      If the control box of your Olympus Digital Camera isn't working, first ensure that the main switch is set to “I” (ON). Check that the AC adapter is properly connected to both the control box and the power outlet. If a PC connection cable is connected, set the main switch to “ ” (OFF), unplug the cable, and try again. Alternatively, operate the camera system from the utility software on your PC.
  • J
    Jenna NicholsonAug 10, 2025
    What to do if Olympus DP12 Digital Camera picture cannot be recorded by pressing the EXPOSE button?
    • C
      Carol BarronAug 10, 2025
      If your Olympus Digital Camera isn't recording when you press the EXPOSE button, it could be because data is currently being written to the SmartMedia. Release the EXPOSE button and wait until the CARD access indicator stops blinking green before trying again. Also, check if the SmartMedia has a write-protect seal or isn't inserted properly; try using another SmartMedia. The SmartMedia might also be full; use another one, erase unwanted pictures, or download existing data to your PC and then erase the pictures.
  • H
    heathermurrayAug 15, 2025
    Why are the colors in my Olympus DP12 picture strange?
    • D
      Dr. Joshua Mason MDAug 15, 2025
      If the colors in your Olympus Digital Camera picture appear strange, it might be due to an incorrect color temperature setting in the white balance control. Adjust the color temperature to the appropriate setting.
  • M
    Mrs. Alexandra McclureAug 19, 2025
    What to do if Olympus Digital Camera picture cannot be played on the LCD monitor?
    • T
      tarajohnsonAug 19, 2025
      If you can't play pictures on the LCD monitor of your Olympus Digital Camera, first ensure the main switch is set to “I” (ON) and that the camera system is in PLAY mode. Also, verify that data has been recorded on the SmartMedia by checking the number of remaining pictures.
  • D
    Daniel CardenasAug 23, 2025
    What to do if I get an error message when downloading data to PC from Olympus DP12 Digital Camera?
    • B
      Brenda CooperAug 23, 2025
      If you're receiving an error message while downloading data to your PC from the Olympus Digital Camera, ensure that the PC connection cable is properly connected. Also, verify that the main switch of the control box is set to “I” (ON).

Summary

System Chart

Nomenclature

Camera Unit

Details the components and connections of the camera unit for system integration.

Control Box

Identifies buttons, indicators, and connectors on the control box for system operation.

Assembly

Attaching the Camera Unit

Procedure for screwing the C-mount adapter into the camera unit's C-mount.

Attaching the Control Box

Steps for connecting the control box to the camera unit via a connection cable.

Attaching the AC Adapter

Instructions for connecting the AC adapter for power supply to the system.

Inserting (Removing) the SmartMedia

Guide on how to properly insert and remove the SmartMedia card from the camera unit.

Digital Image Photographing;Recording Procedure

Basic Operations

Selecting the Record Mode (MODE, EXPOSE)

Explains how to select between REC AUTO and REC MANU modes and set exposure.

One-Touch White Balance (OTWB)

Procedure for setting white balance using the OTWB button for accurate color.

Checking the Live Image

How to view and adjust the live image magnification on the LCD monitor.

Playing a Single Picture (PLAY)

Instructions for displaying and navigating through recorded pictures on the LCD.

Zooming a Played Picture

Details on how to zoom in and out of played pictures and pan the zoomed image.

Protecting a Picture (PROTECT)

Method to protect pictures from accidental erasure by applying a protect marking.

Erasing a Single Picture (ERASE)

Procedure for deleting individual unwanted pictures from the SmartMedia.

Special Functions

Setting the Spot Metering (SPOT)

How to set the metering mode to spot for precise exposure control.

Adjusting the Exposure (EXP. ADJ)

Fine-tuning exposure compensation in REC AUTO mode by ±2 EV.

Locking the Auto Exposure Time (AE LOCK)

How to lock the current exposure time to maintain consistent exposure.

Displaying Picture Recording Information (INFO)

Viewing detailed recording information such as quality, date, and file name.

Making a Print Reservation (PRINT)

Setting print reservations for recorded pictures for DPOF compatible printers.

Setting the White Balance (WB)

Adjusting white balance for accurate color reproduction under various lighting conditions.

Selecting the Picture Quality Mode (Q)

Choosing between SQ, HQ, and SHQ modes to determine image quality and file size.

Setting the ISO Rating (ISO)

Adjusting camera sensitivity to light, affecting performance in low light conditions.

Setting the Sharpness

Selecting between 'NORMAL' and 'SOFT' sharpness for different viewing or processing needs.

Setting the Beep Tone

Configuring audible beep tones for warnings or operations.

Setting the Time of Picture Display During Recording;Setting the Sleep Time

Configuring display behavior during recording and automatic monitor turn-off.

Setting the Date;Time

Setting the current date and time for accurate recording information.

Setting the SQ Picture Size and Compression Rate

Adjusting resolution and compression for SQ picture quality mode.

Setting the SHQ Picture Format (JPEG;TIFF)

Selecting the file format (JPEG or TIFF) for SHQ picture quality mode.

Setting the File and Folder Names

Configuring automatic or manual naming conventions for files and folders.

Displaying the Metering Range

Setting the display of metering areas (spot/center-weighted) on the LCD monitor.

Setting the Color Picture Display

Choosing between color or monochrome display for live and recorded images.

Setting the Picture Display Orientation

Adjusting the orientation of the image displayed on the LCD monitor (erect/inverted).

Setting the Scale Display

Configuring the display of specimen scales on the monitor and in recorded images.

Setting the Focusing Indicator Display

Enabling a focusing indicator bar on the LCD monitor for reference.

Setting the Monitor Brightness

Adjusting the brightness level of the LCD monitor screen.

Setting the Video Output

Selecting the video output standard (NTSC or PAL) for the system.

Resetting the Recording Setups

Restoring all recording-related settings to their factory default values.

Setting the Auto Playback Display

Enabling an automatic slide show playback of recorded pictures.

Erasing All Pictures;Formatting SmartMedia

Options for erasing all pictures or formatting the SmartMedia card.

Printing

Instructions for printing recorded pictures directly or via DPOF reservation.

Monitor Display of Pictures

Monitor Observation in Record Modes

Viewing the live image on a video monitor during recording operations.

Monitor Observation in Play Mode

Viewing recorded pictures on a video monitor during playback.

Picture Downloading in a Personal Computer

Connecting a PC

Steps for connecting the camera system to a PC using the connection kit.

Loading Pictures

Methods for transferring pictures from SmartMedia to a PC via software or card adapter.

Playing Pictures on a PC

Viewing recorded images on a PC using the provided software or other applications.

Error Code List

Specifications

Troubleshooting Guide

Proper Selection of the Power Supply Cord

Olympus DP12 Specifications

General IconGeneral
BrandOlympus
ModelDP12
CategoryDigital Camera
LanguageEnglish

Related product manuals