7
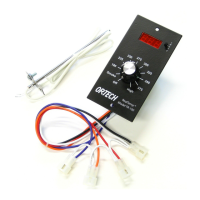
Install the Control Feed the control wiring harness (four plugs with orange,
into the Cutout purple, red, black, and white wires) downward into the grill’s
cutout.
Insert the control into the cutout. Install the control’s circuit
board into the cutout at an angle to ensure the circuit board
fits through the cutout without damage.
WARNING: Do not force the control into the cutout.
Bumping electronic components into the edge of the
cutout during installation may damage the control.
Retrieve the two faceplate mounting screws that were used
to hold the old control in place.
Using a medium Phillips screwdriver, install the top faceplate
screw and lightly tighten. Install the bottom faceplate screw
and tighten. Tighten the top faceplate screw.
Connect the Control Connect the fuel feed auger, draft fan, igniter, and AC
to Grill Components power to the TR-100. Working under the hopper, connect
the control wiring harness to the grill components as follows:
Control Wiring Harness Grill Component
Plug with Red Wire Fuel Feed Auger
Plug with Orange Wire Draft Fan
Plug with Purple Wire Igniter
Plug with Black Wire AC Power
See the figures on the following pages.