- 29 -
Service Adjustments (Electronic Controls, cont.)
Procedure:
1. In the Serviceman Mode for making electronic
adjustments, select DAC Sub-Tint Adjustment
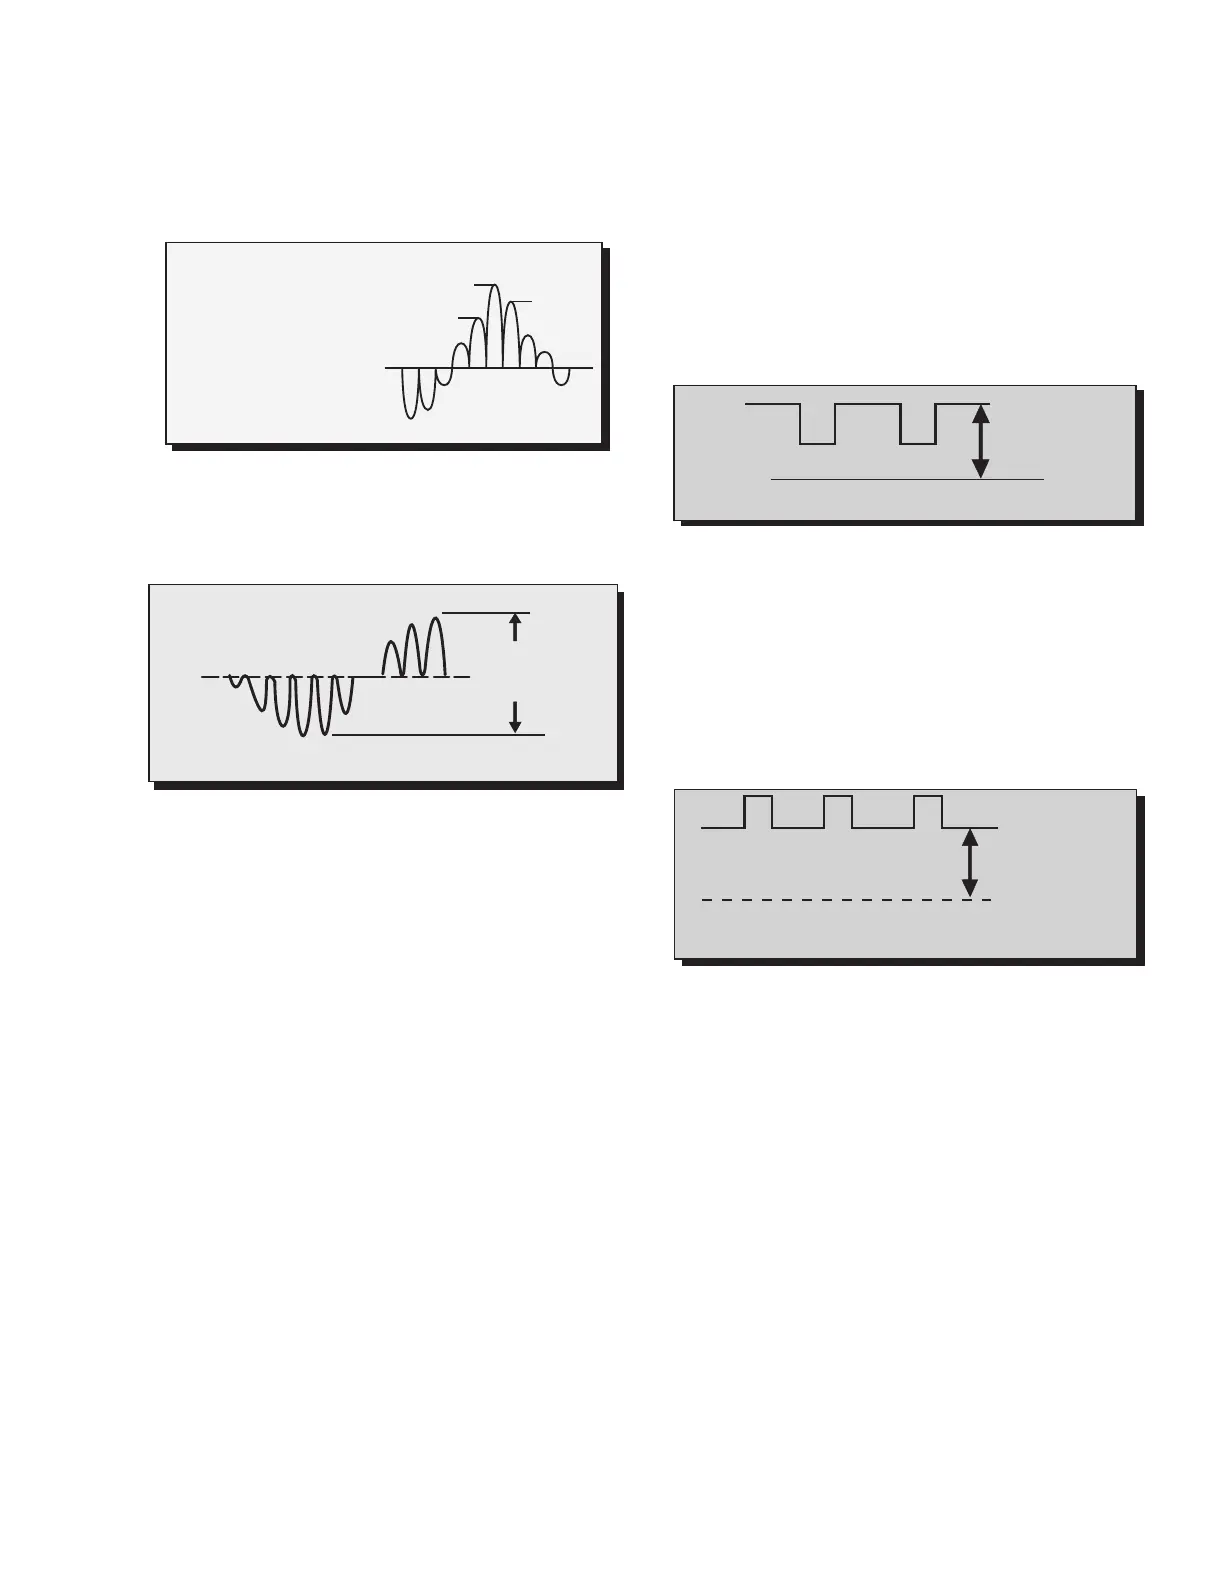
(B1). Adjust until the waveform measured is as the
one shown in Fig. 33.
2. Connect the oscilloscope to TP47G (A-Board) or to
TP35.
3. Select DAC Sub-Color Adjustment (B0) and adjust
for peak to peak amplitude to be 0.9Vp-p ±0.05V
for 27” models as shown in Fig. 34.
4. Remove the jumpers (Preparation steps 4 & 5).
Color Temperature Adjustment
(B/W Tracking)
Serviceman DAC Adjust. (C0) (C1) (C2) (C3) (C4)
Minor Touch-Up Method
OBSERVE low and high brightness areas of a B/W
picture for proper tracking. Adjust only as required for
“good gray scale and warm highlights”.
1. LOW LIGHT areas – In Serviceman Mode for
making electronic adjustments, select Cutoff (C0)
RED, (C1) GRN, (C2) BLU and adjust the picture
for gray.
2. HIGH LIGHT areas – In Serviceman Mode for
making electronic adjustments, select Drive (C3)
RED, (C4) BLU and adjust the picture for warm
whites.
Complete Adjustment
Preparation:
1. Turn the Receiver “ON” and allow 10 minutes
warm up at high brightness.
2. Apply a color bar signal with color “OFF”.
3. Turn the SCREEN control (part of FBT T551) fully
counterclockwise.
Procedure:
Preset the following Serviceman DACs for best results:
• C0 . . . . . . . . . 0 128
• C1 . . . . . . . . . . . 64
• C2 . . . . . . . . . 0 128
• C3 . . . . . . . . . . . 64
• C4 . . . . . . . . . . . 64
1. Connect the oscilloscope to TP35.
2. In Serviceman Mode for making electronic
adjustment, select the Sub-Bright DAC (B2).
3. Press the R-Tune key on the remote.
4. Observe the oscilloscope waveform at Horizontal
rate and adjust the Serviceman Mode Sub-Bright
DAC (B2) level until a scanning period of 3.1V
above DC ground is measured, as indicated in
Fig. 35.
5. Connect the scope to GRN Cathode (KG) on the
CRT-Board.
6. In the Serviceman Mode for making electronic
adjustments, select the GREEN CUTOFF
DAC (C1).
7. Press the R-Tune key on the remote.
8. View scope trace at Horizontal rate and adjust the
Serviceman Mode DAC (C1) level until a scanning
period of 195V above DC ground is measured, as
indicated in Fig. 36.
9. Connect the scope to the RED Cathode (KR).
10. In Serviceman Mode for making electronic
adjustments, select the RED CUTOFF DAC (C0).
11. Press the R-Tune key on the Remote
12. View the scope trace and adjust the Serviceman
Mode DAC (C0) for the scanning period to be 195V
above DC ground. (See Fig. 36)
13. Connect the scope to the BLU Cathode (KB).
14. In Serviceman Mode for making electronic
adjustments, select the BLU CUTOFF (C2).
15. Press the R-Tune key on the Remote.
16. View the scope trace and adjust the Serviceman
Mode DAC (C2) for the scanning period to be 195V
above DC ground. (See Fig. 36)
17. Turn the Screen Control (part of FBT) slowly
clockwise until a color horizontal line appears.
18. With the other two colors Serviceman Mode DAC
CUTOFF adjustments (C0) RED, (C2) BLU;
increase the colors to create a white horizontal line.
19. Confirm that a good gray scale is established by
viewing B/W color bar pattern.
213
456789
10
A
B
C
Figure 33. TP47B waveform
TP47B (A-Board)
A to B = 1 unit
A to C = 2 unit
1 2 3 4 5 6
7 8 9 10
Figure 34. TP47G waveform
TP47G (A-Board)
0.9Vp-p±0.05V
0V DC
Figure 35. TP35 Waveform
3.1V DC
Figure 36. Cathode Waveform, Adjustment
Waveform Detail
195V DC
0V DC
(Ground)





 To Next Page