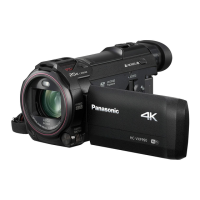
Do you have a question about the Panasonic HC-VX981K and is the answer not in the manual?
Details how to turn the Panasonic HC on/off using the side flap and power button to conserve battery.
Explains the function of the Wi-Fi button, HDR button, and various input ports like HDMI and A/V.
Explains that the left side of the screen houses video/photo functions for tweaking recordings and settings.
Describes how to switch between video and photo modes by pressing a button on the lower right side of the touchscreen.
Details Menu 1 (T/W, recording start) and Menu 2 (O.I.S, Finger Point, Hand options).
Explains Menu 3 (fading, backlight, gridlines) and introduces the concept of Menu 4 video options.
Explains IA for automatic adjustments and IA+ for more detailed control over brightness and color balance.
Details HDR for exposure control, SCN for scene modes, and MNL for manual adjustments.
Lists options like brightness, color balance, and focus selection for IA+ and Miniature effect modes.
Details brightness, color hue, focus, white balance, and shutter speed settings for 8mm, Silent, and Time Lapse modes.
Highlights that most controls are similar to video mode, with differences in stop-motion video features and photo-specific options.
Introduces the camera settings menu, divided into Record Setup, Picture Setup, and Setup sections for customization.
Details Zoom Mode, Recording Format (4K MP4, AVCHD), and REC Mode for resolution settings like 1080p.
Explains Hybrid O.I.S for stabilization, Level Shot for camera tilt, fade options, and guide lines for composition.
Describes settings for external video light, digital cinema color enhancement, and on-screen shooting tips.
Details sound scene select, 5.1ch/2ch options, mike setup (Surround, Zoom, Focus), and mike level adjustment.
Explains display options for data visibility, setting the clock, and configuring world time and daylight savings.
Details economy battery/AC settings, quick power on, alert sounds, and Wi-Fi reset options.
Explains auto-cursor position, number reset for files, and formatting the SD card for media management.
Discusses firmware version info, upgrade options, demo modes, software info, and accessing the online manual.
Details additional picture size options and setting the aspect ratio for photos.
Explains using the self-timer before taking a photo and the AF assist lamp for low-light focusing.
Guides on screwing the camera onto a tripod, adjusting settings, and pressing the record button to start filming.
Explains how to connect the Panasonic camera to a smartphone via the Panasonic Image App using Wi-Fi.
Describes removing the SD card, extracting video files on a computer, and deleting footage from the card.
| Camera Type | Camcorder |
|---|---|
| Optical Zoom | 20x |
| Sensor Type | MOS |
| Focal Length | 4.08 - 81.6 mm |
| Image Stabilization | Hybrid O.I.S.+ |
| Focus | Auto / Manual |
| LCD Monitor | 3.0 inch |
| LCD Screen Resolution | 460, 800 dots |
| Touch Screen | Yes |
| Recording Media | SD/SDHC/SDXC Memory Card |
| HDMI | Yes (micro HDMI) |
| USB | Yes (Micro AB, USB 2.0) |
| Wi-Fi | Yes |
| NFC | Yes |
| Dimensions (W x H x D) | 2.8 x 5.5 x 4.5 inches |
| HDMI Output | Yes |
| Battery Type | Lithium-ion |
| Weight | 1.1 lbs |
| Video Resolution | 4K |
| Sensor Size | 1/2.3 inch |
| Effective Pixels (Motion Image) | 8.29 MP |
| Intelligent Zoom | 50x |
| Minimum Illumination | 1 lux |
| White Balance | Auto |
| Recording Format | AVCHD, MP4 |
| Video Compression Format | MPEG-4 AVC/H.264 |
| Audio Recording Format | Dolby Digital (2ch) |
| Microphone | Stereo |
| Speaker | Yes |
| 35 mm Film Camera Equivalent (Still Image) | 29.5 - 590 mm |
| Aperture | F1.8 - F3.6 |





 Loading...