9
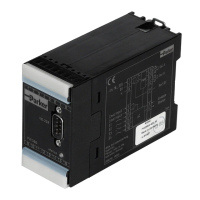
Digital Pump Control Module
Series PQDXXA-Z10
Installation and Setup Manual
Bulletin HY30-3255-INST/UK
Parker Hannifin Manufacturing Germany GmbH & Co. KG
Pump & Motor Division Europe
Chemnitz, Germany
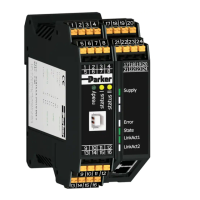
Mounting: 1 bring the module in contact with
the upper edge of the rail
2 flip the module downward until
it snaps into/on the rail
Removing: 1 use a screw driver (approx. 4 x 1 mm
blade) to lift metal socket
2 flip the module upwards and remove
it from rail
Operating limits
The electronic module may be operated within the
speciedlimitsonly.Pleaserefertothe„technical
data“ section (please refer to page 6).
Follow the environmental conditions! Extreme
temperatures, shock load, moisture, radia-
tion, illegal electromagnetic emissions may
result in malfunction and other operating
issues. Follow the limitations listed in the
„specications“table
Electrical Connection
The module is connected to power supply, machine
control and to pump /valves with plug-in PIN screw
blocks.
This easy-to-install connection allows a fast
module replacement.
Theconnectingwiresneedtomatchthespecica-
tion below:
Wire type: hook up cable, stranded
Cross section:
supply voltage,
solenoids: min. AWG 16 / 1.5 mm²
sensors, commands: min. AWG 20 / 0.5 mm²
Wire length: max. 50 m
for wire length > 50 m please consult the
factory
Installation and removal of module from the rail
Wire stripping:
The screw terminals are designed to connect to all
kindsofcopperwireswithouttheneedforspecic
preparation. To protect stripped wires the use of
end sleeves is recommended.
Soldering of the connecting wires is not per-
mitted.
To ensure EMC compatibility, the connections partly
havetobeshielded.Seedetailsinthe„Electrical
Interfacing“ section.
The installation must be performed by quali-
edpersonnelonly.Aelectricalshortbetween
individual connectors, loose wires as well as
improper shielding can result in malfunction
of electronic or pump and in irreparable de-
struction of control module.
The pump has to have a direct connection to
an earth grounded machine frame. An earth
ground connection of the mounting rail and
the cable shields have to be connected to the
control unit earth ground terminal. Machine
frame and control unit must be connected
with a low resistance connection to avoid
ground loops.
Electrical Interfacing
Supply Voltage
The supply voltage has to be connected to PINs 3
and 4 and to PINs 22 and 24. The supply voltage
must be higher than 18 V to avoid sensor malfunc-
tion and lower than 30 V to avoid overheating and
destruction of the module. The residual ripple may
not exceed 5%.
The power supply must comply with the
relevant standards (e.g. DIN EN 61 558) and
must carry a CE mark. The supply voltage
must be free of inductive surges.
Please consider the high inrush current when
selecting the powersupply (see specica-
tion). Power supplies with current limiting
features may cause problems during energiz-
ing the unit.
The function of the module is blocked, when
supply voltage polarity is wrong.
Each module requires a preliminary fuse of
5 A, medium lag. Without a fuse, irreparable
damage to the module or the pump control
is possible.
 Loading...