EasyManua.ls Logo

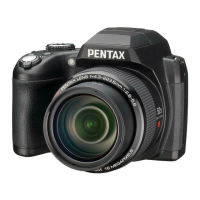
Pentax X-5 User Manual

Pentax X-5
228 pages
To Next Page IconTo Next Page
Page #1 background imageLoading...
Page #1 background image
Digital Camera
Operating Manual
To ensure the best performance from your camera, please
read the Operating Manual before using the camera.
Specifications and external dimensions are subject to change without notice.
54637 Copyright © PENTAX RICOH IMAGING CO., LTD. 2012
R02AYH12 Printed in Indonesia
PENTAX RICOH IMAGING CO., LTD.
2-35-7, Maeno-cho, Itabashi-ku, Tokyo 174-8639, JAPAN
(http://www.pentax.jp)
PENTAX RICOH IMAGING
FRANCE S.A.S.
(European Headquarters)
112 Quai de Bezons, B.P. 204, 95106 Argenteuil Cedex,
FRANCE
(HQ - http://www.pentax.eu)
(France - http://www.pentax.fr)
PENTAX RICOH IMAGING
DEUTSCHLAND GmbH
Julius-Vosseler-Strasse 104, 22527 Hamburg,
GERMANY
(http://www.pentax.de)
PENTAX RICOH IMAGING
UK LTD.
PENTAX House, Heron Drive, Langley, Slough, Berks
SL3 8PN, U.K.
(http://www.pentax.co.uk)
PENTAX RICOH IMAGING
AMERICAS CORPORATION
633 17th Street, Suite 2600, Denver, Colorado 80202,
U.S.A.
(http://www.pentaximaging.com)
PENTAX RICOH IMAGING
CANADA INC.
1770 Argentia Road Mississauga, Ontario L5N 3S7,
CANADA
(http://www.pentax.ca)
PENTAX RICOH IMAGING
CHINA CO., LTD.
23D, Jun Yao International Plaza, 789 Zhaojiabang
Road, Xu Hui District, Shanghai, 200032, CHINA
(http://www.pentax.com.cn)
http://www.pentax.jp/english

Table of Contents

Questions and Answers:

Pentax X-5 Specifications

General IconGeneral
Megapixel16 MP
Camera typeBridge camera
Sensor typeCMOS
Image stabilizerYes
Total megapixels16.37 MP
Image sensor size1/2.33 \
Image formats supportedJPG
Supported aspect ratios16:9
Maximum image resolution4608 x 3456 pixels
Still image resolution(s)640 x 480, 1024 x 768, 1920 x 1080, 2048 x 1536, 2592 x 1464, 2592 x 1944, 3072 x 1728, 3072 x 2304, 3456 x 3456, 4608 x 2592, 4608 x 3456
Digital zoom7.2 x
Optical zoom26 x
Combined zoom187.2 x
Extra/Smart zoom39 x
Focal length range4 - 104 mm
Maximum aperture number5.9
Minimum aperture number3.1
Lens structure (elements/groups)12/9
Maximum focal length (35mm film equiv)580 mm
Minimum focal length (35mm film equiv)22.3 mm
FocusTTL
Focus adjustmentAuto/Manual
Auto focusing (AF) modesMulti Point Auto Focus, Spot Auto Focus, Tracking Auto Focus
Super Macro focusing range0.009 - 0.298 m
Macro focusing range (wide)0.10 - 0.49 m
Manual focusing range (tele)1.7 - ∞ m
Auto Mode focusing range (wide)0.39 - ∞ m
Light meteringCentre-weighted, Evaluative (Multi-pattern), Spot
ISO sensitivity100, 200, 400, 800, 1600, 3200, 6400, Auto
Light exposure modesAuto, Manual
ISO sensitivity (max)6400
ISO sensitivity (min)100
Light exposure correction± 2EV (1/2EV step)
Camera shutter typeElectronic
Fastest camera shutter speed1/1500 s
Slowest camera shutter speed4 s
Flash modesAuto, Flash off, Flash on, Red-eye reduction, Slow synchronization
Flash range (tele)1.49 - 6.09 m
Flash range (wide)0.20 - 11.58 m
Video resolutions640 x 480, 1280 x 720, 1920 x 1080 pixels
Motion JPEG frame rate30 fps
Video formats supportedAVI
Maximum video resolution1920 x 1080 pixels
Analog signal format systemNTSC, PAL
Internal memory75.3 MB
Compatible memory cardsEye-Fi, SD, SDHC, SDXC
Display diagonal3 \
Display resolution (numeric)460000 pixels
PictBridge-
USB version2.0
Power source typeBattery
Minimum system requirements1 x USB
Compatible operating systemsWindows XP/Vista/7\\r Mac OS-X 10.3.9, 10.4, 10.5, 10.6
BluetoothNo
MaterialPolycarbonate
Product colorBlack
Scene modesChildren, Documents, Fireworks, Museum, Night landscape, Night portrait, Panorama, Snow, Sports
Image editingCrop, Resizing, Rotating
Photo effectsBlack&White, Solarisation
White balanceAuto, Daylight, Fluorescent, Manual, Shade, Tungsten
Shooting modesAuto, Manual, Movie, Program
Camera playbackMovie, Single image, Thumbnails
Self-timer delay2, 10 s
Playback zoom (max)10 x
Battery typeAA
Number of batteries supported4
Weight and Dimensions IconWeight and Dimensions
Depth86.3 mm
Width119.3 mm
Height106.6 mm
Weight507.4 g
Weight (including battery)598 g

Summary

Regarding copyrights

Regarding trademarks

Regarding Product Registration

Using Your Camera Safely

About the Camera Safety

About the AC Adapter Safety

Care to be Taken During Handling

Before Using Your Camera

Advice on confirming camera functionality after long periods of non-use and notes on the camera's lens.

Precautions on Carrying and Using Your Camera

Guidelines on avoiding temperature extremes, strong vibrations, and physical damage to the camera.

Cleaning Your Camera

Storing Your Camera

Other Precautions

Camera Features

Easy-to-Navigate Capture and Playback Functions

Describes the camera's intuitive operation with few buttons, mode guides, and Green Mode for simple shooting.

Advanced Movie Recording Functions

Camera Functions for Image Enjoyment

Checking the Contents of the Package

Names of Parts

Monitor Indications

Explains the information displayed on the monitor in capture mode and how it cycles through different views.

Names of Operating Parts

Still Picture Capture Mode Display

Playback Mode Display

Getting Started

Attaching the Lens Cap and Strap

Step-by-step instructions for attaching the lens cap and camera strap securely.

Powering the Camera

Installing the Batteries

Guide on correctly inserting four AA batteries into the camera's battery compartment.

Battery Level Indicator

Using the AC Adapter

Installing an SD Memory Card

Backing Up Data

Turning the Camera On and Off

Initial Settings

Setting the Display Language

Step-by-step process for selecting the desired menu and message language for the camera.

Adjusting the Viewfinder Diopter

Common Operations

Understanding the Button Functions

Detailed explanation of key buttons and their functions in different modes, including A Mode.

Q Mode

Switching Between A Mode and Q Mode

Setting the Camera Functions

Operating the Menus

Explains how to navigate and use the camera's three main menus: Rec. Mode, Movie, and Setting.

Menu List

[A Rec. Mode] Menu Items

Details settings within the Rec. Mode menu, covering image tone, pixels, WB, AF, etc.

[C Movie] Menu Items

Lists settings for movie recording, including pixels, SR, and wind suppression.

[W Setting] Menu Items

Covers camera settings like sound, date, language, USB, video output, Eye-Fi, brightness, power saving.

Taking Still Pictures

Holding the Camera

Provides guidance on the correct way to hold the camera firmly for stable picture taking.

Taking Pictures

Adjusting the Position of the Display

Describes how to tilt the camera's LCD screen for comfortable low-angle or overhead shooting.

Shooting Modes

Taking Pictures in the Custom Settings (Program Mode)

Details how to use Program Mode for automatic shutter/aperture settings with manual adjustments for flash and pixels.

Taking Pictures in Basic Mode (Green Mode)

Explains easy picture-taking using Green Mode with standard, automatic settings.

Setting the Shooting Functions

Selecting the Flash Mode

Explains different flash modes like Auto, Flash Off, Flash On, Red-eye, and Slow-speed Sync.

Selecting the Shooting Mode

Picture Modes

Describes basic shooting modes like Auto Picture, Handheld Night Snap, Sport, Landscape, and Portrait.

SCN Modes

Various Shooting Methods

Framing Your Pictures (Frame Composite Mode)

Instructions on using pre-loaded frames to add decorative borders to still pictures.

Exposure Modes

Using the Digital Wide Function (Digital Wide Mode)

Taking Panoramic Pictures (Digital Panorama Mode)

Taking Pictures of Your Pet (Pet Mode)

Using M (Manual Exposure) Mode

Using A (USER) Mode

Selecting the Drive Mode

Selecting the Focus Mode

Setting the [A Rec. Mode] Menu

Selecting the Autofocus Settings

Explains how to set autofocus area and focusing method for optimal subject focus.

Selecting the Number of Recorded Pixels

Selecting the Quality Level of Still Pictures

Setting the White Balance

Setting the AE Metering

Setting the Sensitivity

Setting the AUTO ISO Range

Compensating Flash Output

Compensating for Brightness (D-Range Setting)

Setting the Shake Reduction

Switching the Face Detection Function

Setting the Blink Detection Function

Setting the Instant Review

Setting the Image Sharpness (Sharpness)

Setting the Color Saturation/Tone (Saturation/Tone Adjustment)

Setting the Image Contrast (Contrast)

Setting the Date Imprint Function

Setting the IQ Enhancer Processing

Setting the Green Button

Recording Movies

Selecting the Movie Mode

Explains the three movie recording modes: Time-Lapse, Movie, and High Speed Movie.

Recording a Movie

Recording a Movie Quickly Using the Movie button

How to use the dedicated Movie button for rapid start/stop of movie recording.

Using the Time-Lapse Movie Function

Using the High Speed Movie Function

Setting the [C Movie] Menu

Selecting the Number of Recorded Pixels and Frame Rate for Movies

Setting the Movie SR (Movie Shake Reduction) Function

Suppressing Wind Noises during Movie Recording (Wind Suppression)

Saving the Settings (Memory)

Playing Back Images

Playing Back Still Pictures

Step-by-step guide to displaying and navigating through still images in playback mode.

Playing Back Movies

Multi-Image Display

Four-Image Display/Nine-Image Display

Details on how to switch between four-image and nine-image thumbnail views for browsing.

Folder Display/Calendar Display

Using the Playback Function

Slideshow

Rotating the Image

Zoom Playback

Deleting Images

Deleting a Single Image

Procedure for deleting one image at a time from the camera's memory.

Deleting Selected Images

How to select multiple images for deletion simultaneously from the four/nine-image display.

Deleting All Images

Protecting Images from Deletion (Protect)

Connecting the Camera to AV Equipment

Connecting the Camera to a Video Input Terminal

Guide on connecting the camera to AV equipment using a video input terminal and the optional AV cable.

Connecting the Camera to an HDMI Terminal

Editing and Printing Images

Editing Images

Introduces the camera's built-in image editing capabilities.

Changing the Image Size (Resize)

Cropping Images

Stretching a User-Selected Area of an Image (Stretch Filter)

Processing Images to Make a Face Look Smaller

Using the Digital Filters

Using the HDR Filter

Creating a Collage Image

Compensating for a Red-eye Effect

Adding a Frame (Frame Composite)

Editing Movies

To Save a Frame from a Movie as a Still Picture

How to extract a single frame from a movie and save it as a still image.

To Divide a Movie

To Add a Title Picture to a Movie

Copying Images

Setting the Printing Service (DPOF)

About printing

Lists available printing options: using a service, direct card printing, or computer software.

Printing a Single Image

Steps to set print options like copies and date imprint for individual images.

Printing All Images

Camera Settings

Changing the [W Setting] Menu

Guide to accessing and modifying settings within the main Setting menu.

Formatting the Memory

Changing the Sound Settings

Changing the Date and Time

Setting the World Time

To Set the Destination

Process for selecting a destination city and adjusting for daylight saving time.

To Display the Time of the Destination (Select Time)

Setting the Text Size on the Menu

Changing the Display Language

Changing the Naming System of the Folder

Selecting a Rule for Naming Folders

Guides on choosing between Date, PENTAX, or USER naming conventions for image folders.

Naming the Folder Yourself

Allows users to manually name folders using up to five numbers and letters.

Changing the Naming System of the File

Changing the Video Output Format

Selecting the HDMI Output Format

Setting Eye-Fi Communication

Adjusting the Brightness of the Display

Using the Power Saving Function

Setting the Auto Power Off Function

Setting the Quick Zoom Function

Setting the Guide Display

Setting the Battery Type

Changing the Start-up Screen

Correcting Defective Pixels in the Image Sensor (Pixel Mapping)

Setting the Playback Shortcut

Resetting to Default Settings (Reset)

Connecting to a Computer

Setting the USB Connection Mode

Configures the camera's USB connection type (MSC or PTP) for computer communication.

Connecting the Camera and the Computer

Disconnecting the Camera from the Computer

Using the Provided Software

System Requirements

Lists the minimum hardware and OS requirements for installing and running the MediaImpression software.

Installing the Software

Product Registration on the Internet

Using MediaImpression on Windows

Using MediaImpression on Macintosh

Transferring Images Using an Eye-Fi Card

Appendix

Functions Available for Each Shooting Mode

A table summarizing which functions are available or cannot be set for each shooting mode.

Messages

Troubleshooting

Default Settings

List of World Time Cities

Main Specifications

WARRANTY POLICY

Declaration of Conformity

Information for Users on Collection and Disposal of Old Equipment and Used Batteries

Related product manuals